TABLE OF CONTENTS
Description
WeClapp is a cloud-based CRM and ERP software designed for small and medium-sized businesses, offering a comprehensive suite of tools to manage customers, projects, orders, inventory, purchasing, sales, accounting, and invoicing. With its user-friendly interface and scalable architecture, WeClapp streamlines business operations, enhances collaboration, and improves workflow efficiency.
By integrating WeClapp with SyncSpider, you can automate data synchronization, streamline multi-channel operations, and connect with 400+ platforms. SyncSpider helps eliminate manual data entry, ensuring real-time updates and seamless integration between WeClapp and your eCommerce, ERP, or marketing tools for improved business performance.
Entities
Source | Target |
| Get Customers | Customers |
| Get Articles | Article |
| Get Sales Orders | Update Customers |
| Get Sales Invoice | Update Contacts |
| Get Shipments | Create Contacts |
| Get Campaigns | Create Leads |
| Get Contacts | Quotation |
| Get Leads | Create Time Record |
| Get Suppliers | Update Time Record |
| Get Users | Create Sales Order |
| Get Warehouses | Update Sales Order |
| Get Custom Attributes | Supplier |
| Get Time Records | |
| Get Tasks | |
| Get Quotations | |
| Get Shipping Carriers |
The task can be triggered on following events:
• on successful completion of a different task
• API call
Steps to Integrate WeClapp
Step 1: Access the Integration Menu
Click on the ‘Integrations’ tab in SyncSpider. Click Connect new app and search for the WeClapp module in the pop up window. You can also do this while creating a new task.

Step 2. Adding Credentials
You will be prompted for the Base URL and API Token.
Note: Enter the base URL in the form: https://{tenant}.weclapp.com

Step 3. Obtaining the API Token
To obtain the API Token, head over to your WeClapp dashboard.
In the upper right corner, click on your profile picture, and then select "My settings" from the drop-down menu, as shown in the picture below:

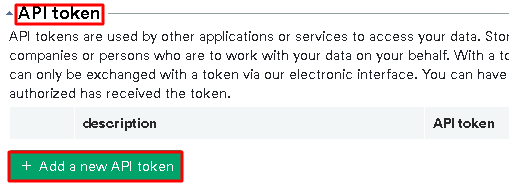
Scroll down until you reach "API Token". Click on it and then select "Add a new API token" from the drop-down menu, as shown in the picture below:
Name it however you wish, and click Save, as shown in the picture below:

To obtain the Base URL, go to your WeClapp dashboard, and copy the text from your address bar along with ".com" portion.
E.G if your domain was ABC123.weclapp.com, you would copy the whole thing.

Step 4: Complete process in SyncSpider
Back in SyncSpider, click on Finish paste both API token and the Base URL and click Save to complete the integration process.

Additional Resources
Learn more about SyncSpider's capabilities and how to optimize your WeClapp integration with these additional resources:
- What are Source and Target Integrations?
- How to create a Task?
- Create a custom Collection field with SyncSpider
Weclapp is just one of the tools we support!
To check the list of the tools and features we support please click here!
If you don't see your favorite tool on our list, please take the time and send us the request here to create an integration for you or UP-vote if it's already on the list :)
We develop integrations based on the requests and up-votes :)
We hope that this covers everything. If you have any further questions or need additional clarification please reach out to us via [email protected] or our chat widget!
Was this article helpful?
That’s Great!
Thank you for your feedback
Sorry! We couldn't be helpful
Thank you for your feedback
Feedback sent
We appreciate your effort and will try to fix the article