TABLE OF CONTENTS
- 1) Definition
- 2) Mapping Interface
- 2.1 Source Mapping Panel
- 2.2 Target Mapping Panel
- 2.3 Mapping Tools Panel
- 2.3.1 Preview Values
- 2.3.2 Refresh source schema
- 2.3.3 Refresh destination schema
- 2.3.4 Unmapped Attributes switch
- 2.3.5 Mapped Attributes switch
- 2.3.6 Show Required Only switch
- 2.3.7 Required attributes mapped counter
- 2.3.8 Mapping by Templates
- 2.3.9 AI Mapping
- 3) Required Fields
- 4) Field Types
- 4.1 Const
- 4.2 Number
- 4.3 Text
- 4.4 Bool
- 4.5 Date
- 4.6 Image
- 4.7 Options
- 4.8 Hierarchy
- 4.9 Collection
- 4.10 Complex
- 5) Additional Info
1) Definition
Mapping can be defined as an act of matching the fields of your Source Integration to those of your Target Integration.
This can be considered the most important part of creating a task as it will determine what data will be sent over to the Target integration.
The mapping fields offered will differ based on the Integration you choose to as Source and Target.
This is determined by the Entities that have been selected.
Mapping is a simple Drag-and-Drop process of matching the Source fields with the ones of the Destination.
2) Mapping Interface
The Mapping Interface is divided into the following 3 panels:
2.1 Source Mapping Panel
This is the part where all available fields from the selected Source will be displayed.

Clarification on the fields offered can be found under the Field Types section.
The values offered here can be Drag and Dropped into the Target Mapping Panel.
2.2 Target Mapping Panel
This is the part where the mapping happens. Here you can match the fields offered in the Source Mapping Fields section.
This is the most important activity in creating a task as this will determine what data will be sent over to the Target Integration (Destination).

2.3 Mapping Tools Panel
In this panel you will find some useful tools to assist in the process of mapping the fields.

It consists of the following options:
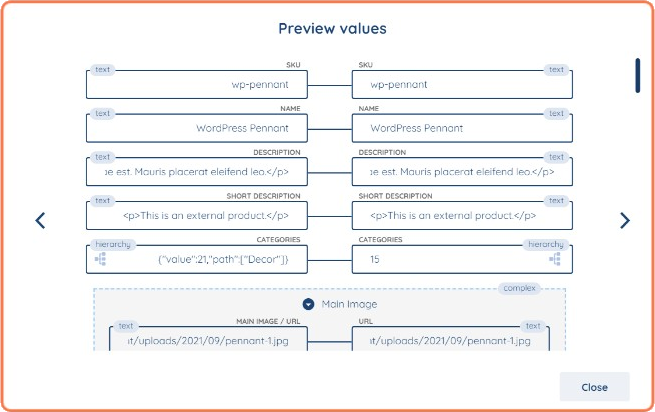
2.3.1 Preview Values

The preview values button will allow you to peek into what data will be fetched from the Source and how it will look once transferred to the Target.

2.3.2 Refresh source schema
Refresh source schema is used to update the fields and values provided from the source located in the Source Mapping Panel.

This is ideally used when the Source fields or data is updated while mapping a task
2.3.3 Refresh destination schema
Refresh destination schema is used to update the fields available in the Target Mapping Panel.

This is ideally used when additional fields are added in the Target.
2.3.4 Unmapped Attributes switch

Using this switch will allow you to hide and show the attributes that are not mapped yet in the Target Mapping Fields panel.
2.3.5 Mapped Attributes switch

Using this switch will allow you to hide and show the attributes that are already mapped in the Target Mapping Fields panel.
2.3.6 Show Required Only switch

Using this switch will allow you to hide and show the attributes that are marked as a Required Field in the Target Mapping Fields panel.
2.3.7 Required attributes mapped counter

This counter indicates how many Required Fields are already filled in at the Target Mapping Fields panel.
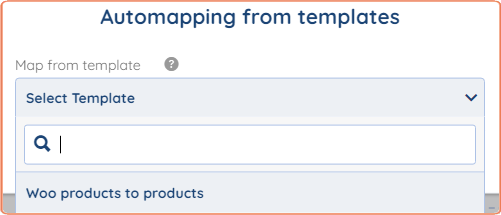
2.3.8 Mapping by Templates

Mapping by templates as the name suggests allows you to select a template for mapping.
This will automatically fill in all the fields based on the template that is predefined by either SyncSpider or the User itself.

For more information regarding Mapping by Templates please consult the Mapping by Templates Article.
2.3.9 AI Mapping

The AI mapping function will allow you to fill in fields with matching names automatically.
This is best used as the first step in mapping as it will override already existing mapped fields.

3) Required Fields
Required fields are fields that have to be mapped in order for the task to be able to execute.
3.1 Regular Required Fields
These are indicated by the Orange Dot marker

3.2 Collection & Complex with Required Fields
Collection & Complex fields may also include required fields. This is indicated by a hollow orange dot.
This means that if you decide to map this collection all fields with the Orange dot indicator have to be mapped.
However when you do not want to map this collection at all the fields are NOT mandatory.

When expanded the required fields in the Collection/Complex field are shown

4) Field Types
4.1 Const
A Const (or Constant Value) field is a User defined value that can be used for mapping.
This can be applied to any destination field making it particularly useful when the Source does not provide all fields requested by the Target integration.
For more information please consult the How to use Constant Value Article.
4.2 Number
A number is a simple field that only accepts digits.
4.3 Text
A text field is a simple field accepting any kind of character.
4.4 Bool
a Bool (or Boolean) field is a data type that has one of two possible values (usually denoted true and false)
4.4.1 Mapping Configuration
Inverse value checkbox
If this field is checked the source value will be inverted.
Meaning that if the source value is "true" the destination value will be set to "false and vice versa.

4.5 Date
The date field is a possible representation of Day, Month, Year, Hours, Minutes and Seconds.
4.6 Image
An Image field can contain a URL to the Image location or pointer towards the storage location of (S)FTP Server(s)
4.7 Options
An Options field is a set of attributes that are predefined in the Source and/or Destination
4.7.1 Mapping Configuration
Matching Source & Target option attribute.
The options offered in the Source and Destination might differ based on what is defined in both the Source platform and the Destination platform.
In order to configure an options field the attributes from the source will need to be matched with the corresponding attribute of the destination.

4.8 Hierarchy
A Hierarchy field is a data structure containing a parent and child attribute

4.8.1 Mapping Configuration
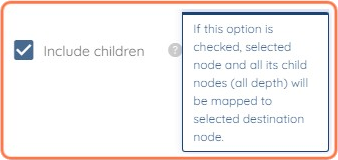
Include children
If this option is checked, the selected parent node and all of its child nodes will be mapped to the selected destination node.

E.g.
When Clothing is selected, Tshirts and Hoodies will also be included in the field
Extend for subcategories
Checking this option will cause the subcategories of the selected category to be treated the same way as Non mapped values action that has been chosen for the field.

Matching Source & Destination Attributes
The available options in the Source & Destination can be paired in order to match the desired option in the Destination.

4.9 Collection
A collection is an attribute with multiple values representing an array of data
When mapping a collection field, you will get the following options:
(only appears when taking from source)

- Take all
One call record will be taken for each value in the source collection.
- Take first
Only the first attribute from the collection will be taken.
- Take last
Only the last attribute from the collection will be taken.
- Take all (as multiple values)
One call record will be taken for each value in the source collection and will be put together as multiple values
This option is only available when the destination field accepts multiple values

4.10 Complex
A complex is a structure of multiple values representing an object
An example of this can be an Image containing the Image URL, Name and Alt Text

5) Additional Info
5.1 Multiple Values
When a field can accept multiple values the following indicator is shown

5.2 Fallback value
A fallback value is a value that should be used if a source does not have a value, or as a combination of other options if any.

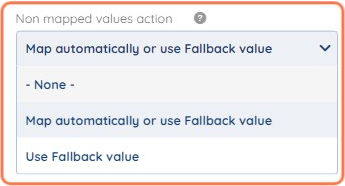
5.3 Non mapped values action
This option specifies what action will be taken if a source attribute value is not mapped to the destination attribute value.

The available options are the following:

Map automatically or use the Fallback value
This will attempt to automatically fill in the value based on the data in the given source field. If none is available it will use the assigned Fallback Value.
Use Fallback value
This will directly use the fallback value when the field is not mapped.
5.4 Custom Fields
For the use of Custom Fields please consult the following Article.
We hope that this covers everything. If you have any further questions or need additional clarification please reach out to us via [email protected] or our Chat Widget!
Was this article helpful?
That’s Great!
Thank you for your feedback
Sorry! We couldn't be helpful
Thank you for your feedback
Feedback sent
We appreciate your effort and will try to fix the article