TABLE OF CONTENTS
- What is the DataHub module?
What is the DataHub module?
DataHub stands as a powerful solution for users seeking to create, organize, and connect structured data. With its unique identifiers, complex attributes, and diverse field types, DataHub empowers users to manage their data efficiently. By facilitating the management of complex and collection data, optimizing media file handling, and offering seamless schema import through its API, DataHub sets a new standard in data organization and connectivity.
In today's data-driven world, efficient management and organization of data are paramount for businesses and individuals alike. Recognizing this need, the development of DataHub, a versatile module, has revolutionized the way users create, structure, and connect their data.
With its robust features and user-friendly interface, DataHub offers a comprehensive solution for data organization, empowering users to streamline their workflows and enhance productivity.
Locating the DataHub module
The DataHub module can be found by following the provided steps below:
Step 1: Click on the gear icon right next to your profile picture within the SyncSpider App

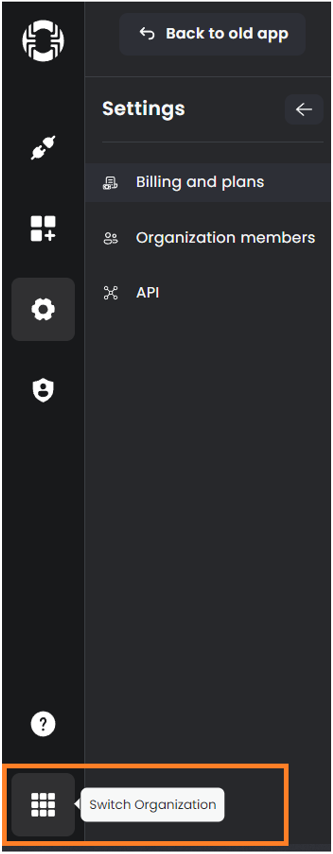
Step 2: Click on the 'Switch Organization' button
Step 3: Press the 'Switch to DataHub' button:

Step 4: DataHub Interface and getting started
In the following DataHub panel, we will be able to create our first entities and tables.
What are the benefits of the DataHub module?
Unique Identifiers and Complex Attributes
One of the key features of DataHub lies in its ability to create tables and entities with unique identifiers and complex attributes. This functionality allows users to categorize and classify their data with precision, ensuring seamless retrieval and manipulation. By assigning unique identifiers to tables and entities, users can establish a structured framework that enhances data integrity and accessibility.
To further enhance the organization of data, DataHub offers helpful features such as required and unique fields. These fields can be applied to all other data fields, depending on the type of integration or connected data. This flexibility enables users to enforce specific data validation rules, ensuring accuracy and consistency throughout their datasets.
Diverse Field Types for Deeply Structured Data
Data Hub caters to the diverse needs of users by providing a wide array of field types. These include text, number, media, date, boolean, multi-selection, and tax fields, empowering users to create deeply structured data. By leveraging these field types, users can precisely define and categorize their data attributes, enabling more granular control and efficient data manipulation.
Managing Complex and Collection Data
For users dealing with complex and collection data, DataHub offers an intuitive solution. By navigating to the "manage attributes" section, users can effortlessly create new attributes to accommodate their specific data requirements. This feature enables users to organize and manage intricate datasets efficiently, ensuring optimal data representation and accessibility.
Optimal Media File Handling and URL Management
While DataHub has the capability to host media files, it is recommended to utilize text fields for URLs. This approach ensures seamless integration and compatibility with external platforms and applications. By using text fields for URLs, users can effortlessly navigate and access relevant media resources, enhancing the overall user experience and data connectivity.
Streamlined Schema Import through API
To simplify the migration of existing data schemas, DataHub provides a convenient schema import feature through its robust API. This functionality allows users to seamlessly transition their data structures into Data Hub, minimizing disruption and maximizing efficiency. By leveraging this capability, users can effortlessly import their existing schemas, saving valuable time and effort in the data migration process.
Seamless Transition and Enhanced Creation with DataHub
DataHub aims to provide a seamless transition for users by offering a straightforward switch from their current settings to the platform. With this effortless transition, users can easily create new entities and tables within the DataHub, capitalizing on its comprehensive features and enhanced data management capabilities. By embracing DataHub, users can unlock the full potential of their data, bolstering productivity and driving informed decision-making.
Example and how to use it
Imagine you run an e-commerce business that sells a wide range of products. Efficiently managing your product catalog is crucial for your business operations. You want to leverage the DataHub module to create and organize your product data, ensuring accurate representation and easy access for your team.
In this example, we will be creating a Table that contains Product Images and a product description.
Note: We can currently only create Tables inside the DataHub.
Step 1: Creating a Product Catalog Table:
In the DataHub panel, create a new table named "Product Catalog" to store your product data and click on the 'Submit' button.
Step 2: Creating a new Table view
Step 3: Adding the columns
In the next step, we will be prompted for the data type we would like to include within our column. For this use case, we will be choosing Media as we would like to store the images of our Products.
Step 4: Configuring our column where the Media will be stored
a) Essentials:
One important thing to note is that we can set a custom identifier for each of our values by clicking on the Set custom identifier option. Here is what it will look like:
Note: We can use only the following value formats to clarify our custom identifiers:
- Alphanumeric values
- Space
- Dash
- Underscore
b) Settings:
Within the Settings panel, we have the ability to configure the properties of our Product image column, including whether it is a required field and its visibility within the Table.
Enabling the 'Required' option ensures that the Product image field must be filled in when creating a new item in the table. If this option is checked and the Product image is missing, it will prevent the creation of a new item.

Once the configuration of our column is done, press 'Save'.
Step 5: Selecting the Media
In this step, we can add new rows within our Product Images column by pressing on the ' Add New Item' button and selecting the media we would like to upload from our local machine simply by clicking on the Select media text within the Table row.
a) Selecting the media:
b) Choosing the media file:
For this step, we have already uploaded our desired image which we can select within the Media Library panel.
If there is no uploaded media yet, simply press the 'Upload' button and choose the desired media from your local machine.
We will now choose our media file and press the 'Insert' button.
Our image will be now stored within the corresponding row inside our Table:
Step 6: Adding the Product Description
In this step, we will be adding an additional column within our Table by pressing on the + sign right next to the Product Images column:
For storing the description of our products within our Table, we will opt for a Text field in this scenario.
Step 1: Choosing a Text field to capture the product description

Step 2: Configuring our column where the Text ( Description) will be stored
a) Essentials:
b) Settings:
In this step, we have the opportunity to define the specifications and requirements for our product description, aligning it with our desired workflow. Here are the available options to customize this field:
Required: By enabling this option, the product description field must be filled in when adding a new item. Failure to provide a description will prevent the creation of the item.
UUID (Unique Identifier): This option allows us to specify which data field will serve as a unique identifier for the item.
Unique Value: Enabling this option ensures that no duplicate entries with the same description value can be created. If an item with an identical description already exists, it will prevent the creation of a duplicate.
Visible: This option determines whether the field should be visible within the form when adding new items. It provides flexibility in controlling the visibility of the product description field based on your specific requirements.
By utilizing these options, we can tailor the behavior and visibility of the product description field within our table to meet our desired workflow and data management needs.
Step 3: Inserting the Description for a product
By simply double-clicking on the desired row within our column we can add a description of our product, modify it or delete it.
a) Selecting the row:
b) Inserting the Description:

Seamless Schema Import through API:
If you already have an existing product data schema, leverage the DataHub API's schema import feature.
In the following step, we will be explaining how can we generate a schema inside the DataHyb automatically based on our source integration.
Step 1: Creating an entity
Navigate to the Entities section within the DataHub and press the 'Create New Entity' button:

Once we created our new entity, we can simply leave it blank, without adding any row or column as we will be generating our schema automatically.
Step 2: Integrating the DataHub
To begin, we will navigate to the Integrations panel in order to locate the DataHub integration.

In the next step, we will be prompted for the Name of our Integration and an API Key.
To obtain your API key, you can easily retrieve it by navigating back to the DataHub section and accessing the Settings panel. Once you're there, simply copy the API key provided.

After inserting the API key into the Integration panel, please proceed by clicking on the "Finish" button.
Step 3: Creating The Task
In this particular step, our source will involve utilizing a Shopify integration, specifically focusing on the Product entity. As for our target, we will be utilizing DataHub.
It's important to note that the configuration for the source may differ based on the specific use case. Therefore, we will directly proceed to the target configuration, where we will have the option to select the previously created entity within DataHub and generate the corresponding schema.
a) Selecting the entity:

b) Generating the Attributes:

The following pop-up window will be displayed:

If the DataHub entity is not selected, a new one will be created using the attributes from the source connection. On the other hand, if the entity is selected, its attributes will be regenerated.
Once the configuration is reviewed, press 'Done' to proceed.
Our schema has been now generated automatically. To see what our generated schema looks like simply go back to the DataHub and select the desired entity, in our case that would be ' Shopify Product Schema '
We can now see that the schema has been generated within our entity and the table rows are created based on the product data our source integration contains.
This capability allows you to effortlessly migrate your data structure into DataHub, minimizing disruption and saving time.
By following these steps and utilizing DataHub's powerful features, you can create and manage your e-commerce product catalog with ease. DataHub's unique identifiers, diverse field types, and seamless schema import capabilities ensure accurate data organization and connectivity.
With streamlined workflows and enhanced data management, you can boost productivity, make informed business decisions, and deliver a seamless shopping experience to your customers.
We hope that this covers everything.
If you have any further questions or need additional clarification, please contact us via [email protected] or our chat widget!
Was this article helpful?
That’s Great!
Thank you for your feedback
Sorry! We couldn't be helpful
Thank you for your feedback
Feedback sent
We appreciate your effort and will try to fix the article