In this article we will be going through an example of what variations are in Shopify and how you would use them in SyncSpider.
TABLE OF CONTENTS
1) Definition
1.1 What are Variations
Variations are attributes that differentiate products from one another ( in this case Parent Variation would be a T-Shirt and the child variations would be the color of the T-Shirt and size)
1.2 Considerations for adding Variants
You can create up to 100 variants for a product.
Each product can have up to 3 options. The options can be different from product to product. For example, one product can use size, color, and style, and another product can use weight, finish, and material.
E.G. Sending Products with Variations(Options) from Shopify to Shopify.
IMPORTANT NOTE: In Shopify Variations are called Options. And the maximum number. of Options for each Variations you can have is 3 for import and export.
2) How to create Variations in Shopify
To create variations in Shopify, you can create them while editing or creating a new product.
2.1 Finding Products
Simply go under "Products".

2.2 Adding Products
Proceed to "Add product".

2.3 Variation Creation
There you will have all the options for the product, under "Options" which will be the Variations, To add Variations, Click on "This product has Options, Like size and color".

2.4 Variation Editing
Now you choose the Variations Name and Values, In this example we will take:
Size as Variation 1 (Option 1) as the name and Values as Small, Medium and Large.
Color as Variation 2 (Option 2) as the name and Values as Black, White and Blue.
Logo as Variation 3 (Option 3) as the name and Values as Classic or Not Classic
Name:

Option Values:

If you wish to add another option, Simply click on "Add another option".
2.5 Variation settings in Shopify
After that save the product and you will see the options for adding Images , Stock and name.
Here you can add Image, Price, Stock etc. for each Variant specifically.
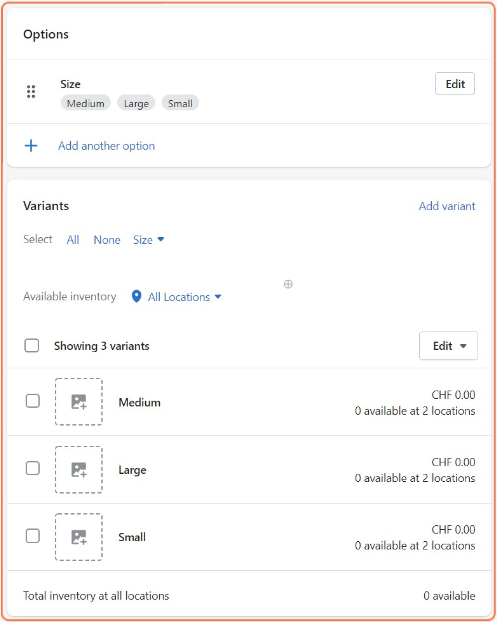
After you have added everything you need for your Variants we can continue to SyncSpider.
3) How to use Variations in SyncSpider
To use Variations in SyncSpider, First go to your task that you have created.
You will have to create a Shopify Integration in SyncSpider, Please check our help article here.
The example we will be using is WooCommerce to Shopify.
3.1 Source Configuration (WooCommerce)
To set this up correctly with already predefined fields that we set, we will have to Exclude parent from Variable products, and just send Variants. With this option
If this is switched on all parent products from Variable products type will be excluded from the export.
Variations and Simple products will be exported.

3.2 Target Configuration (Shopify)
First we would recommend that you set the Product UID to SKU.

After that check the checkbox named "Check this if you want to predefine option fields". And create the 3 Variation options that we set in Shopify, meaning Color, Size and Style.

We would also recommend to check these checkboxes too:

3.3 Variation Mapping (With predefined Options)
Here we will have to map:
SKU- sku
pa_color - Color
pa_size - Size
pa_logo - Logo
We will have to map all 3 because we made 3 Variations, Size, Color and Logo.

IMPORTANT NOTE: Variation Positioning is decided by the order you create the variations, we have created "Size" first so "Size" will be the first Variation.
To map SKU simply type it out in the top left corner and connect it with SKU on the right side of the mapping.

For pa_color we will use the "Values" option field.

Here are the settings we will use to connect this field to the field "Color" on the right side:
Which value to take? - Take all (Concatenate)
Order of values - Take as-is
Concatenation character - Comma
NOTE: We use concatenation so that everything will transfer smoothly into one product with multiple values in Shopify instead of creating multiple products with one variation

Regarding Mapping configuration you can just click on "Automap" and it will Automap source and destination attributes accordingly.
As we can see it mapped everything correctly.
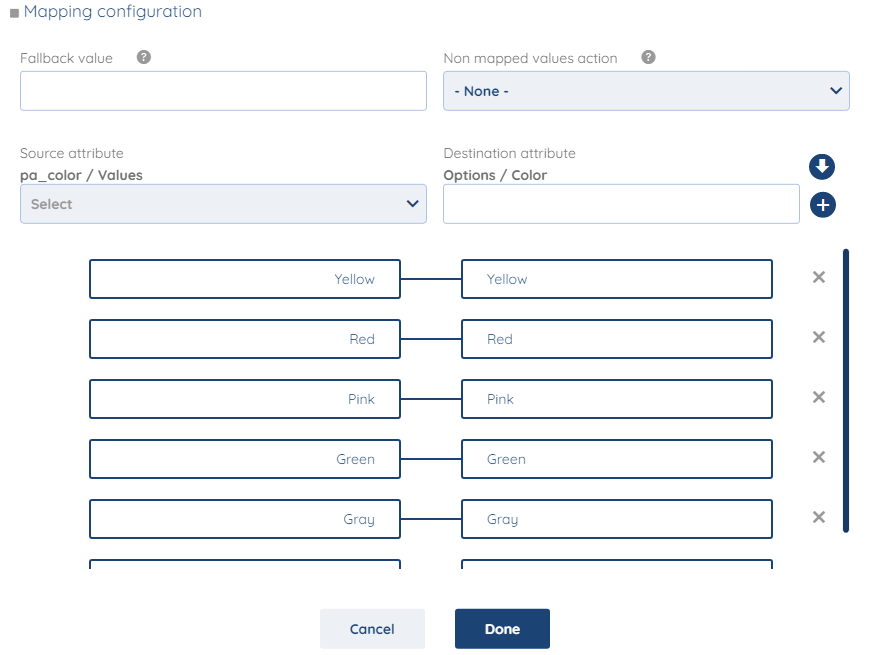
For pa_size and po_logo repeat this process that you did on pa_color until you have Options that look something like this:

With this we will finish our help article.
To check the list of the tools and features we support please click here!
If you don't see your favorite tool on our list, please take the time and send us the request here to create an integration for you or UP-vote if it's already on the list :)
We develop integrations based on the requests and up-votes :)
We hope that this covers everything. If you have any further questions or need additional clarification please reach out to us via [email protected] or our chat widget!
Was this article helpful?
That’s Great!
Thank you for your feedback
Sorry! We couldn't be helpful
Thank you for your feedback
Feedback sent
We appreciate your effort and will try to fix the article
