SyncSpider platform allows you to connect your local databases with any other SyncSpider supported app/platform/system by using our SyncSpider local app.
TABLE OF CONTENTS
- PART 1:
- Install SyncSpider local app and connect it to your database
- PART 2:
- Connect SyncSpider local with SyncSpider cloud platform
- PART 3:
- Creating Entities
- PART 4: Example (Local DB to SyncSpider Data Transfer)
- PART 5: Example (SyncSpider to LocalDB Data Transfer)
- PART 5: Example (SyncSpider to LocalDB Data Transfer)
Here is the list of all tools we are supporting at the moment.
Note: If the app, platform, or tool you want to connect is not yet supported by SyncSpider, you can connect them by using our External API module or our WebHooks module.
Alternatively, you can simply request and up-vote new integration modules to be developed here.
We are constantly expanding the databases we support. At this moment, you can easily connect Active Directory, Firebird, Microsoft Access 200-2007 (mdb), Microsoft Access ab 2010 (accdb), Microsoft SQL Server, MySQL 3.51, MySQL 5.2, MySQL 8.0, and Oracle.
Note: Due to security reasons, any connection with SyncSpider has to have encryption in transit implemented (TLS1.2 or above).
The following 5 main steps are required in order to connect your local database to an external system:
Install SyncSpider local app and connect it to your database
Connect SyncSpider local with SyncSpider cloud platform
Create custom Integration template (Custom templates section)
Create API token
Create Entities
We will go over each and every step with the help of an use-case.
PART 1:
Install SyncSpider local app and connect it to your database
STEP 1:
The first step is installing SyncSpider local app. Download the latest version, and install it.
The next step is connecting your database and setting up the profile.
Note: In case of more than 1 database or more than 1 SyncSpider account, you can connect them with 1 installation.
Usually, you install SyncSpider software on each computer where there is a database to be connected.
In the case of multiple databases on one computer, you can set up multiple profiles, as one profile can be connected to one database.
STEP 2:
To set up a profile, open the application and click on “profiles” in the upper - right corner, as shown in the picture below.

Select “new profile” from the drop-down menu. Name it how you want and select the appropriate connection type.
STEP 3:
We are creating the ‘Microsoft SQL Server’ connection type here as an example.
Enter the driver, server, user id, password and database details, and click SAVE.

If the configuration was successful, a message saying “profile was saved successfully” will appear. Feel free to close this dialog.
Note: You will not be able to save the profile successfully if the Microsoft ODBC driver is not installed on your machine.
In that case, SyncSpider will notify you of it and provide you with a download link.
________________________________________________________________
PART 2:
Connect SyncSpider local with SyncSpider cloud platform
Now, we need to connect our SyncSpider local (and your database) with SyncSpider cloud app.
STEP 1:
Click on “properties”, located in the upper - right corner of the application. An API token and Module/Template ID are needed. We will guide you through obtaining them in the next section.


The next steps ("Create API token" and "Create Custom Integration template") will show you how to get your API token and CIT ID.
STEP 2:
API token generation (for your Local app):
• Go to the SyncSpider web app Settings.

• Select API

• Enter the desired name and press Create.

• Copy the Previously created API Token

STEP 3:
Paste the previously created API Token to the connection dialog in the Local SyncSpider app as shown below.
Leave the Local app opened, and get back to SyncSpider web app to get your Module/Template ID
Creating a Custom Integration Template (CIT) ( get the Module/Template ID)
Since there is a lot of different use cases and databases, you will have to create your own custom Integration template.
STEP 4
Log in to your SyncSpider dashboard and click Custom Integrations and Then, click on ADD INTEGRATION TEMPLATE.


STEP 5:
In this example, the visibility is set to the owner company. Set the integration type as “API” and click on “configure”.

Note: There are three options available when it comes to Custom Integration Template’s (from here on out abbreviated as CIT) visibility:
My company - only visible to your company, the company in which you are creating a custom integration template.
Specific companies - Select which one of your sub-companies can see the template. If you are doing a project for another company, you would need to go to SyncSpider account settings and create a sub-company. (provided you are subscribed to our Agency Plan.
Public - you can request this custom integration template to be public so that every SyncSpider user can access your DB or your CRM, ERP, CMS, etc. Kindly note that you will not be able to change your CIT’s visibility again once it is set to public.
Customer templates can be shared across all the clients, provided they have the same entities.
Next screen will give you the option to add data types.
STEP 6:
Your CIT ID is needed for the next step. It can be found in the URL, as shown below.

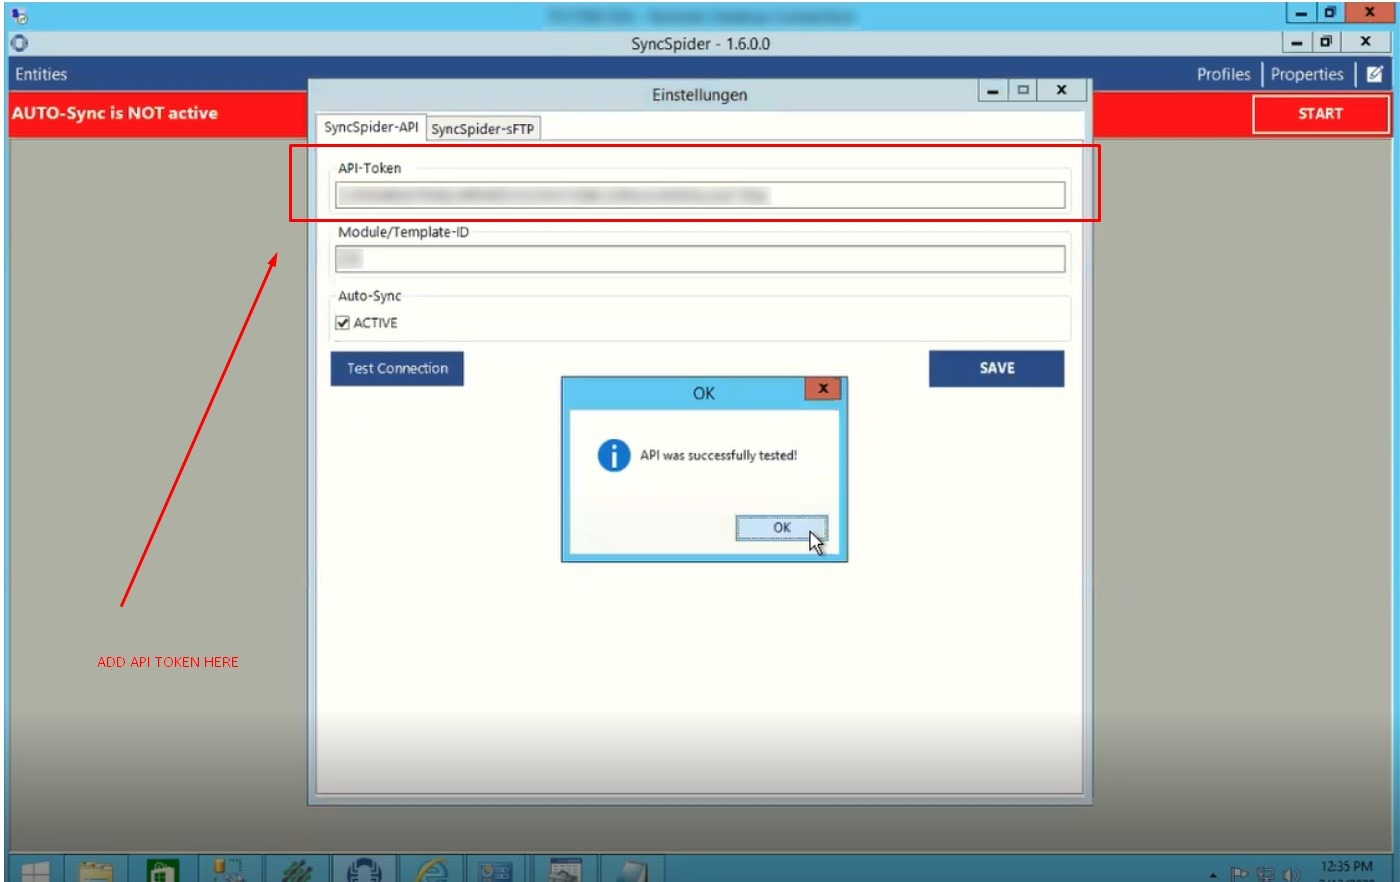
Simply copy the number and paste it to your SyncSpider local connection dialog, as shown below.

STEP 7:
Set the Auto-Sync as “Active”, by ticking the checkbox to the left of it. Then click on “Test Connection”. “API was successfully tested” pop-up should appear. Simply close this dialogue and click “SAVE”.

Now, close this dialog. You should see the notification that AUTO-sync is active like below in the next section- indicating that connection is valid.
__________________________________________________________________
PART 3:
Creating Entities
Creating Entities is essential for connecting your database with SyncSpider.
Entities are nothing more than a collection of attributes you want to send/receive with any external system via the SyncSpider platform.
e.g. Customer can be an Entity. While Name, Email, Phone number could all be its attributes.
Let us now create your first Entity.
STEP 1:
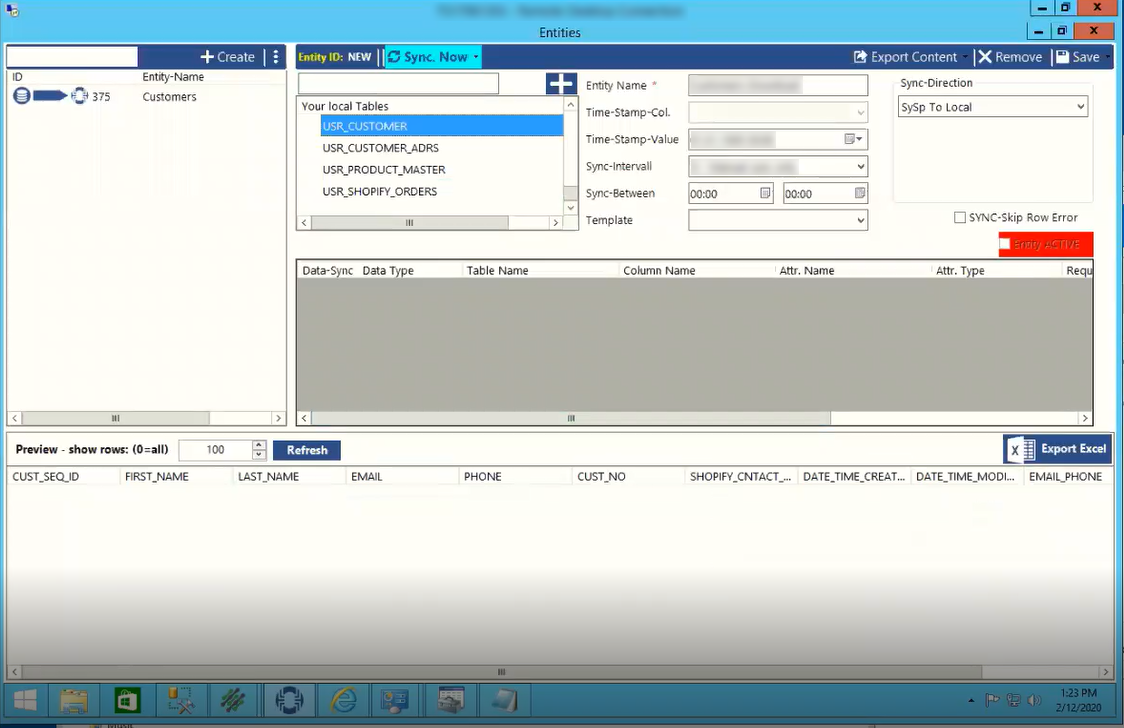
Click on Entities located on the upper left side of your local SyncSpider app. This will open a new screen with the details to be configured.

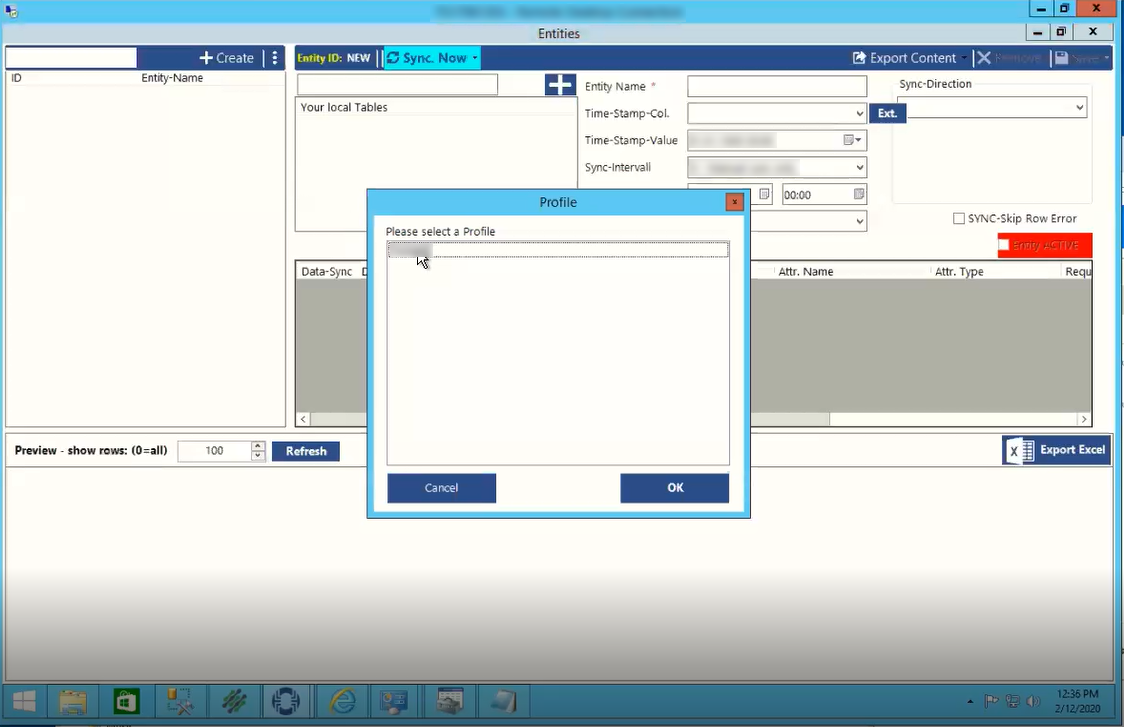
STEP 2:
Click on “Create” located in the upper-left corner. You will be presented with an option to choose the profile for which you want to create Entities.
If this is your first database that you are creating, you will only have one Profile available for selection.
In the future, you may connect more databases with more profiles to choose from.
SyncSpider local will automatically pull all tables from your databases and present them in the dialog like shown below:

STEP 3:
Name your Entity in the Entity name field.

STEP 4:
Select the table from which you wish to get the data. The fields from that table will be visible in the “preview” section.
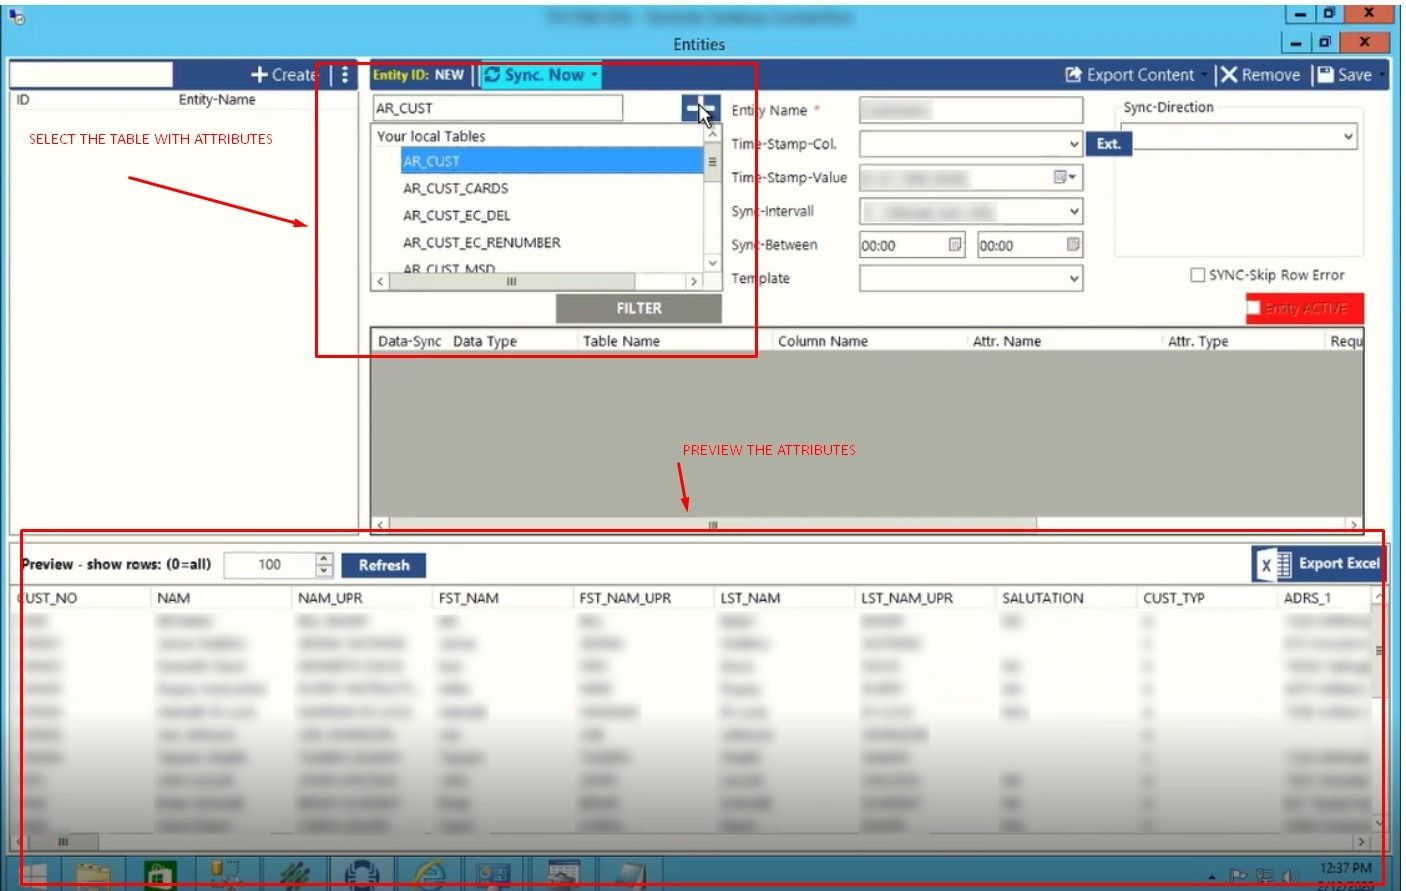
STEP 5:
Click the plus sign to add the selected table. In our example, we are adding the Customer entity.

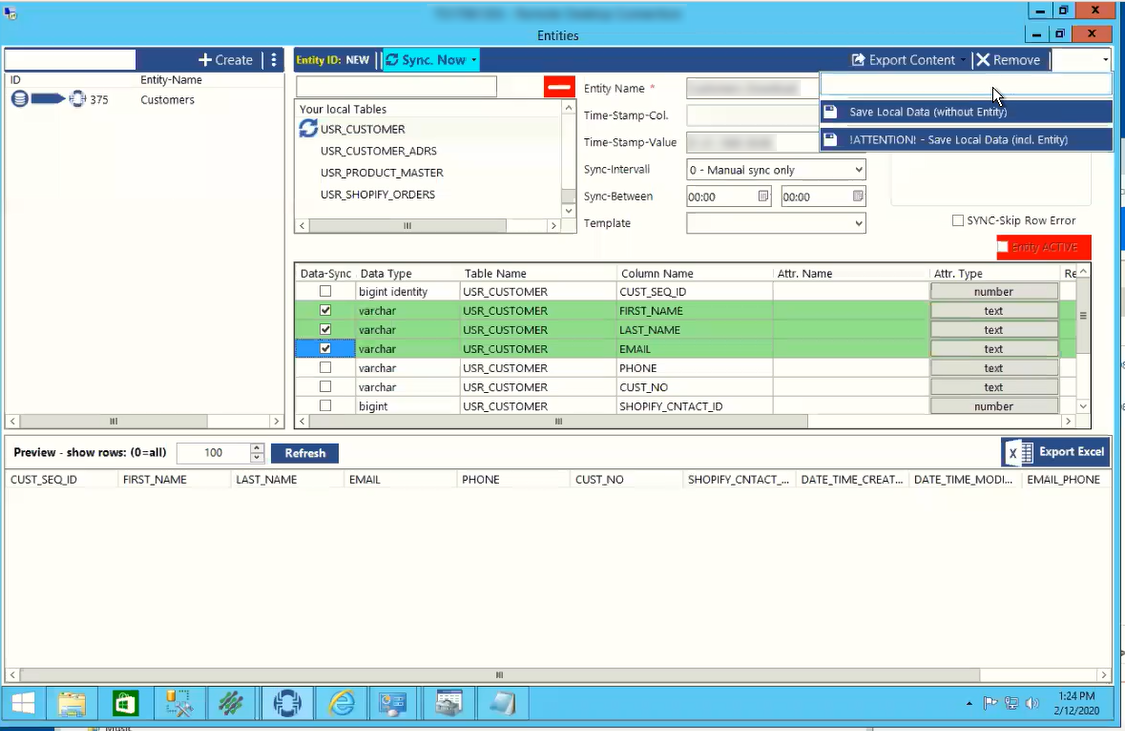
STEP 6:
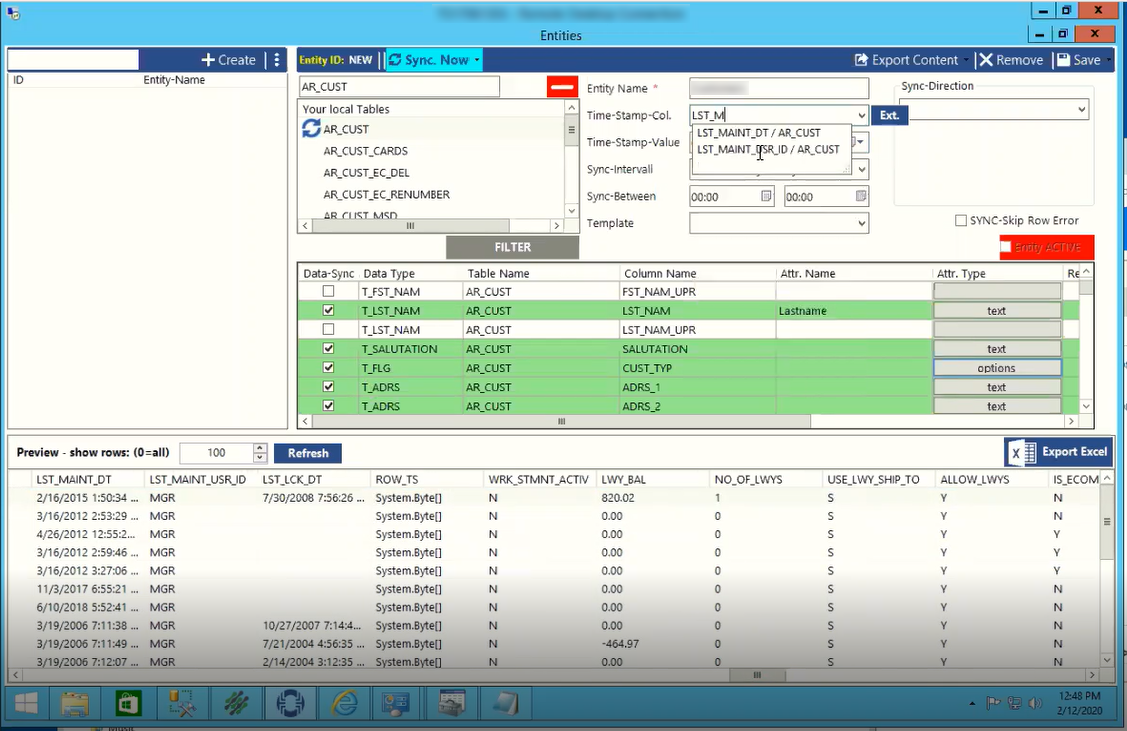
Once the Entity is added, you can add the desired columns from your table. We call these columns Attributes. Select the desired Attributes by ticking the checkbox found to the left of them.
Simply click the checkbox to select all the attributes you want to synchronize.

TIP: You can enter the Att. Name as well, which can help your users and you know which Attribute is present within the column.
E.g. In the example shown below, our database table is showing the FullName attribute as T_NAM. We have added the Attribute name to be FullName, so all users connecting can better understand the mapping.

STEP 7:
Attribute types
SyncSpider tends to automatically read all your Attribute types and Attribute options. In the case that it does not, or if you wish to change them manually, you have the option to do so.
The Attribute type can be changed simply by selecting it and choosing the desired type.
It is important to select and mark proper attribute types to avoid errors.
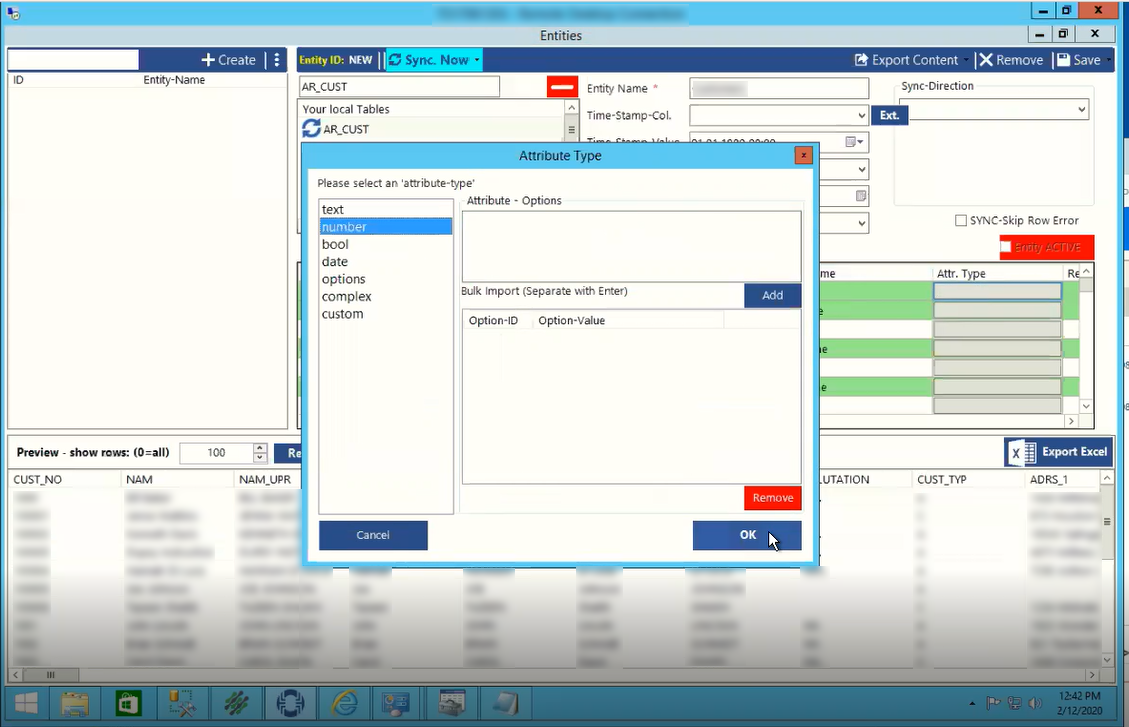
Additionally, you can create Options Attributes and manually input the desired options by writing them one below the other. In our example, we wanted two options: “A” and “C”.

STEP 8:(Optional)
If needed, you can also enter the ‘time-stamp-column; if you have one.
STEP 9:
You can add the “Sync-Between” intervals, which could be your office hours (or any time frame where the changes can happen), in order to save resources.

STEP 10:
The next option is the “Sync-Interval” option. This enables you to select the frequency of data synchronization.

TIP: The optimal settings might vary depending on your needs. However, it is advised to not overdo it, as this transfer data is counted in your plan.
Initially, when we run the sync, SyncSpider local will send all the data to be synchronized. Later on, every 5 minutes (if we have selected a 5-minute interval), SyncSpider local will send only the data which had changed or new data.
STEP 11:
Additional sync feature
Kindly note that there is an additional option called “Ext.” that is located to the right of the “time-stamp-col”. This option offers extended settings regarding the timestamp, for a unique column where data needs to be monitored. Once chosen, only changes to this column will prompt the Local Database to send updated data.

It is recommended not to use this option frequently, as it requires the creation of a new database to monitor and it might slow down the system.
STEP 12:
Selecting the Sync-Direction
Once done, it’s time to set up the “Sync-Direction” option.

The dropdown menu offers a variety of directions, however, we will choose the “Local to SySp” one, as we wish to send all local data to SyncSpider web app.
Once done, click on “Save” located at the top-right corner. Then, select “Save ALL”. This means that all Entities will get uploaded.
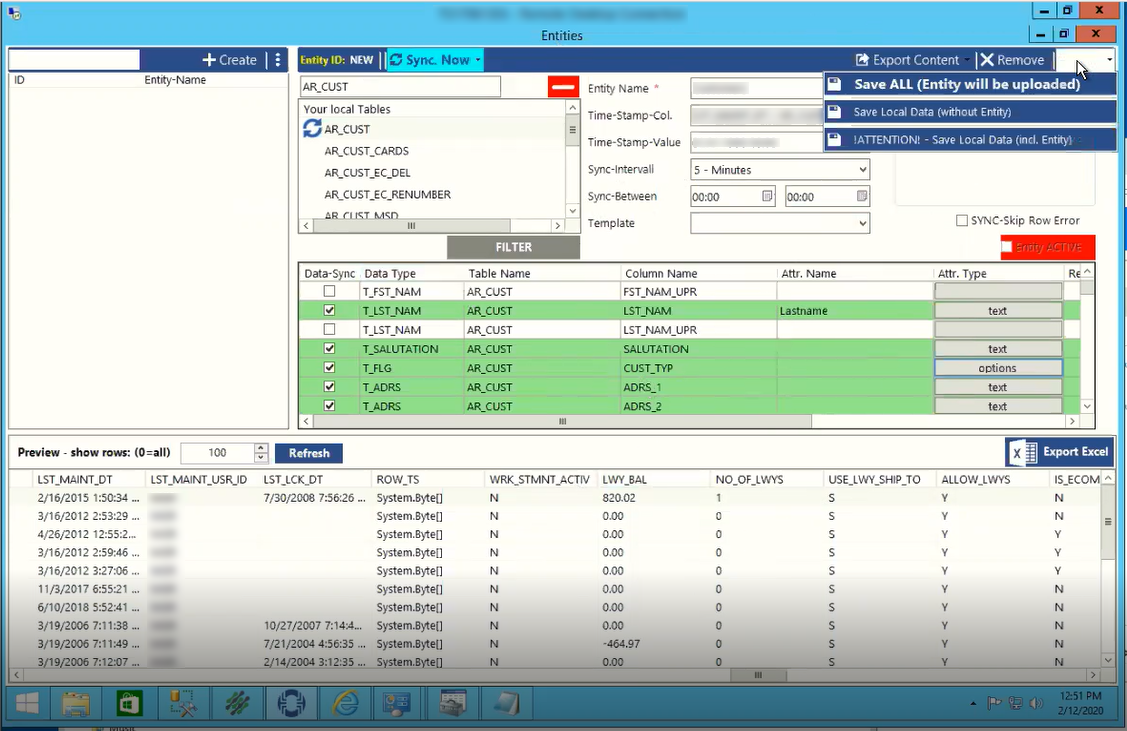
The time needed for completion might vary due to the number of Entities and Attributes, and the fact that everything is being sent to SyncSpider web app via API.
STEP 13:
After the previous step is completed, you will be prompted to test the query and show the results in an Excel file.

While this is entirely optional, we recommend doing it just to be on the safe side. Once this is done as well, you will get a success notification.
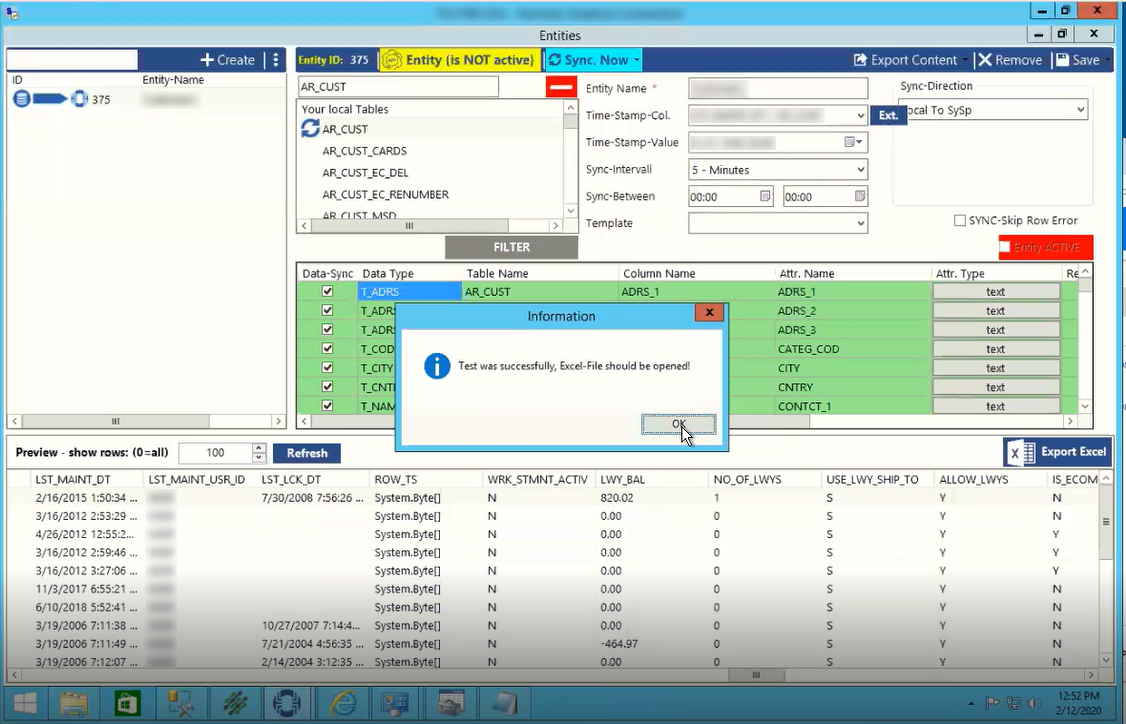
Click OK to close it.
STEP 14:
Export content feature
We are also giving you the export content feature.

Once you click it, you will see all the export options:

This can be useful in many ways. E.g you might want to count and later compare your data, export JSON file, etc.
__________________________________________________________________
PART 4: Example (Local DB to SyncSpider Data Transfer)
Before everything can get synchronized, some changes to the custom template we create need to be made.
STEP 1:
Go to the SyncSpider web app and select the template you wish to configure. Here you can see the Entity’s name in addition to the fields which were mapped from the local database.


The template status should change to ‘active’ for data sync.

Note: Whenever you make a change in the template or local database, the status of the template needs to be set to “deactivated” beforehand.
After the changes have been made, the “SAVE ALL” button has to be clicked again in the Local App, so the data-sync remains intact.
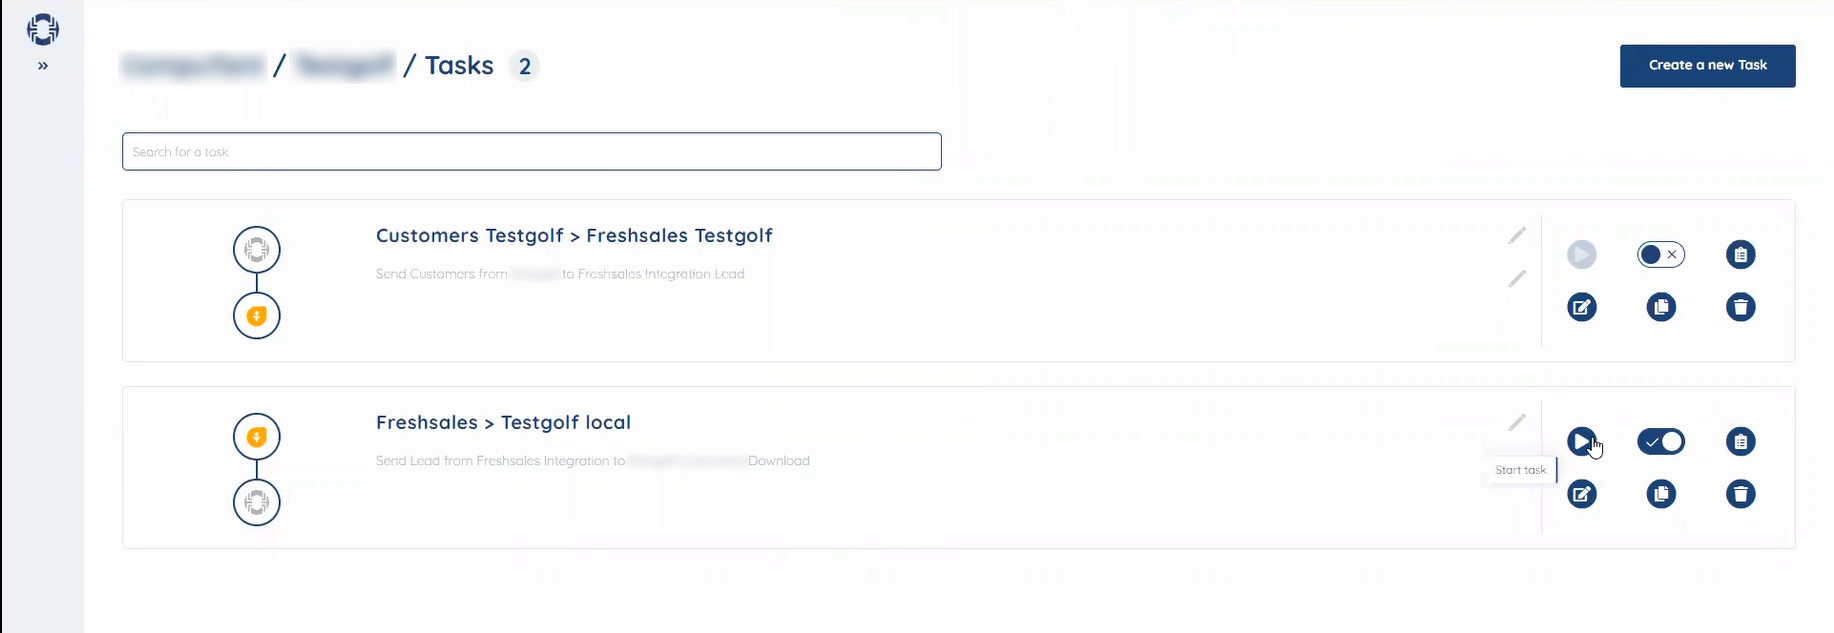
We will now create a new task in order to test everything out.
Step 2:
Click on “create a task” and the following screen will appear.
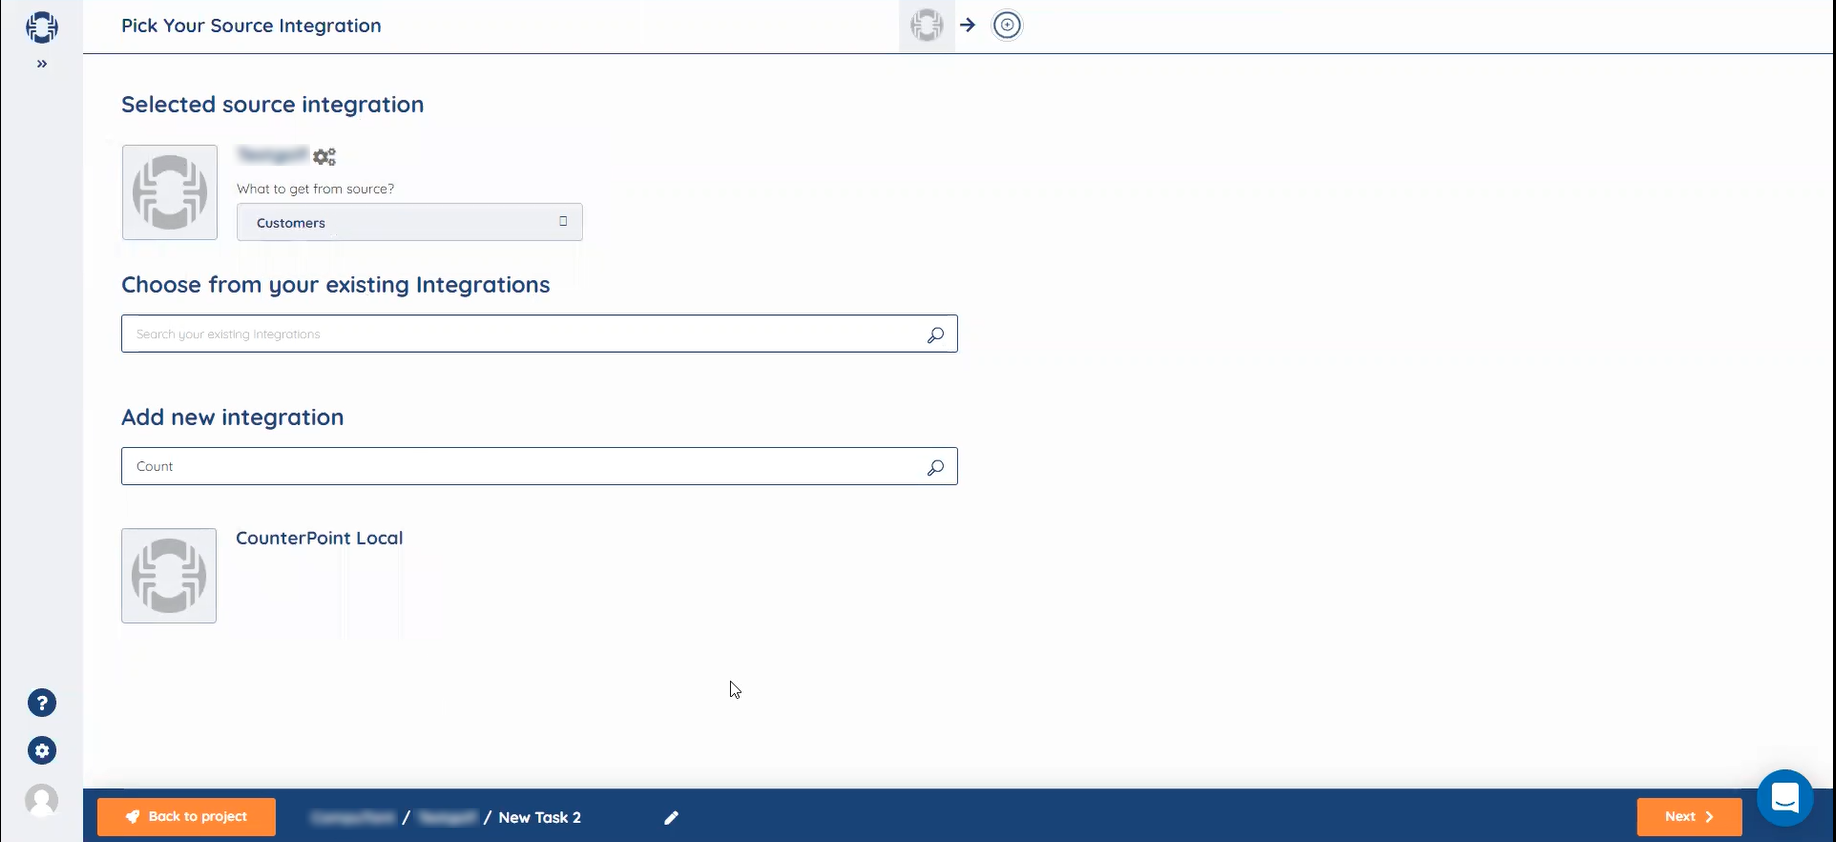
Select our new integration, enter the name and description (if you wish) and click “Next”. This integration will be our Source integration.


Step 3:
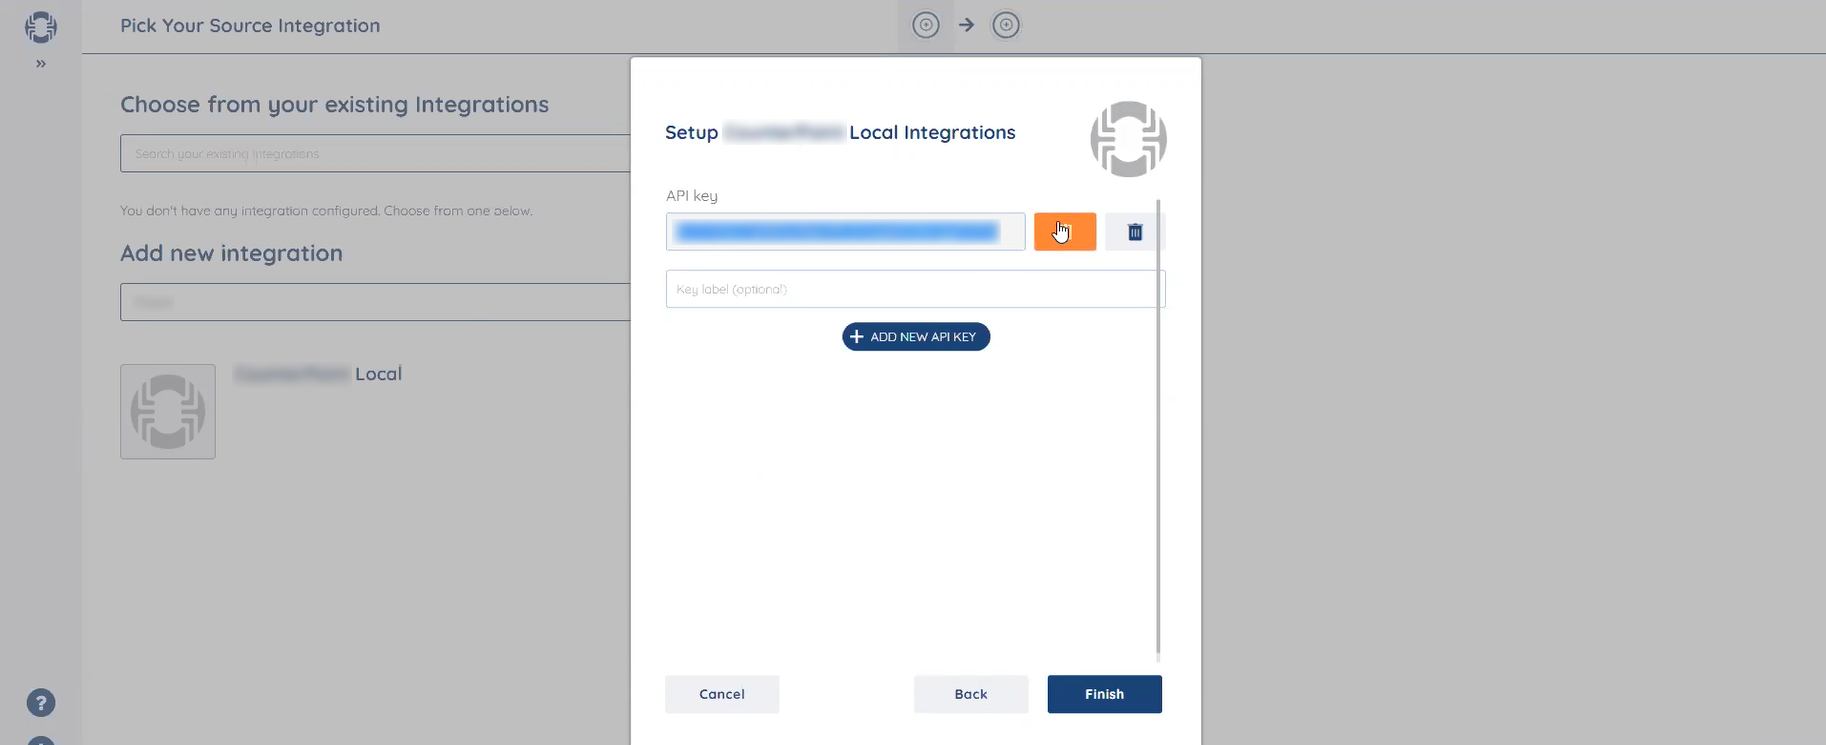
Copy the API key found here to clipboard and once again head over to SyncSpider local app. Click the “entity is not active” message. Once done, you will be prompted to enter the API key. Simply paste the previously copied API and select “entity active for sync”. Click on “Finish” once done.
Note: This API key will be different than the one created in the previous step. A new API key can be shared with others, whereas the personal API key keeps the integrity of your integrations and databases intact.

Step 4:
Select the ‘source integration’ and click on next.
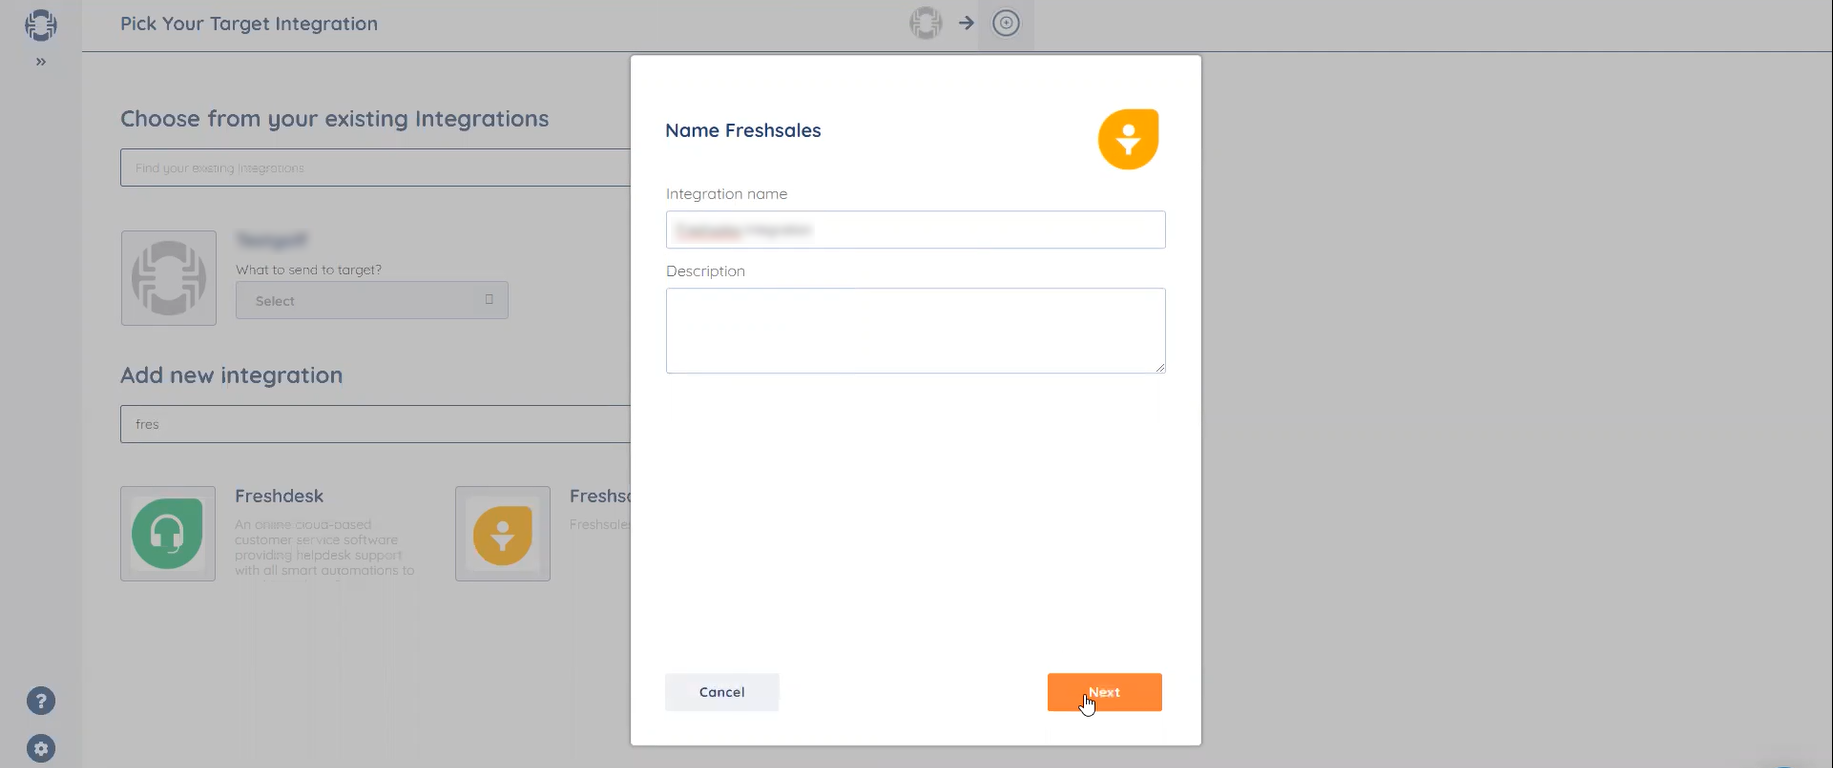
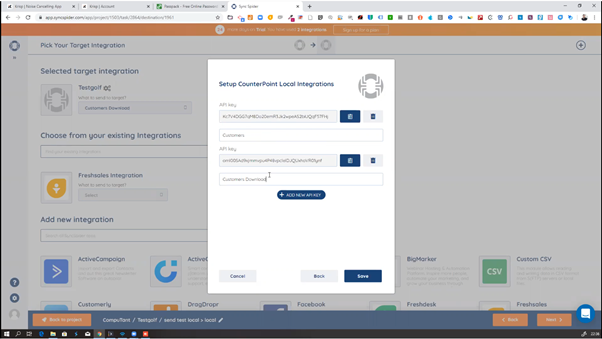
Now you need a Target Integration, one that is able to receive the synced data. For this example, we have selected “FreshSales”. Name this integration, give a description (optional) and click “Next”.
Step 5:
Enter the ‘domain name’ and API Key and click ‘finish’. You can find more about generating an API key on Freshsales here.

Step 6:
Select the target integration (data which needs to be synced) and click on ‘next’.

Step 7:
Once the previous step is done, you will be prompted to choose for how long the data from the source file we made gets saved on SyncSpider. After that time expires, the data gets deleted automatically. The default is one day. You don’t need to make any changes to it. Click “next”.

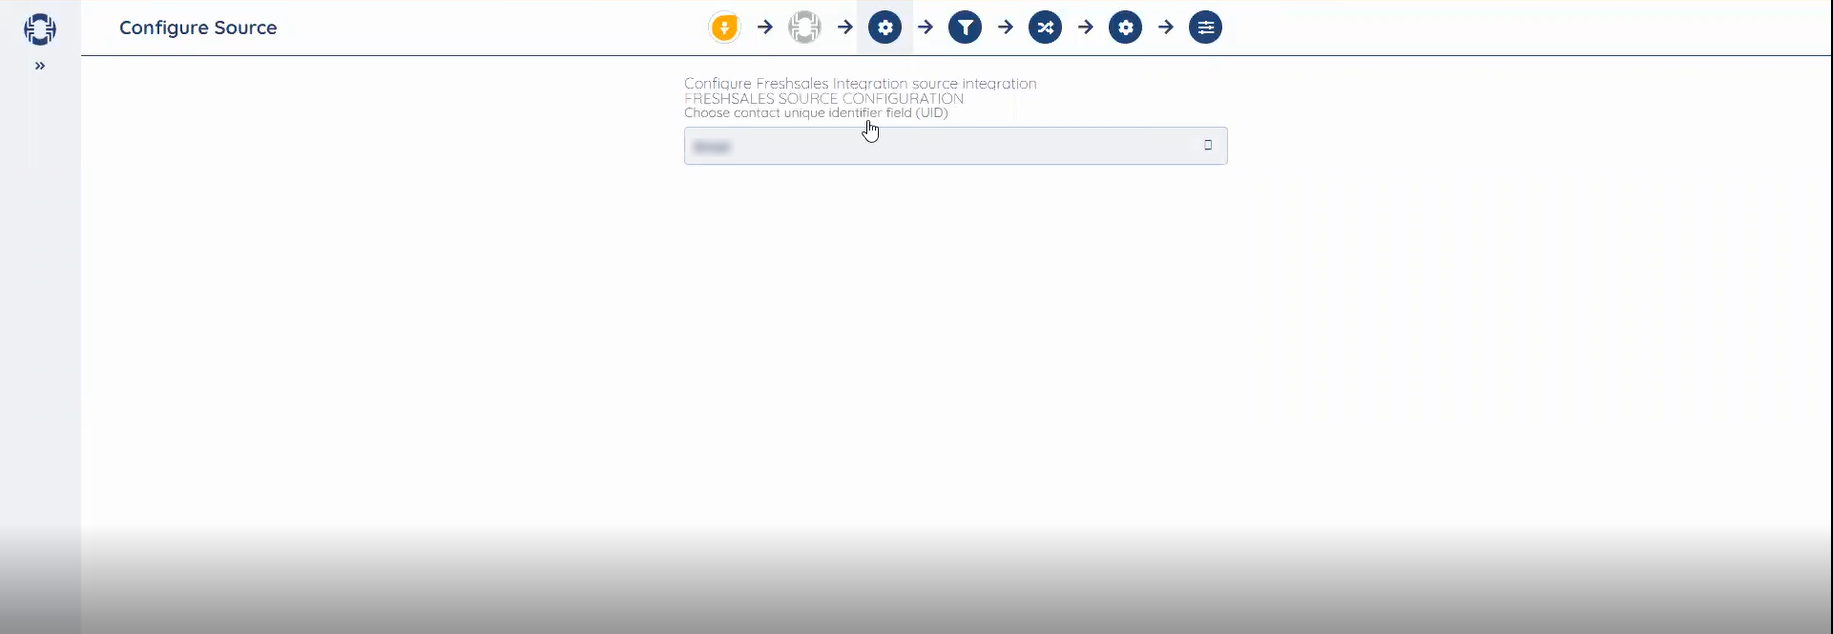
Step 8:
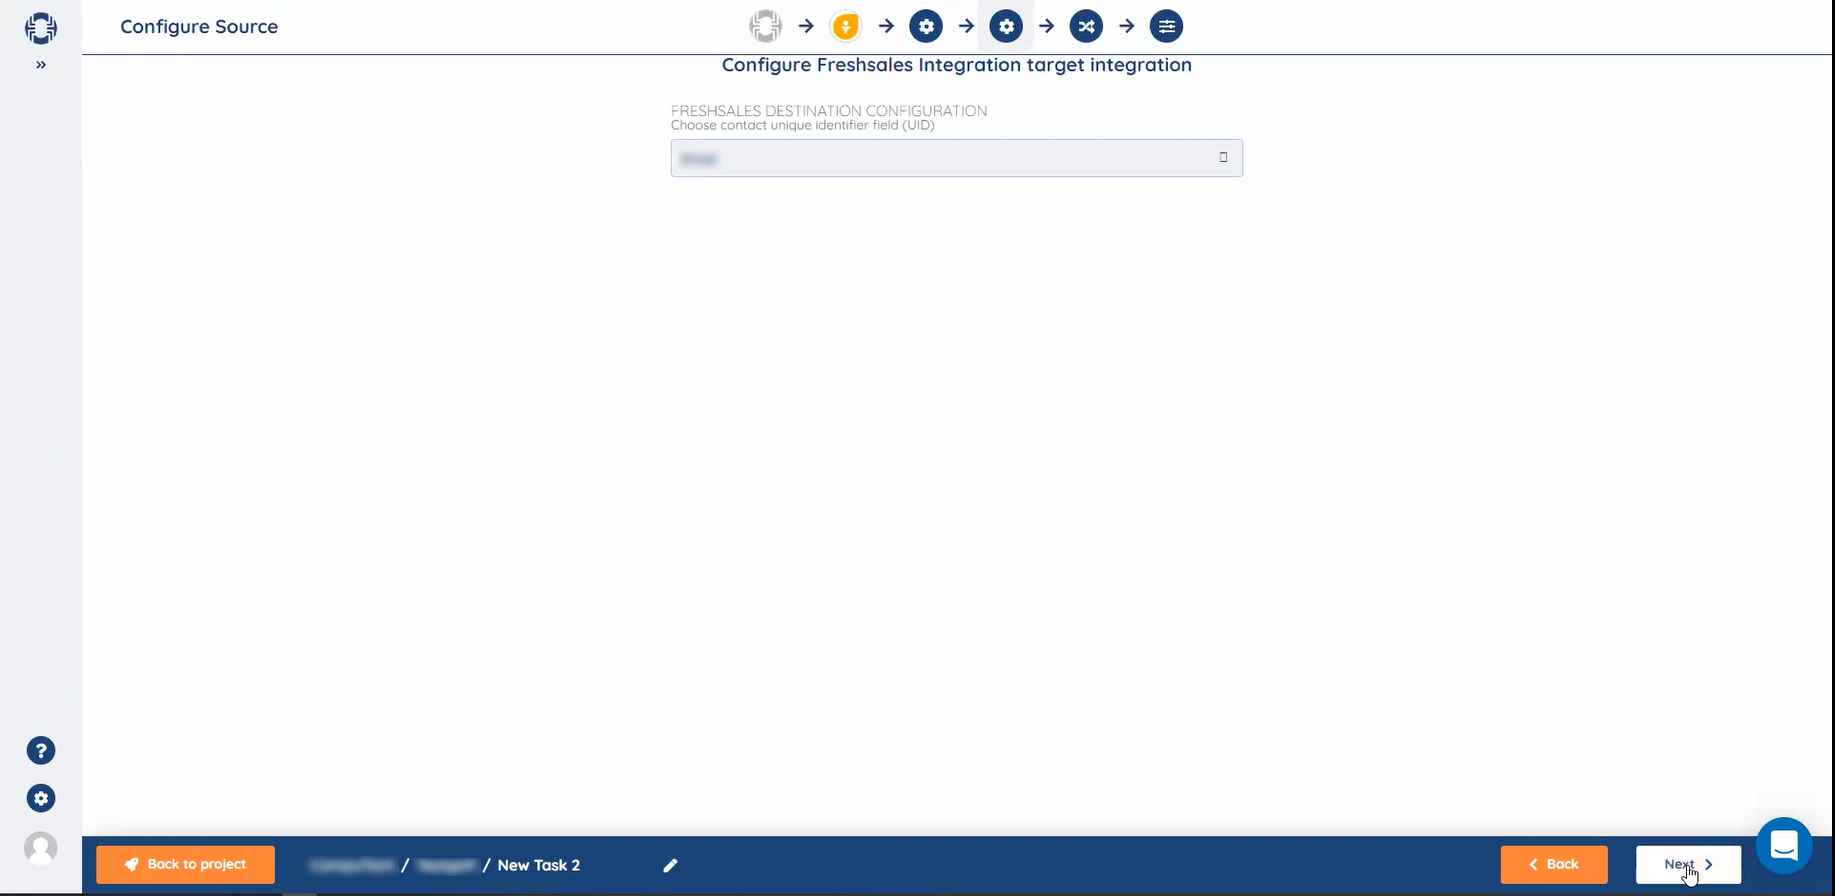
Now, it will ask about the unique identifier for Freshsales. It could be a contact id or email id. Select a suitable one. In most of the cases, email id would be better as they are unique. Click ‘next’.
Step 9:
It is time to map the suitable fields.
You can add “new” fields which you might need and map them here as well. In the case of FreshSales, you can add new fields in the FreshSales app. After that is done, simply refresh the “destination schema” on SyncSpider and freshly added fields will become visible and mappable.

For example, ‘customer type’ is one of the custom fields here, to make the changes in it, we click the settings (gear icon) and find some options to select. Selecting the ‘use source value’ allows us to use the same settings as in the source data, and for the customer field column, click on the down arrow which shows the sync that would take place. Click ‘done’.


Step 10:
After everything has been mapped, click “next”. Enter the task’s name, choose how you wish the task to get activated, and enter an email address you wish to get notified on upon successful or unsuccessful task completion (optional).
We will choose API Event as a task trigger since we have configured this integration accordingly.


Step 11:
Enter the SyncSpider Local app and click on “full sync now”.
Afterward, go back to the SyncSpider web app, refresh the page, start the task, and it will get executed.
NOTE: “Full Sync” overwrites existing data and populates fields with updated data, whereas “normal sync” updates new data that was saved in the database.


Note: All the fields which you need must have the data, at least some of them. Or else, it will be considered as an empty field and get skipped.
The data thus gets synced and one can send data from the local database of SyncSpider to the SyncSpider windows app.
PART 5: Example (SyncSpider to LocalDB Data Transfer)
Step 1:
Head over to SyncSpider Local app. Enter the Entity’s name, but change the “sync direction” to “SySP to Local”. Select the table and the required fields.


Step 2:
We need to disable the custom template created for the previous integration. Go to the web app of SyncSpider and disable the previously created template temporarily.

Step 3:
Go to the local windows SyncSpider app and click on ‘save all’.

Head over to the web app and create a new task. Since this time around we wish to import data to our integration, FreshSales will be used as a Source integration. Select it and click on “next”.


Step 5:
Select the target integration, the new entity name entered in the local database, enter the integration name, description, and copy the API key to the local database and click on ‘next’.

Step 6:
Enable the custom template. You will be prompted to choose the unique identifier. It will be email id by default. Click “next”.
If you do not wish to filter out any data, you can skip the “Source Filter” section and proceed straight to “Mapping”.

Step 8:
Next, you need to set the data expiry time. In this example, we left it as is. Click on “next”.


Step 9:
Task settings such as name, task activation, event trigger, and email notifications (optional) need to be adjusted.
We have chosen the Successful completion of the previous task (Custom Integration to FreshSales) as the event trigger for our current task. Click “Finish”.

After syncing the data in the local database, one can start the task and the data from Freshsales will be displayed on the local SyncSpider database.
Thus, we have connected the Local windows database with SyncSpider via SyncSpider windows app.
This is just one of the features offered by SyncSpider.
To check the list of the tools and features we support, please click here.
If you don't see your favorite tool on our list, please take the time and send us a request here to create an integration for you OR Up-vote it if it's already on the list :)
We develop the integrations based on the requests and up-votes :)
Was this article helpful?
That’s Great!
Thank you for your feedback
Sorry! We couldn't be helpful
Thank you for your feedback
Feedback sent
We appreciate your effort and will try to fix the article