TABLE OF CONTENTS
- 1.What is a Calculated Field and its Operators
- 2. Calculated Field's Options
- 3.Example and how to use it
1. What is a Calculated Field and its Operators
Calculated Field represents a single value field whose value is calculated by mathematical expression that consists of several other columns or constants with specific mathematical operators following priority of math operators.
You can calculate 2 or more fields using the operators and you can also Round up the number.
Note: if you select fields from collection, field value will be sum of all values in collection.
2. Calculated Field's Options

2.1. Name
The name of the Calculated Custom Field that you would like to be displayed in the Mapping Screen.
2.2 Field or Constant Value
The field that you would like to include in the calculation formula.
For example "Price" or "Amount".
This field has to be a number.
2.3 Operator
The operator that you would like to apply in the formula of the Calculated Field.
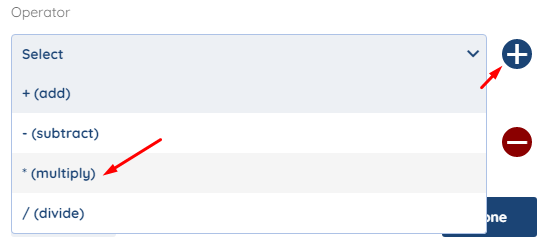
You can use the following operators in the formula:
- Add
- Subtract
- Multiply
- Divide
- Bracket Open
- Bracket Close
2.4 Result Modifier
This will allow you to round up the result of the formula
You can round up your number to any decimal place.
2.5 Expression Preview
A preview of the fields and operators that you used in the formula.
3. Example and how to use it
First thing that is important is that calculated field can be only used with "number" value fields due to its mathematical nature.
as we will be adding VAT Price in % for the example that we will be using.
For our example we will be using the Price of on an Item and will be applying a VAT % to this Price.
Lets say we are trying to transfer the price from Dokan to Shopify.
Shopify is expecting the price to be with VAT however Dokan only has "Price" ( meaning without VAT) in this case it would be optimal to use the Calculated Field.
Now we move to the mapping part, here is where you create the "Calculated" Field.
On the bottom left corner on mapping click on the + sign and click on "Calculated Field".

First you will name the field. You can put "Price Including Vat" or whatever you prefer but we would recommend that you put the % of VAT in the name of the field.
Next we add the "Price" Field that we were changing earlier and click on the + to add it to the Expression preview.

Now we will add the Operator "*" which in this case is "Multiply" as we are adding 20% ( this varies from use-case to use case) to the Price. When adding the VAT you Multiply the original number with the % of the VAT, so in this case it will be Price * 1.2 ( as 20% is 0.2 of the original Price)

To add the % of VAT, now we add another field which is constant Value and set it to 1.2 as explained above how the multiplication of VAT works.

When we have added all the fields and Operator for this example, the preview should look something like this.

When you have created it, just drag and drop it from the bottom left corner and connect it to the "Price" of Shopify in the mapping section


With this we will end our Calculated Field article.
We hope that this covers everything. If you have any further questions or need additional clarification please reach out to us via [email protected] or our Chat Widget!
Was this article helpful?
That’s Great!
Thank you for your feedback
Sorry! We couldn't be helpful
Thank you for your feedback
Feedback sent
We appreciate your effort and will try to fix the article