TABLE OF CONTENTS
- Introduction
- Section 1: User needs to create a template (Custom integration)
- Section 2: User needs to configure connection with the API (Connection Config)
- 1.Connection Config
- 2.Required Authentication
- 2.1. Basic Authorization
- 2.2. API Key
- 2.3. Other
- 2.4. OAuth2 (default)
- 2.5. OAuth2 (custom)
- 3. Use Custom Headers
- 4. Data Type
- Section 3: User can configure data type setup, schema, and other rules that API dictates
- 1. Data Type Setup Configuration
- 2. Pagination
- 3. Schema
- 4. Option field Type in Schema
- 5. Dynamic URI Component
- Section 4: Workflow
Introduction
This manual is going to show how can users integrate new REST APIs that are not in a collection of integrated applications and platforms.
Using this documentation, users can create SyncSpider integration which would allow users to create custom API endpoints that could be used for an external system to connect to and send data to SyncSpider. There are two steps:
A user creates a custom API module (template for integration)
A user creates integration for created API module.
Read SyncSpider's API documentation module here.
SyncSpider's Homepage
On Figure 1. there is Sync Spider's Homepage. On the left side of Webpage, there are two dropdown menus: In this example, there is SyncSpider (in this dropdown menu users can see a list of clients) and a Company.
In place of Company is going to be integration that is the user currently working on and below that name is going to be a list of Companies.

Figure 1. SyncSpider's Homepage
Custom Integrations
With a click on Custom Integrations, shown on Figure 2. Users can open Custom Integration Page.
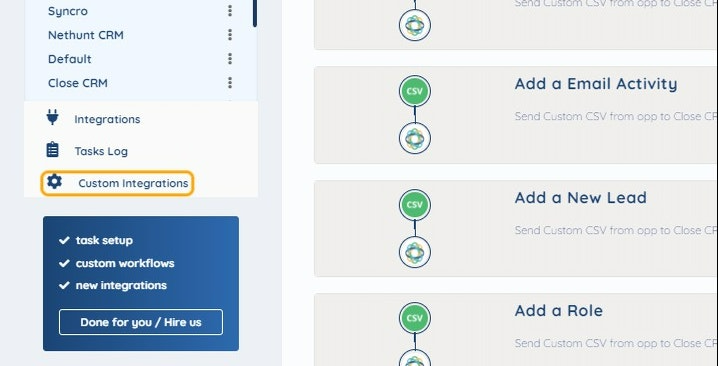
Figure 2. Custom Integrations
Look of Custom Integration Page
On Figure 3. there is a Custom Integration Page.
There are a few columns of this look:
Users can put a logo of their integration
Custom name
Type of integration (External API, API, CSV and XML),
Visibility of integration (My Company, Public)
Toggle on/off integration
Activision name (Date of created integration)
Actions (Edit Integration, configuration, and delete)

Figure 3. Custom Integration Page
On Figure 3, users will only see their own Integrations that they created for themselves, for the company, or sub-company. At creation, all integrations will be private.
Users can contact us at [email protected] or at Intercom to make templates Public for all other users and enable them to use the very same integration.
Section 1: User needs to create a template (Custom integration)
In this section, users will learn how to configure their own custom integration, about the term data type.
1.Add Custom Integration
On Figure 4, If a user wants to add integration, on top of the page there is a button with the name "ADD CUSTOM INTEGRATION". With a click on that, a new page will open.

Figure 4. Add Custom Integration
2.Custom Integration
On Figure 5, users can see the appearance of creating custom integration.
First of all, a user needs to input the name of his integration.
After that, he can put some description about it in several sentences.
After filling description, the user can choose visibility between two options:
Inside of user's Company (My Company)
Public
The next step would be choosing the Integration type. There are a few options:
External API
API
CSV
XML
Last option but not a must, user can input his very own picture of integration.
Picture can be dragged from Internet or can be uploaded from computer.
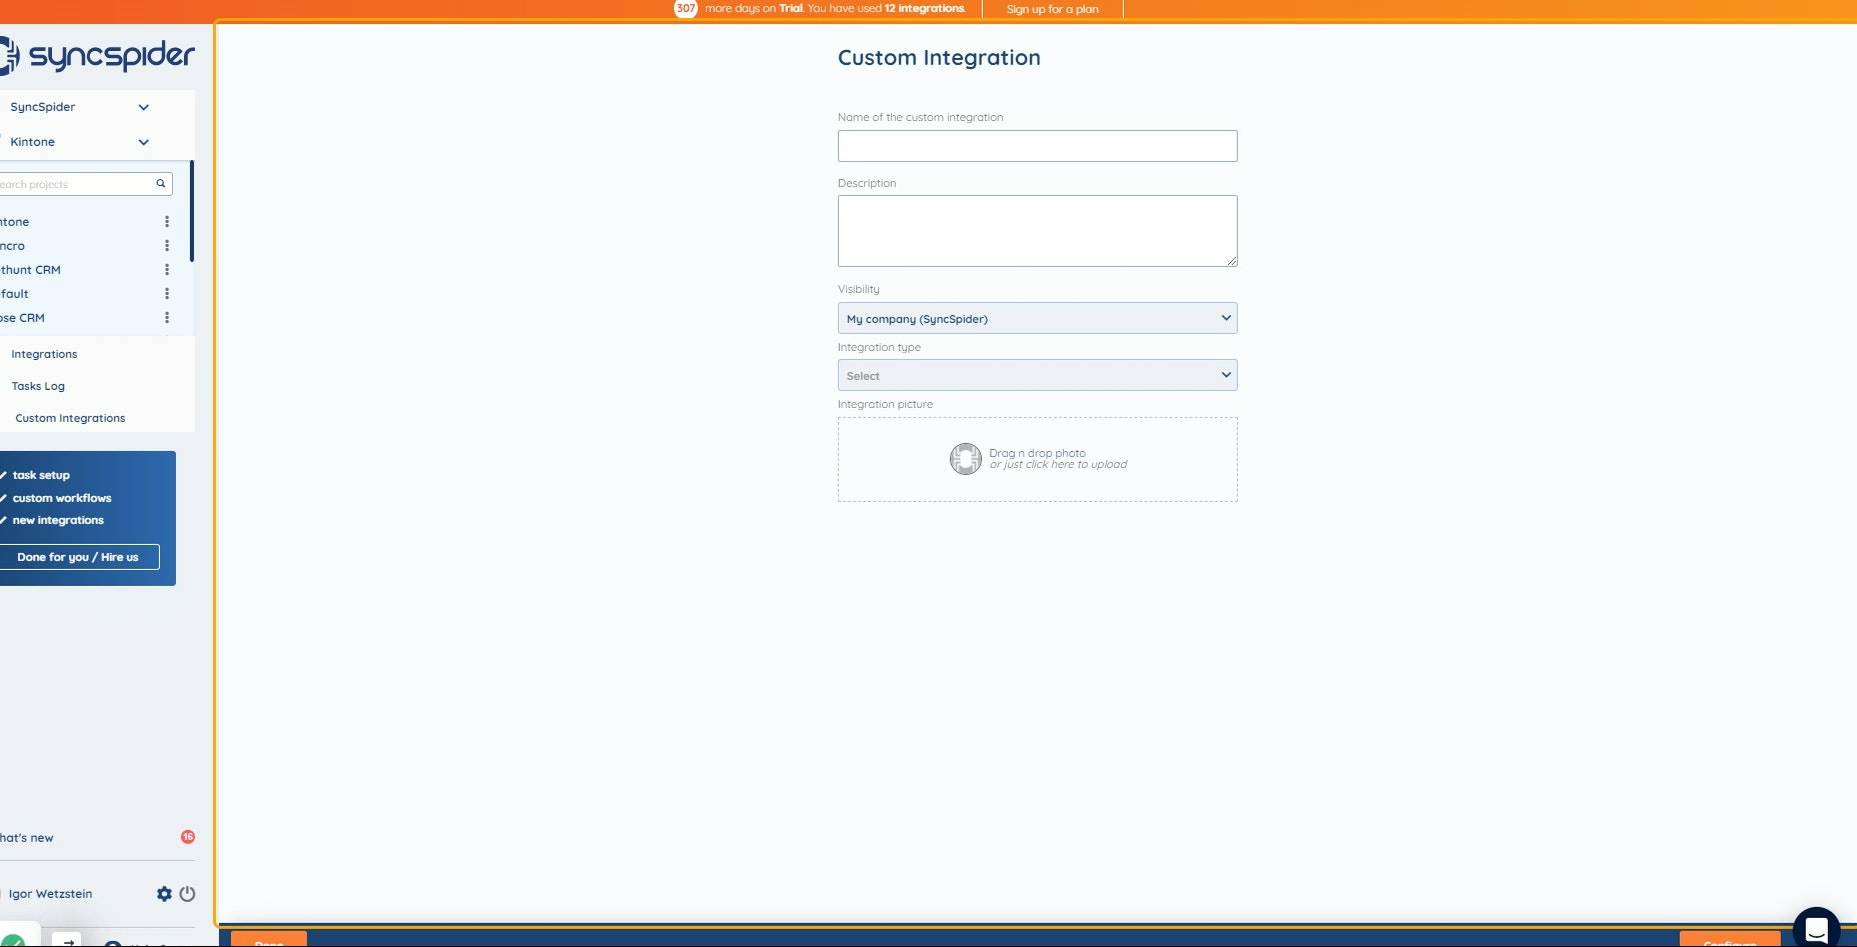
Figure 5. Custom Integration
3. Created Custom Integration
After completing all previous steps, if a user chooses External API, then he will get the very same look as on Figure 6.
Right now, the user can add Data Type, Toggle on/off Integration status. There is a red alert icon on Figure 3. This means that the user needs to configure a connection.

Figure 6. Created Custom Integration
Section 2: User needs to configure connection with the API (Connection Config)
1.Connection Config
In this section, the user is going to learn how to establish the connection with the Integration API.
The Connection Config is a Configuration window where a user needs to establish the connection with platform API by specifying:
Connection type
Base URL
Configure Custom Error Handling
Connection Note - Support HTML
This option is used for the formatting connection part of the integration. This connection configuration is a must! After configuring the connection, the user can create endpoints, add tasks, and use Get/Post data from systems.
To enter connection configuration, click on the button Connection Config that is shown on Figure 7.

Figure 7. Entering Connection Config
Figure 8 is showing the first look of Connection Config. Clicking on the button below Connection Type (Select), the user can choose between options Integration and Webhook.
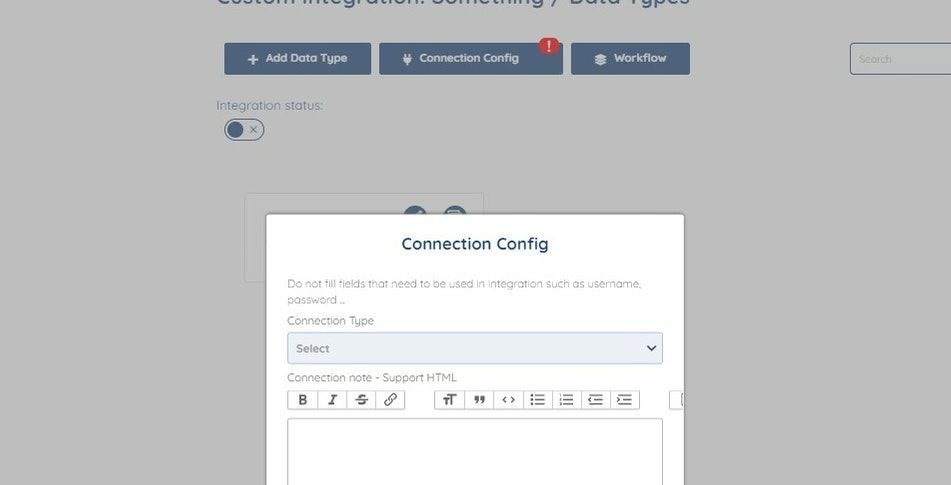
Figure 8. Connection Type Option
After choosing one of the following, other options will appear, same as on Figure 9.

Figure 9. Connection Config
On Figure 9. users can see the next options:
Base URL - In this field, the user inputs the same URL for all endpoints. The remaining parts of the URL will be placed in the field "API endpoint" for specified data types that were created in Custom Integration Page via "Add Data Type".
Required Authentication - This checkbox is used when the URL is requiring Authentication. If a user checks this box, there will be a dropdown menu with a few options: (Basic Authorization, OAuth 2.0 Authorization, API Key, Other, and OAuth 2.0 Template). On Figure 10. are shown options.

Figure 10. Required Authentication
Use Custom Header - This option is used if it is specified in the documentation of Integration/Platform that is being integrated or if the headers are not relevant.
Using Custom Headers allows users to prepare syntax and encryption specified in the documentation of Integration/Platform.
For example: In documentation is specified that in header's key should be put "Accept" and in the header's value, "application/json".
On Figure 11. the user can see that while checking "Use Custom Header" new options will pop-up.

Figure 11. Custom Headers
On Figure 12. users can click on the button "ADD CUSTOM HEADER" to add as much as they need custom headers.

Figure 12. Add Custom Header
On Figure 13. when the user clicks on the selected button, he will delete the following custom header.

Figure 13. Delete Custom Header
Configure Custom Error Handling - ...
Connection Note - Support HTML - This option is behaving like the description. In this text box, the user can write directions, put links, attach files on how to follow guidance for given Integration/Platform for Authorization Process.
2.Required Authentication
In this section, users will be introduced with types of Authentication
This checkbox is used when the URL is requiring Authentication. If a user checks this box, there will be a dropdown menu with a few options:
Basic Authorization
OAuth 2.0 Authorization
API Key
Other
OAuth 2.0 Template
On Figure 14. are shown options.

Figure 14. Required Authentication
On the following links, users can see explanations and guidance of enumerated options:
2.1. Basic Authorization
In this section, users will be introduced with Basic Authorization
How does this work?
The Authorization request header contains the Base64-encoded username and password. When Handling the request, the server decodes the login details and checks if the user can access the requested content.
On figure 15. is shown the look of Basic authorization.

Figure 15. Basic Authorization
Most of the time when a user registers on some system, he inputs a custom Username or email. So in this example, the user needs to put in filled "User Name" that he used for registration on the system. The same goes for passwords.
2.2. API Key
In this section, users will learn about API Key Authorization
Using API keys is a way to authenticate an application accessing the API, without referencing an actual user. The app adds the key to each API request, and the API can use the key to identify the application and authorize the request.
How the key is sent differs between APIs. Some APIs use query parameters, some use the Authorize header, some use the body parameters, and so on.
On Figure 16. the user needs to pass Api Key (key) and Api Key (value). On field Api Key (key) user will pass the name of the API that has been created on an external system and on field Api Key (value), the user will pass API Key's value that has been stored on an external system. Value field should be left empty and it is required to declare it inside Connection Config.

Figure 16. API Key Authorization
If option "API key in URL" is checked, then API key name and API key value will be sent as URL query parameters.
2.3. Other
In this section, users will learn how to use Other authentication
With Other authentication, there is a chance to create custom Key and Value fields that Integrations require.
On Figure 17. there is an example of usage of Other authentication. There are three types of fields. For this integration, there was a need for users to enter email, API Key, and Authorization ie. field for encoding entered values for the previous two fields.
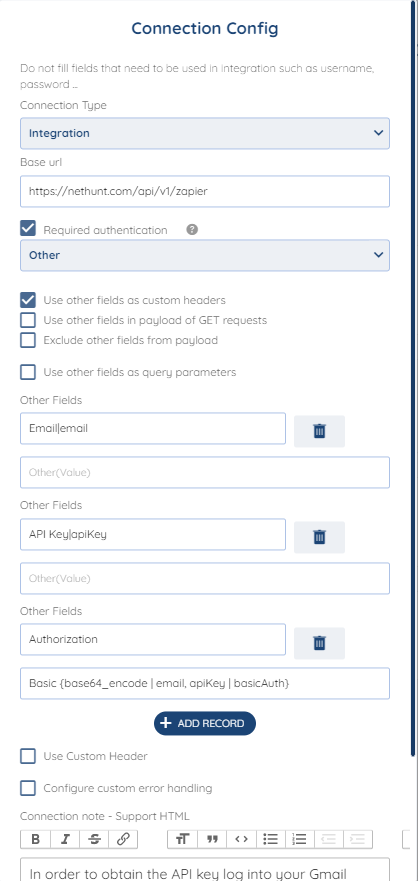
Figure 17. Other authentication type
On Figure 18, there is an example of using API key in Other Authentication Type. This is used when a user needs to provide API Key through Basic Authorization.

Figure 18. API Key in Other Type
With completing connection config, on the left menu in SyncSpider Website, below Company option, there is Integration option, where you can create Integration.
Examples with steps on how to create Integration and look of using Other authentication in the given example is in following Figures.
Click on Integrations
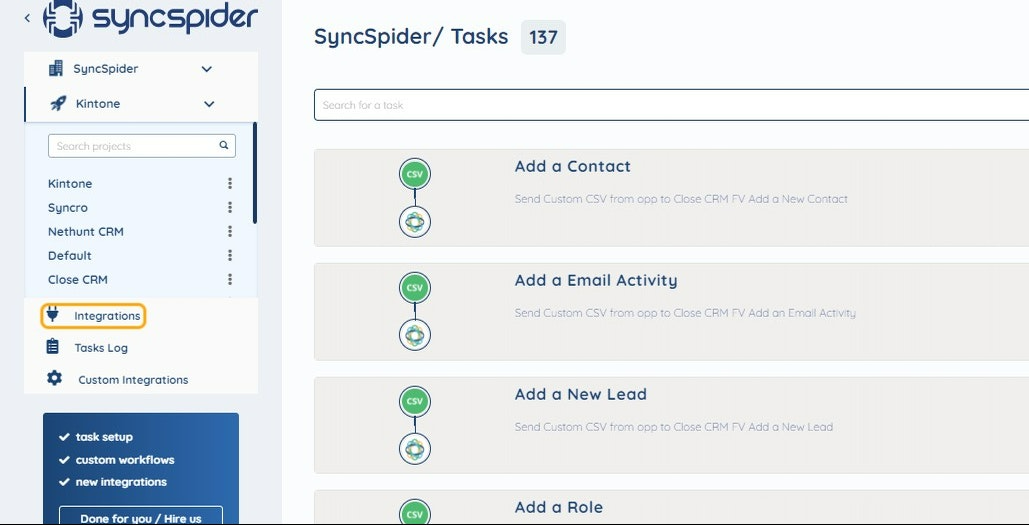
Figure 19. Selecting Integrations
In Add new integration section, enter the name of Integration to create it.

Figure 20. Adding new Integration
Inputting name and description
In these two fields, users can enter the Integration name and description of that Integration.
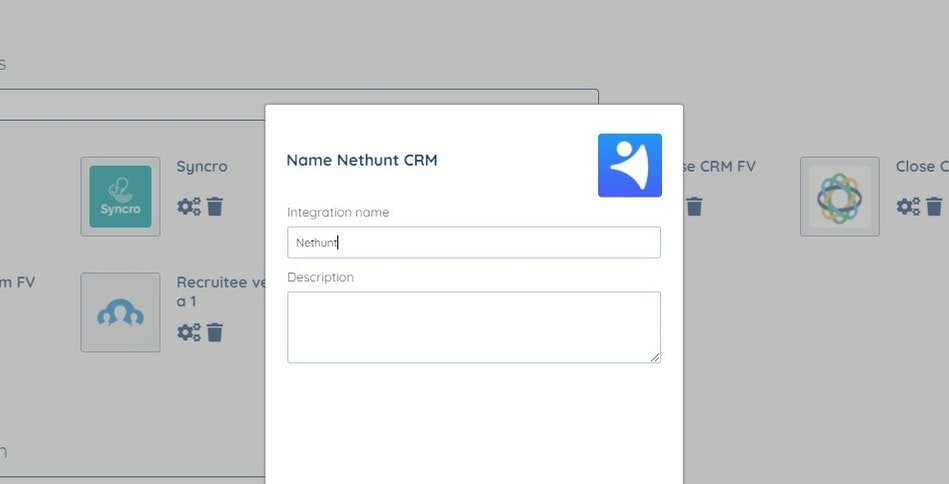
Figure 21. Input name and description
Setup Integration
With the example of Nethunt Integration in this section, there were created two fields, Email field for users to enter their email that was used for registration on Integration/Platform and API Key that was on the very same Integration/Platform.

Figure 22. Setup Integration
2.4. OAuth2 (default)
2.5. OAuth2 (custom)
Depending on the documentation, a unique template is created for each integration.
On Figure 23, there is an example of Configuration.
In the Template dropdown menu, it is going to be selected template that has been created previously. By documentation, in Token URL will be placed route. The route can be seen in Figure B. It is left for the user to input Email and password by the documentation.

Figure 23. Configuration of Auth2 Template

Figure 24. ClientJoy Integration documentation for OAuth2
3. Use Custom Headers
In this section, users will learn about using Custom Headers
This option is used if it is specified in the documentation of Integration/Platform that is being integrated or if the headers are not relevant.
Using Custom Headers allows users to prepare syntax and encryption specified in the documentation of Integration/Platform.
For example: In documentation is specified that in header's key should be put "Accept" and in the header's value, "application/json".
On Figure 25. the user can see that while checking "Use Custom Header" new options will pop-up.

Figure 25. Custom Headers
On Figure 26. users can click on the button "ADD CUSTOM HEADER" to add as many custom headers as they need.
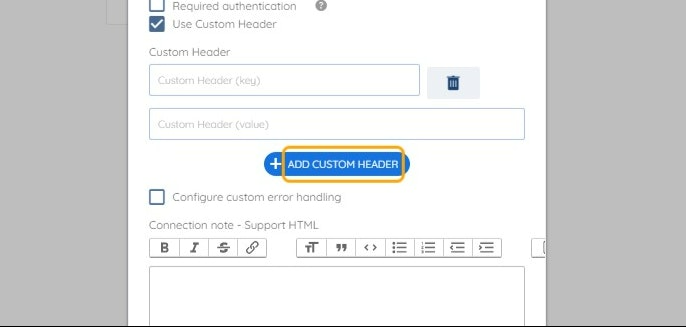
Figure 26. Add Custom Header
On Figure 27. when the user clicks on the selected button, he will delete the following custom header.

Figure 27. Delete Custom Header
4. Data Type
In this section, users will learn about Data Types
On Figure 28. the user can specify the API endpoint he wants to use in his template.
Simply put, an endpoint is one end of a communication channel. When an API interacts with another system, the touchpoints of this communication are considered endpoints.
For APIs, an endpoint can include a URL of a server or service. Each endpoint is the location from which APIs can access the resources they need to carry out their function.
APIs work using ‘requests’ and ‘responses.’ When an API requests information from a web application or web server, it will receive a response.
The place that APIs send requests and where the resource lives are called an endpoint.
As endpoints, most of the times users will use methods such as (GET, POST, PUT, DELETE). For example (Get Users, Add User, etc.)
On Figure 28. is shown how to create a Data Type.
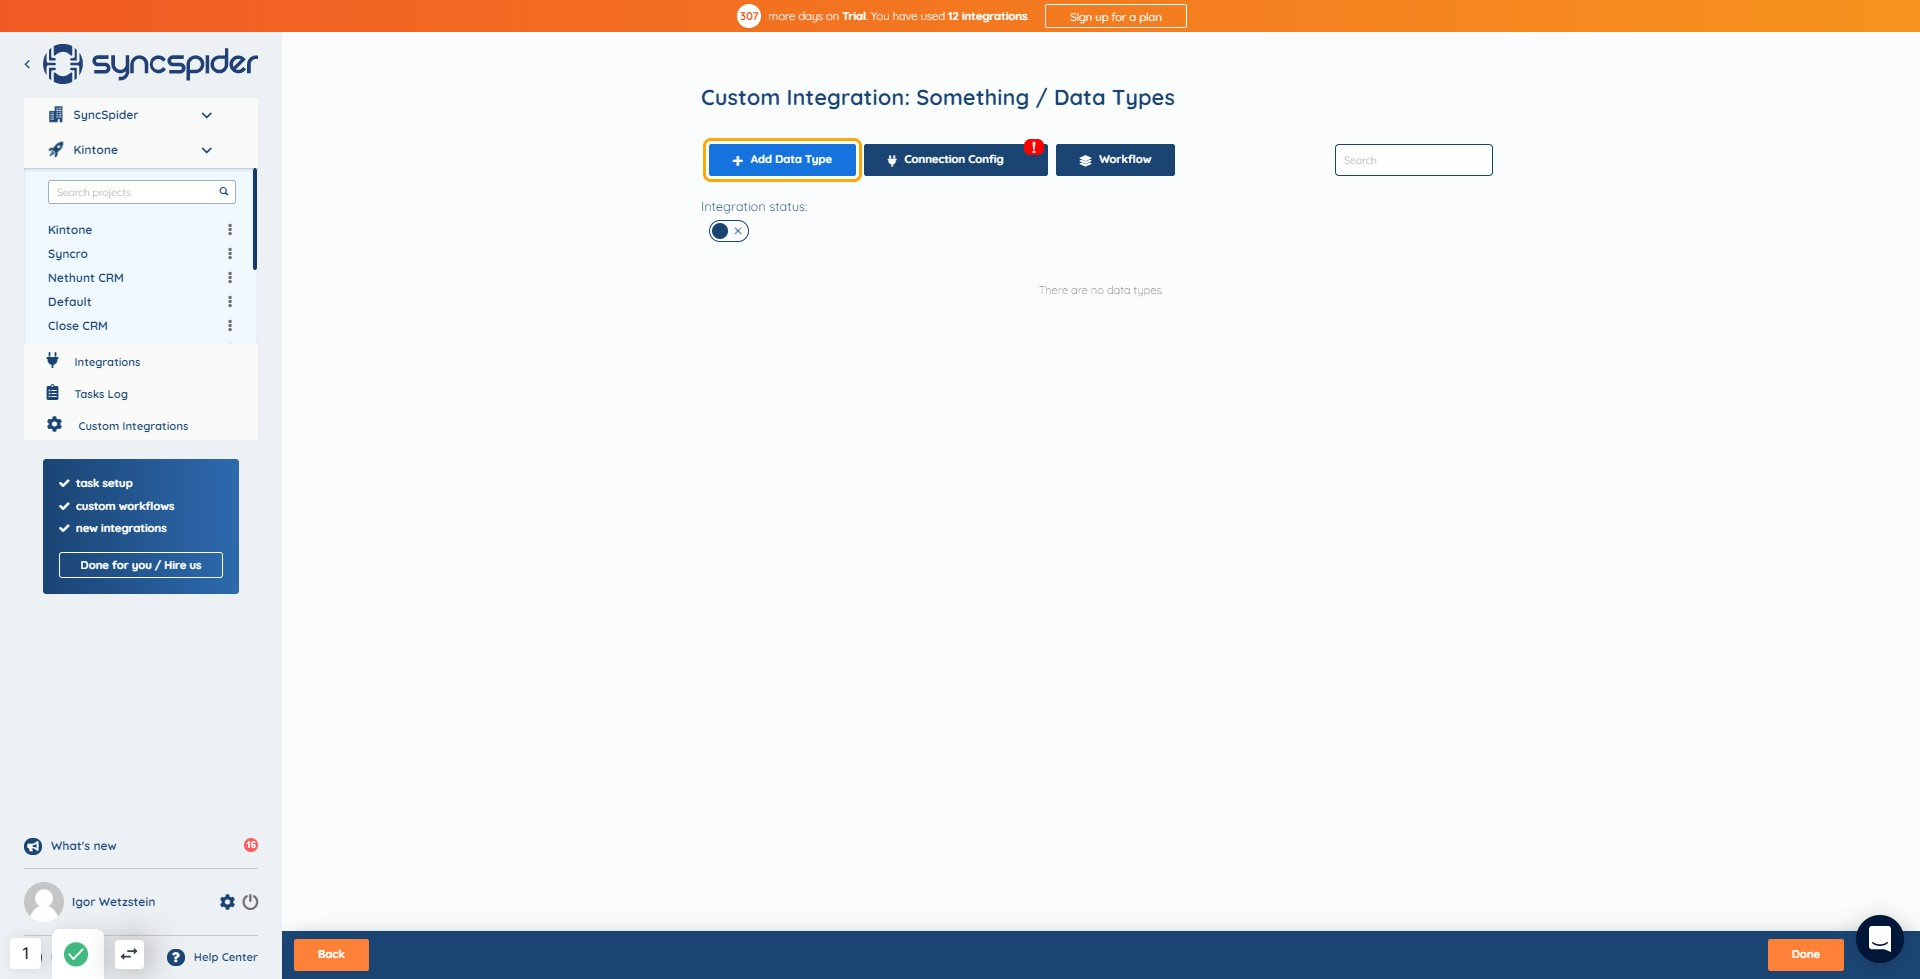
Figure 28. Create Data Type
On Figure 29, is shown the look of the pop-up after clicking "Add Data Type". A user only needs to put the name he wants to use for certain endpoint.

Figure 29. Add Data Type Pop-up
After clicking the button "Done", the User will have the same look as it is shown on Figure 30.

Figure 30. Created Data Type
Now, the user can do several things with the endpoint (as long as the integration is inactive):
Rename existing
Copy
Delete
Toggle on/off (as long as the integration is inactive)
Duplicate
Section 3: User can configure data type setup, schema, and other rules that API dictates
1. Data Type Setup Configuration
In this section, users will learn how to configure their data type for the External API template
This section is the first step of the Data Type configuration.
To enter this configuration in SyncSpider, users need to click on the Data Type they want to configure that was previously created and explained in the section Data Types.
On Figure 31. users can see a look at Config.

Figure 31. Config
In Config there are the following options and fields:
Request type
This is used to specify the type of request of the call users want/need. There are a few options that are supported:
POST
GET
PUT
PATCH
DELETE
Type
This is used to specify the type of data that is going to be sent/received. There are a few options that are supported:
JSON
x-www-form-urlencoded
CSV
API Endpoint
This is used to write out the remaining portion of the URL that was used for this particular endpoint, ie. users gave the base URL in Connection Config, so here it is needed to put the remaining URL to complete this endpoint.
Usually starts with a dash "/". For example: /v1/k/contacts
Direction
This is used to specify the direction of data flow. Supported options are:
Import data in SyncSpider - From External System to Sync Spider (Most of the time when choosing to GET request type, users will choose import)
Export data from SyncSpider - From Sync Spider to External System (Most of the time when choosing POST request type, users will choose export)
If a user chooses Export data from SyncSpider, then the Pagination step
Use dynamic url?
This is used to specify whether or not Api Endpoint is dynamic. This means that part of the URL is expected to be inside of curly brackets { }.
For example: There is Api Endpoint "/v1/k/{ContactId}/emails. The dynamic part of url is {ContactId} because for every user contact id is different and emails of the very same contact are going to be different. That's a function of dynamic url.
Once checked "Use dynamic url", there is going to be a new dropdown menu. This value is changeable as it is.
On Figure 32. users can see that with a check on the checkbox "use dynamic url" new dropdown options will appear.

Figure 32. Use Dynamic url option
There are two things:
Choose Dynamic Type: Users can choose Options or Field. Field type user inputs value at Source/Target Config step. Options type pulls data from other Data Type.
The most practical way is to choose Options. For example, if users have a contact Id that has 20 random characters it would be hard to be remembered, but if choosing options, users can choose from the list of contact Ids which is a lot easier.
Choose Data Type for options dropdown: Users will have here Data Types that have been created already and they can choose what they want to display, ie. from where to take exact data.
Next to these new things, After the Schema part, there is an additional step in the Data Type building process and it carries the name of the dynamic part of the Api Endpoint.
On Figure 33. users can see the Dynamic URI Component that appeared by choosing "use dynamic url"

Figure 33. Dynamic URI Component
2. Pagination
In this section, users will learn about Pagination
Pagination is the process of separating print or digital content into discrete pages.
Pagination also refers to the automated process of adding consecutive numbers to identify the sequential order of pages, to break up content.
Pagination is used only when importing data to SyncSpider and it is meant to take different syntax in fields to determine the starting point. From system to system it may vary.
How to get to the Pagination? After creating the data type, click on it. After configuring "Config", Pagination will be next.
On Figure 34. is shown the look of Pagination.

Figure 34. Pagination
On Figure 1. there are different options for users to choose in their Integrations. Options and fields that are available:
Disable Pagination
This option is used to disable Pagination. Users disable Pagination when there are not in documentation specified or when there are not showing data differently by checking it in Postman.
For example, in response of Postman, we have total pages: 2, total entries: 100, per page: 50. This means there is Pagination in this data type because we can navigate from page 1 to page 2 since there can be displayed only 50 records on one page.
Page
In this field, a user needs to define a key for Page ( Key might be page, [page], p, etc.). To remove the key from the request type or if it is not needed, type in this field -1.
Page start from
This field is used to define the start number for the page. Most of the time it is specified to start from 0 or from 1, it depends from system to system.
Maximum pages per Data Type
In this field, the user can specify the maximum number of pages that can be reached for the very same data type. If not specified, it will use the default number of pages, ie. 1000 pages.
Limit
In this field, a user needs to define a key for Limit ( Key might be, limit, _limit, l, etc.). To remove the key from the request type or if it is not needed, type in this field -1
Limit batch
This field is used to specify the number of records on one page. In SyncSpider default number is 25. That means if the user does not specify the number of records e.g. user leaves this field empty, the system will use 25.
Offset
...
Has More
...
Has More Value Param
...
Has more param with options
...
3. Schema
In this section, users will learn about the schema of data type and how to configure it
In section, the user can define what form of Content he wants or expects.
Both Importing in SyncSpider or exporting from Sync Spider will show this step.
On figure 35, there are several important parts.

Figure 35. Schema
There are:
Root Schema node - The outermost level of a JSON document. To add a single, top-level element to the JSON is the Root option, ie. Root Schema node. If the user doesn't specify the Root Schema node, the JSON output will not include a root element. If Root node exists for a certain json and if is not written, there won't be any type of response.
Send as Complex - Only if there is Root node then this will be checked.
Content - here, a user puts json that will be shown in json preview and generated fields in the mapping by clicking "GENERATE SCHEMA". Json will either start with curly brackets, that is "object" or one object inside a collection (square brackets).
For example: On figure 36. there is an example json.

Figure 36. Code Example with root
In this example, we have a root schema node that can be read from certain documentation or Postman. Here, a user is only getting objects since we have only curly brackets. In this case, send as complex will be checked.
In the second example on Figure 37. there is a second example of code.

Figure 37. Code Example without root
On Figure 38. There is a Postman example json with a root node.

Figure 38. Json root node from Postman
How is this going to be filled in Content, in section Schema? Simple. On Figure 39. there is an answer.
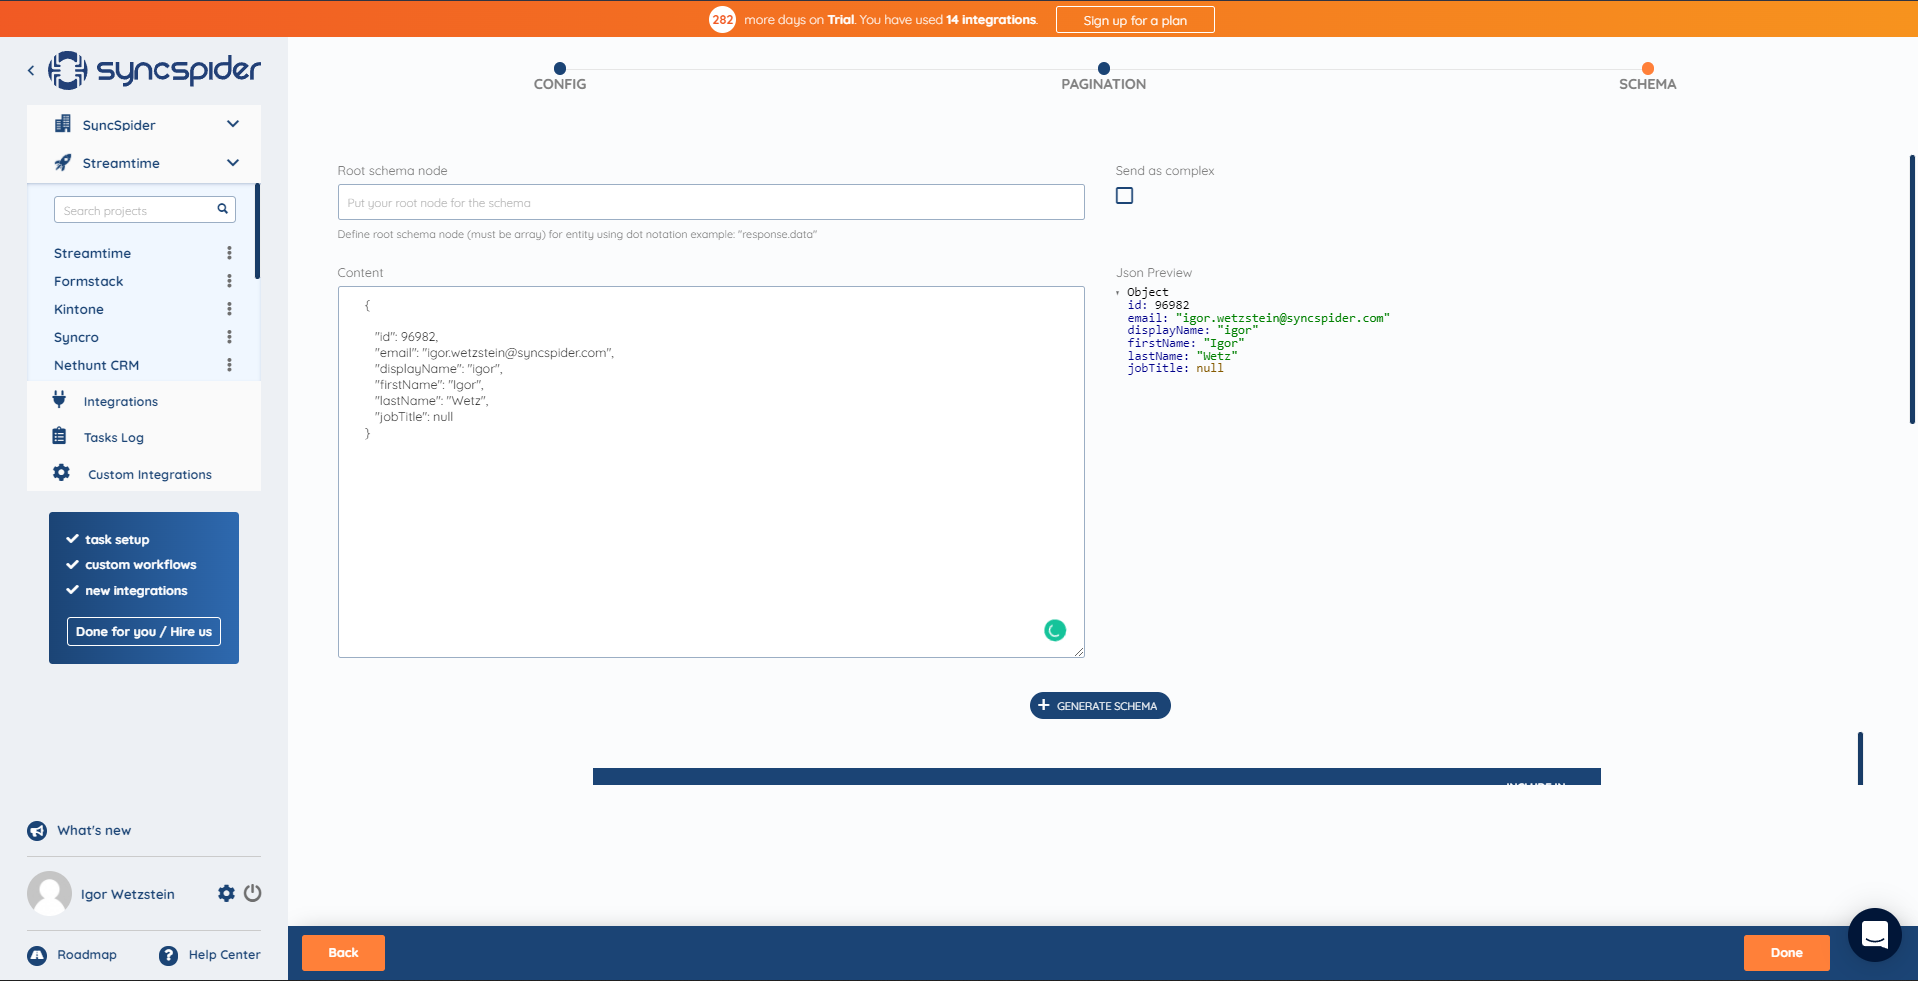
Figure 39. The code example in Schema
Why is it written like this?
First, on Figure 39. there is no root node, so there is no filled root schema node.
Second, we are returning an array of objects, not objects of objects, in this case, there won't be checked "Send as complex".
Third, since there is an object with the same attributes, there won't be duplication in code, since users only need to map fields.
JSON Preview - this part simplifies the code that there is in content by showing users a simpler look of attributes.
Preview of Schema - This is only going to be shown if a user clicks "GENERATE SCHEMA" and if there is no syntax error in json in Content.
On Figure 40. there is a preview of the schema.
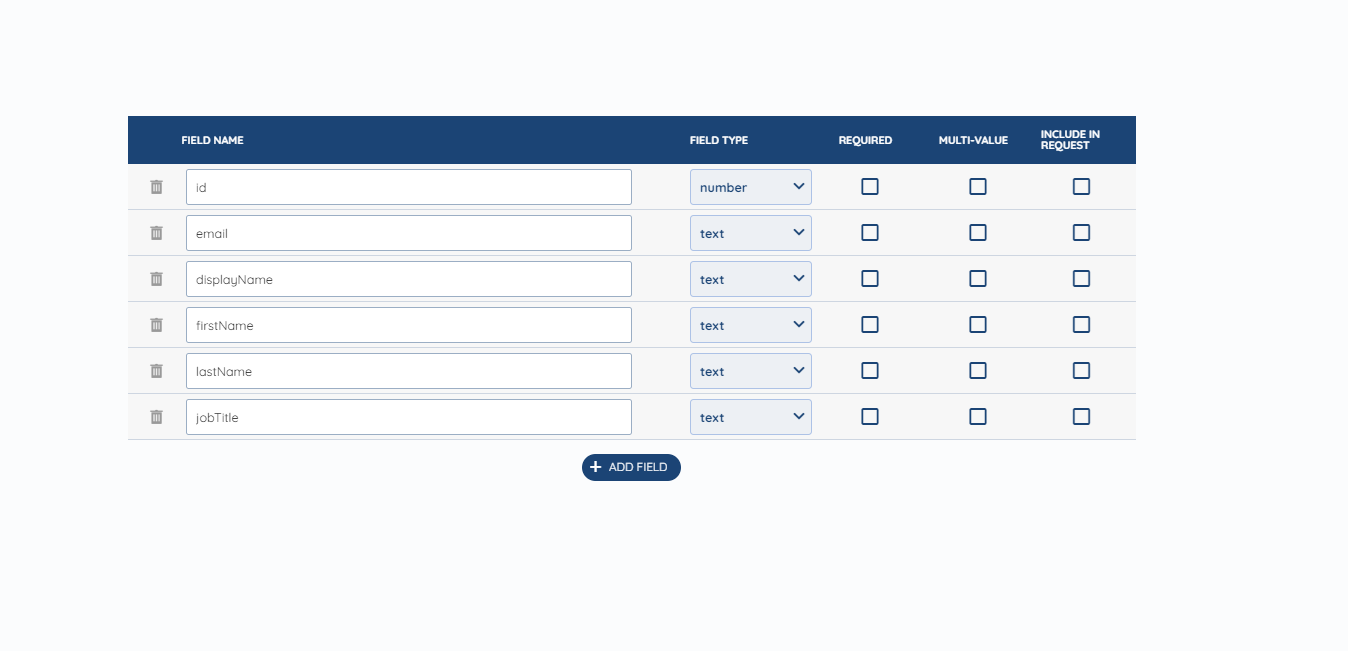
Figure 40. Preview of Schema
There are several types of Field Type:
bool - returns True/False value
date - returns date
number - returns number
text - returns any type of text
options - returns custom options (created or dynamic ones)
collection - returns collection
complex - returns complex
hierarchy - returns hierarchy
More details on Options, Hierarchy, Collection, and Complex fields can be found in Sync Spider's documentation, link.
Required fields - this section is only checked if there is a POST method/export from SyncSpider. If there is a required field in schema then those fields must be filled in Mapping Screen.
Multi-value - this one is checked if there is more than one element in the attribute. For example, if there was in code in email enumeration, ie. a minimum of two emails, the user will check the multi-value option.
4. Option field Type in Schema
In this section, users will learn about option field type in Schema
The first type of option is that users can write custom options that could be choosable for this field in the mapping section, either inputting one then clicking on button "+" then again one or inputting in bulk with each value in a separate row. In the following Figures, users can see process.
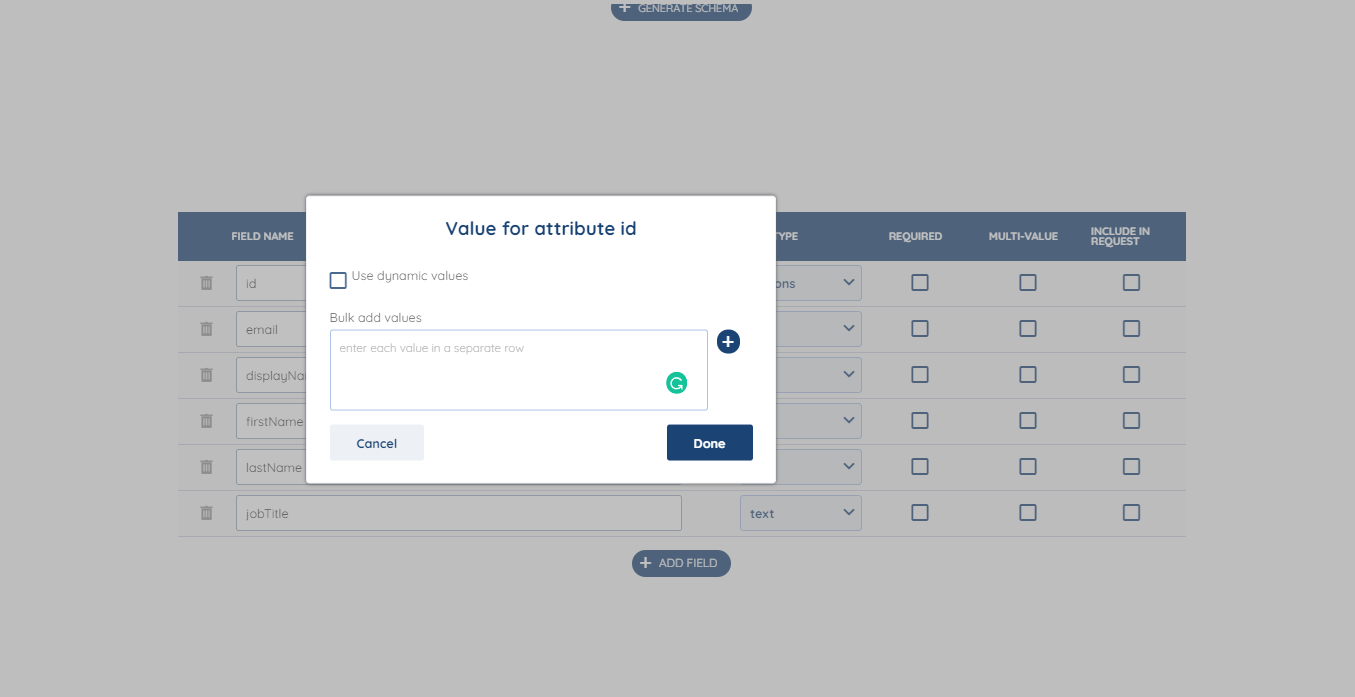
Figure 41. Option Field type - Custom input

Figure 42. Option Field type - Inputting one by one

Figure 43. Option Field type - Inputting in bulk separated by a row
The second option is to use Use dynamic values by checking a box and following the key/value principle from the previously provided source Data Type user added during template configuration.
As it is shown on Figure 44. we previously added List Leads Data Type to draw all leads in the list so the user can dynamically pull id one lead he needs.
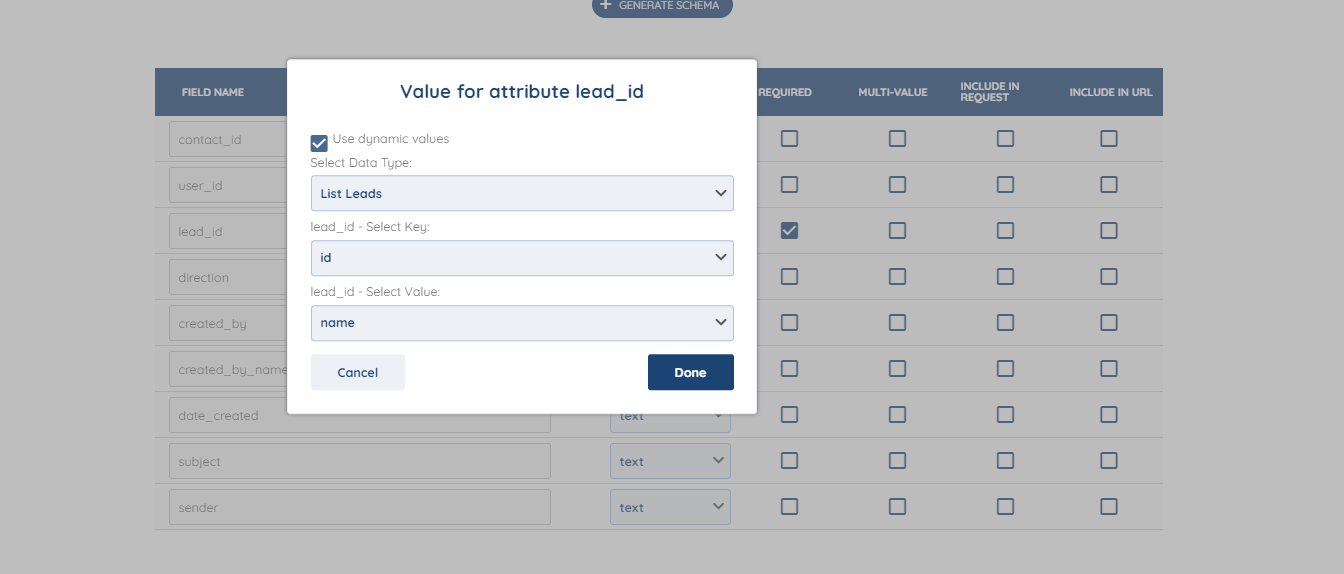
Figure 44. Option Field type - dynamic values
In the Select Data Type section, in this example, the user chooses from the Data Type he wants to pull id. The user chooses list Leads. Next as a key user chooses id and as a value name. As a result, users will have a dropdown menu where they can choose from the names of leads. The result could be seen in Figure 45. So, here, the user basically parses from id to name. For value, a unique field should be chosen, such as email for contacts.

Figure 45. The result of options field type - dynamic value
5. Dynamic URI Component
In this section, users will learn about Dynamic URI Component
As already said in the previous section, this option will only appear if "use dynamic url" is checked in the Configuration config section.
On Figure 46. is the look of the Dynamic URI Component.
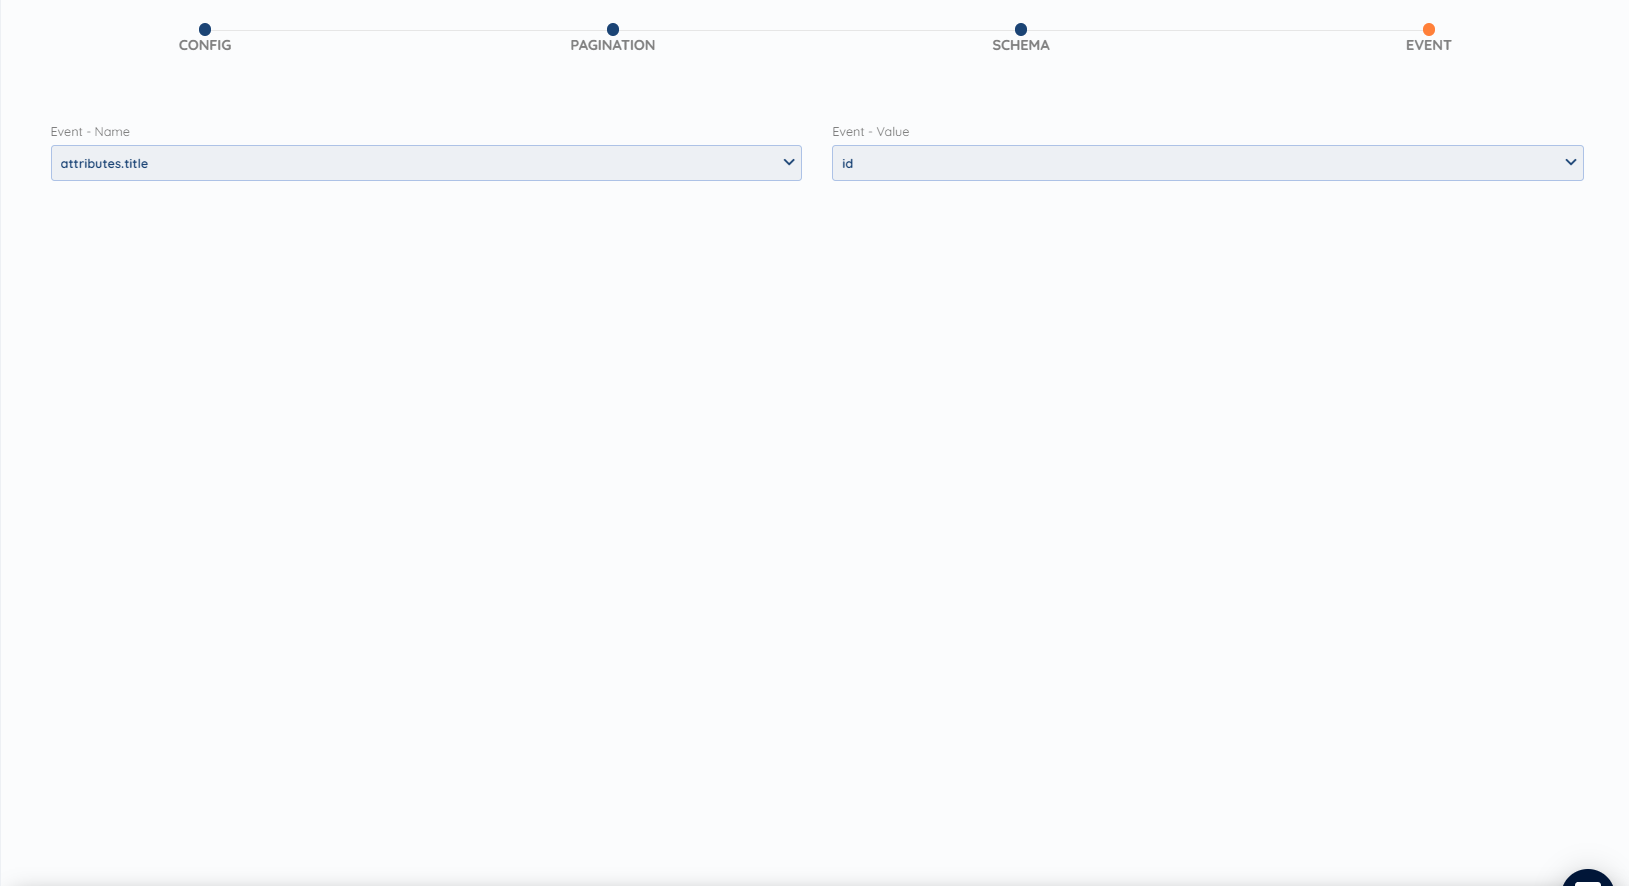
Figure 46. Dynamic URI Component
The logic behind this is to place in the left bar what the user wants to be displayed on-screen and the right bar value (Most of the time here will be placed id).
This is very useful because users can easily navigate by viewing and picking among names while if this wasn't used, users would have 20-30 digits or characters for every name, id number that would be hard to remember. That's why this is a very handy tool.
Section 4: Workflow
In this section, users will learn about Workflows
Workflow “consists of an orchestrated and repeatable pattern of business activity enabled by the systematic organization of resources into processes that transform materials, provide services, or process information”. More simply, “a workflow defines the steps involved in the process of getting work done.”
A business workflow is a repeatable process that consists of a series of tasks that generally need to be completed in a specific sequence. Think of it as work flowing from one stage to the next until it is finished.
Workflows are useful for ensuring that important processes are done the right way every time. For example, you may want to define a process workflow for onboarding new employees to ensure that all new employees get the information, policies, and resources they need to do their jobs.
To use Workflow, first users need to create endpoints. After creating the endpoint, users can enter Workflow by clicking Workflow in Data Type Screen same as on Figure 47.

Figure 47. Enter Workflow
After clicking the new window will open, same as in figure 48.

Figure 48. Empty Workflow
First, the Workflow screen will be empty in beginning, but when users configure all they need, a list of them will show. An example can be seen on figure 49..

Figure 49. List of Workflow
In this example, there are several columns:
Name - User can input the custom name of Workflow
Action - User can choose which Workflow type he wants to use
Data Type - User can choose on which Data Type he wants to use Workflow
Status - User can choose should Workflow be on/off
Delete - User can delete by clicking the "trash-can" button
New Workflow can be created by clicking Create Workflow button that is shown on Figure 50.

Figure 50. Creating Workflow
By clicking Create Workflow, on Figure 51. users can see the first look of creating Workflow.
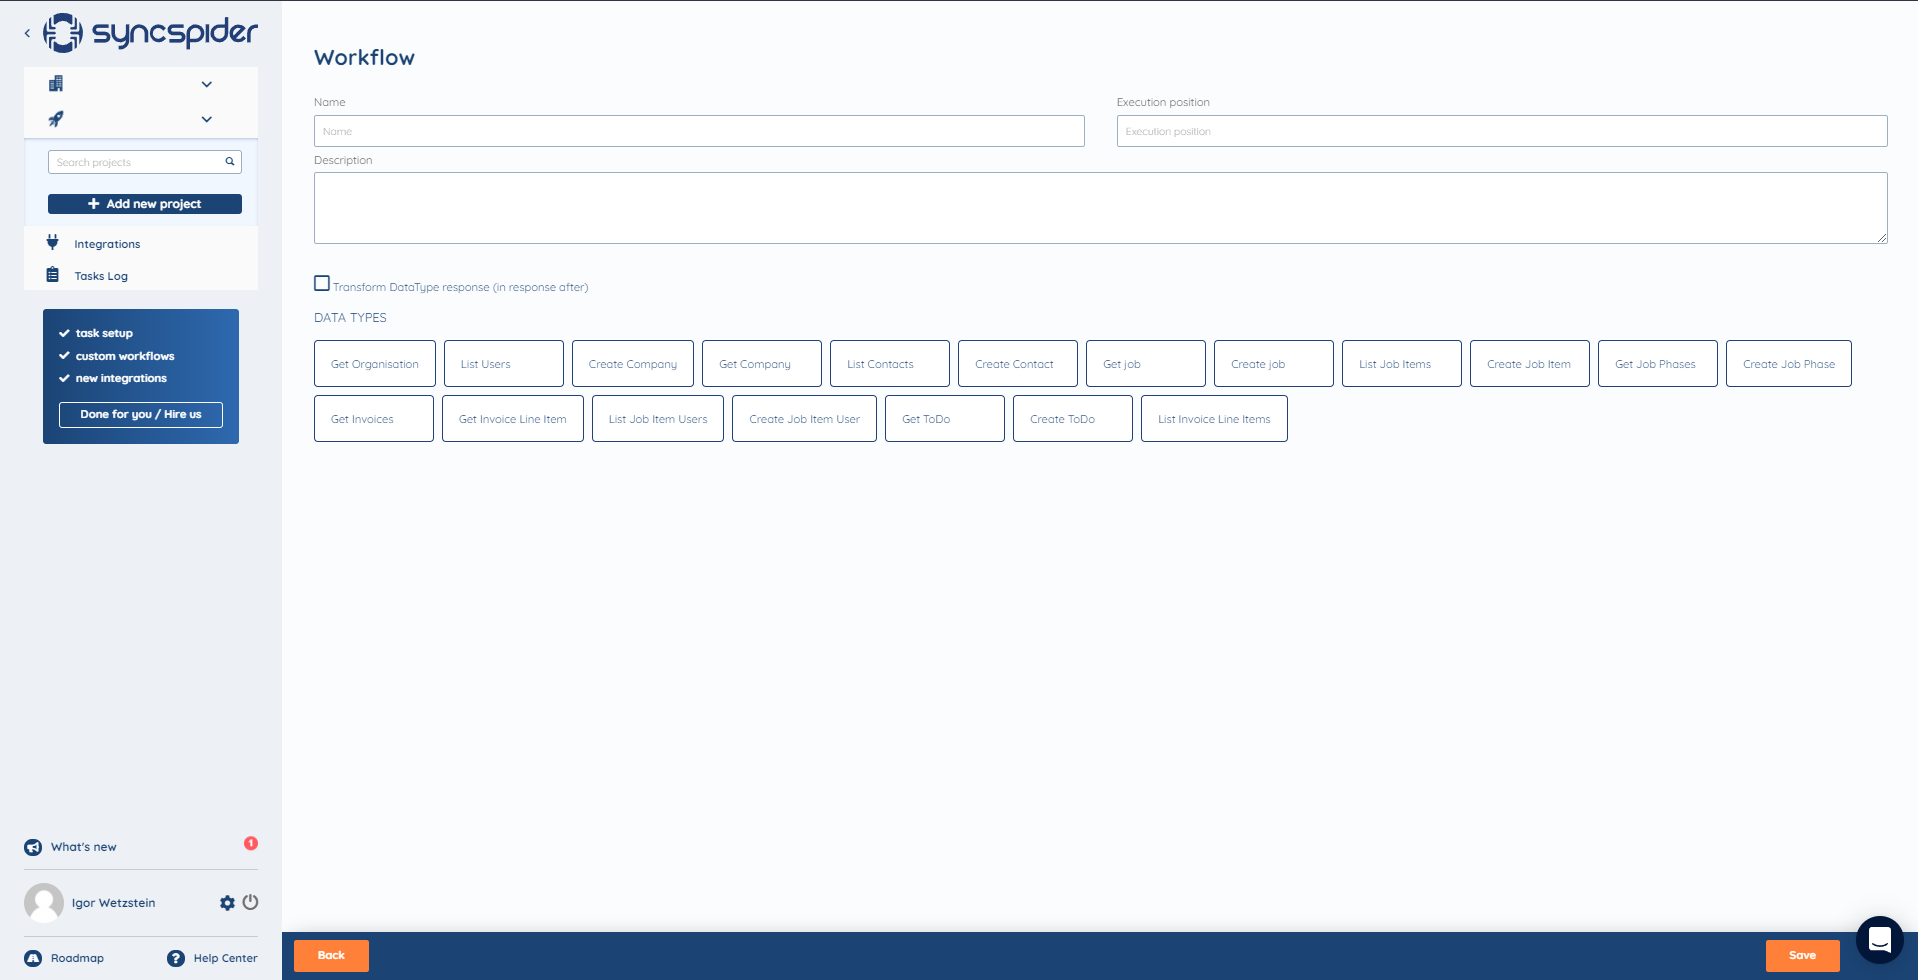
Figure 51. Creating Workflow screen
On this screen, there is:
Name - User can input the name of Workflow
Execution position - is used when on one data type that is interconnected, ie. depending on each other.
Description - User can input text about this Workflow
Transform Data Type response (in response after)
If checked - ...
If not checked - ...
Data Types - in this section, users will see all created Data Types in this Integration.
To create Workflow, it is required to input name and to choose on which Data Type Workflow should be used.
After choosing Data Type, the ACTIONS section will appear like on Figure 52.

Figure 52. Actions section
In the Action section there are several options:
Custom Fields
Add/Modify Schema Field
Data Payload Handler
Response Data Handler
Other
Custom Fields
On an external system is allowed to define some field values, etc. In each of these systems fields can be defined, for example, MyExample, and in this MyExample field users can write whatever they want as value. These types of fields are totally customized only for this account and only for that customer. And then it is necessary to connect Workflow that will be able to read it.
If a user chooses Custom Fields, a new section will appear with new options. Same as on Figure 53.
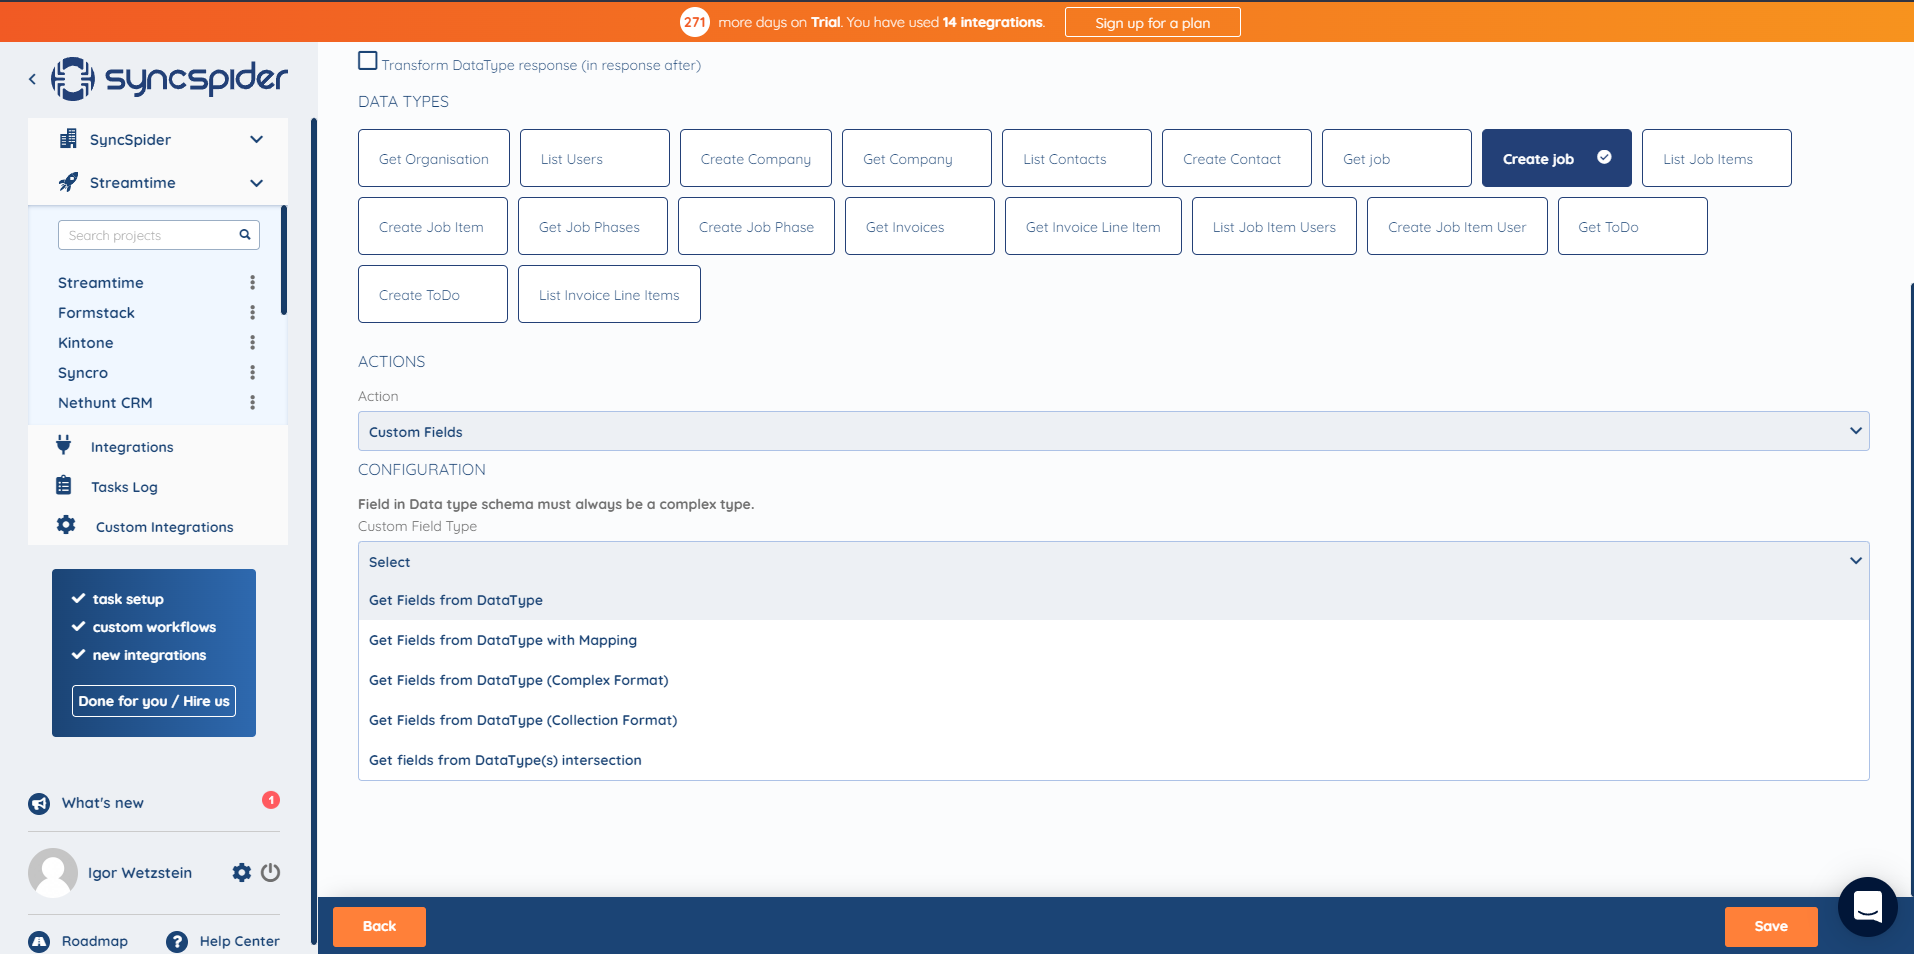
Figure 53. Custom Fields options
Get Fields from DataType
On Figure 54. users can input the name of that custom field and from which DataType users can get data. This means that in this list of endpoints there are already listed custom fields in certain Data Type. Now user wants to choose from which Data Type he wants to pull data so this Workflow can read it.
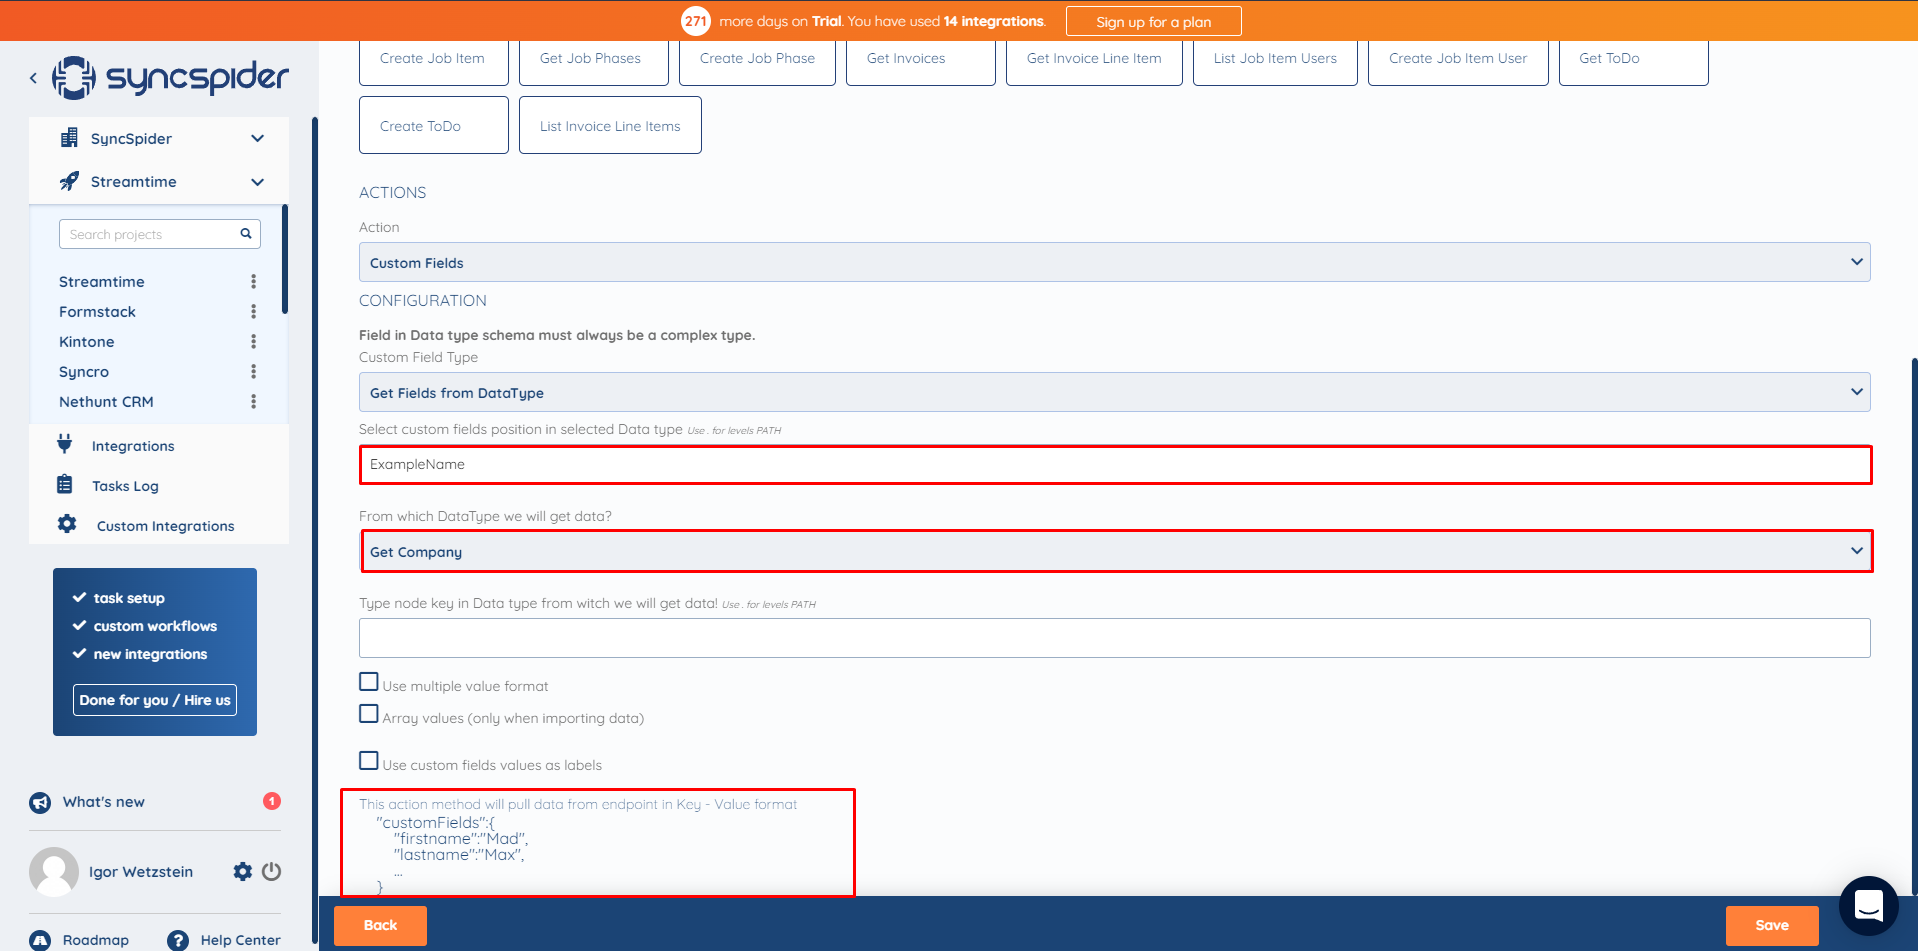
Figure 54. Get Fields from Data Type
At bottom of the page, there is a look at how is defined custom field and if it comes in that format, it will be read by this Workflow. It is already predefined Workflow how he expects to get this data.
When an example is found in the documentation that has a structure like this, then it will be used this type of Workflow.
Get Fields from DataType with Mapping
Example Integration: Automizy
Data Type Examples: Getting all custom fields; Getting a given list
In many systems there is a special endpoint that is called Custom Fields, Get Custom Fields, or similar. That endpoint will only list Custom Fields which are on that account. On Figure 55. there is an example of Custom Field in Automizy documentation.

Figure 55. Automizy - Custom Field
In Contacts, there is a need to get those Custom Fields so we could get a list. They appear in the following form shown on Figure 56.
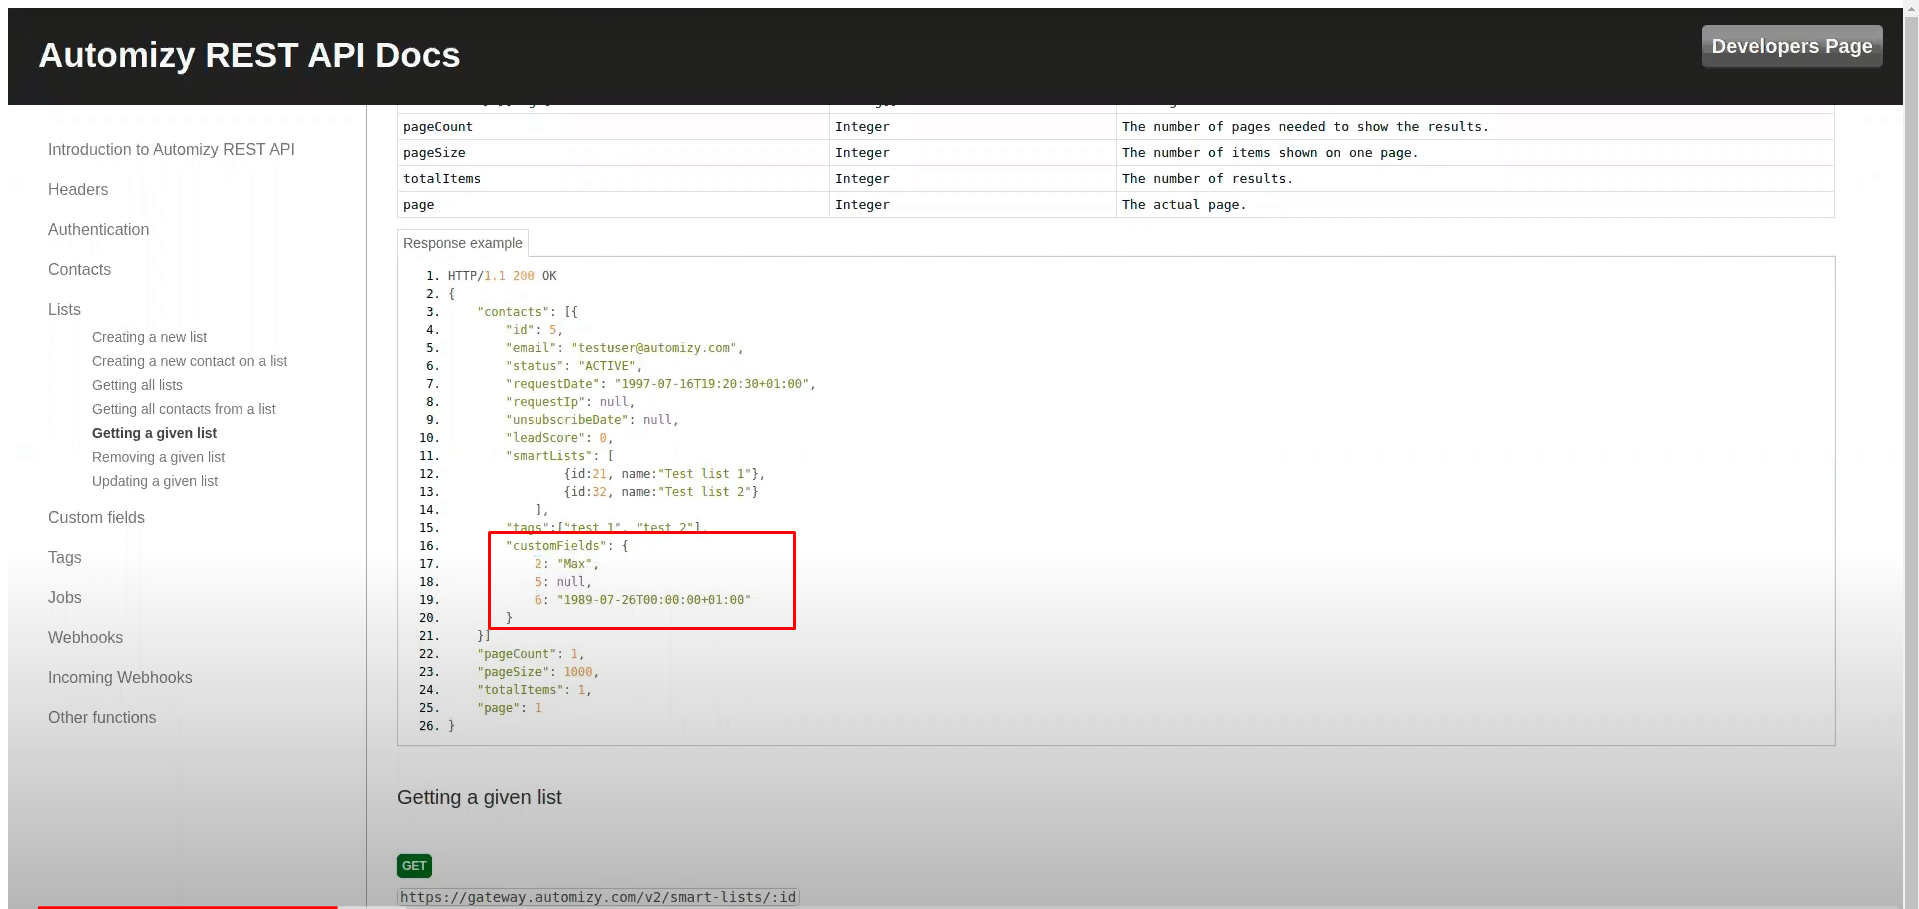
Figure 56. Automizy - Custom Fields - Contact
On Figure 56. there are Custom Fields attributes. It can't be determined which one is exactly that Custom Field. In this example, first, we need to pull all custom fields, and pull id's and match it with the name of those custom fields.
On Figure 57. there is a configuration of Custom Fields. We choose for which endpoint we want to use Custom Fields, after that, we choose action Custom Fields, after that Get Fields with Data Type with Mapping.
Next, we need to fill the section "Select custom Fields position in Selected Data Type". Here, we will write the position in the schema, that is a position of Custom Fields in Documentation. In this example, it's customFields. After that, we choose from which Data Type we want to get data. That's CustomFields. Key is id, Name is a label, they will match by that. In Custom Fields it can be seen what type is particular Custom Field. So we have to list all of them and configure them.
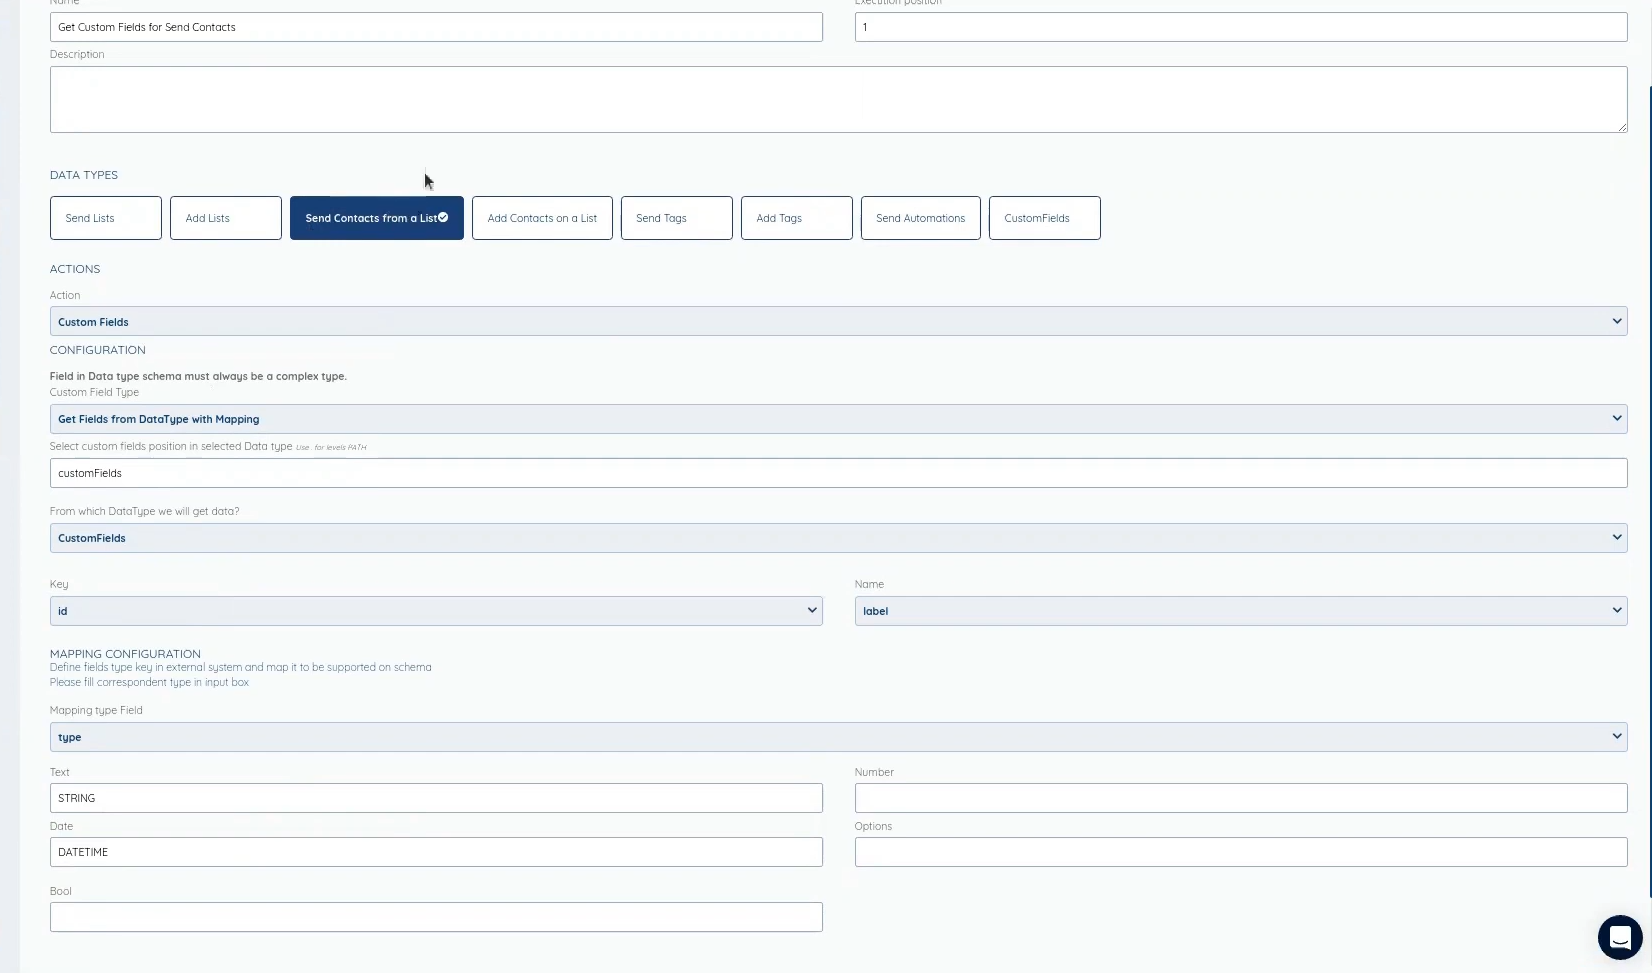
Figure 57. Configuration of Custom Fields
Get Fields from DataType (Complex Format) - ...
Get Fields from DataType (Collection Format)
Example Integration: ClickUp
Data Type Example: Get Accessible Custom Fields
There is a special endpoint regarding Custom Fields and they are in the format as in Figure 58.
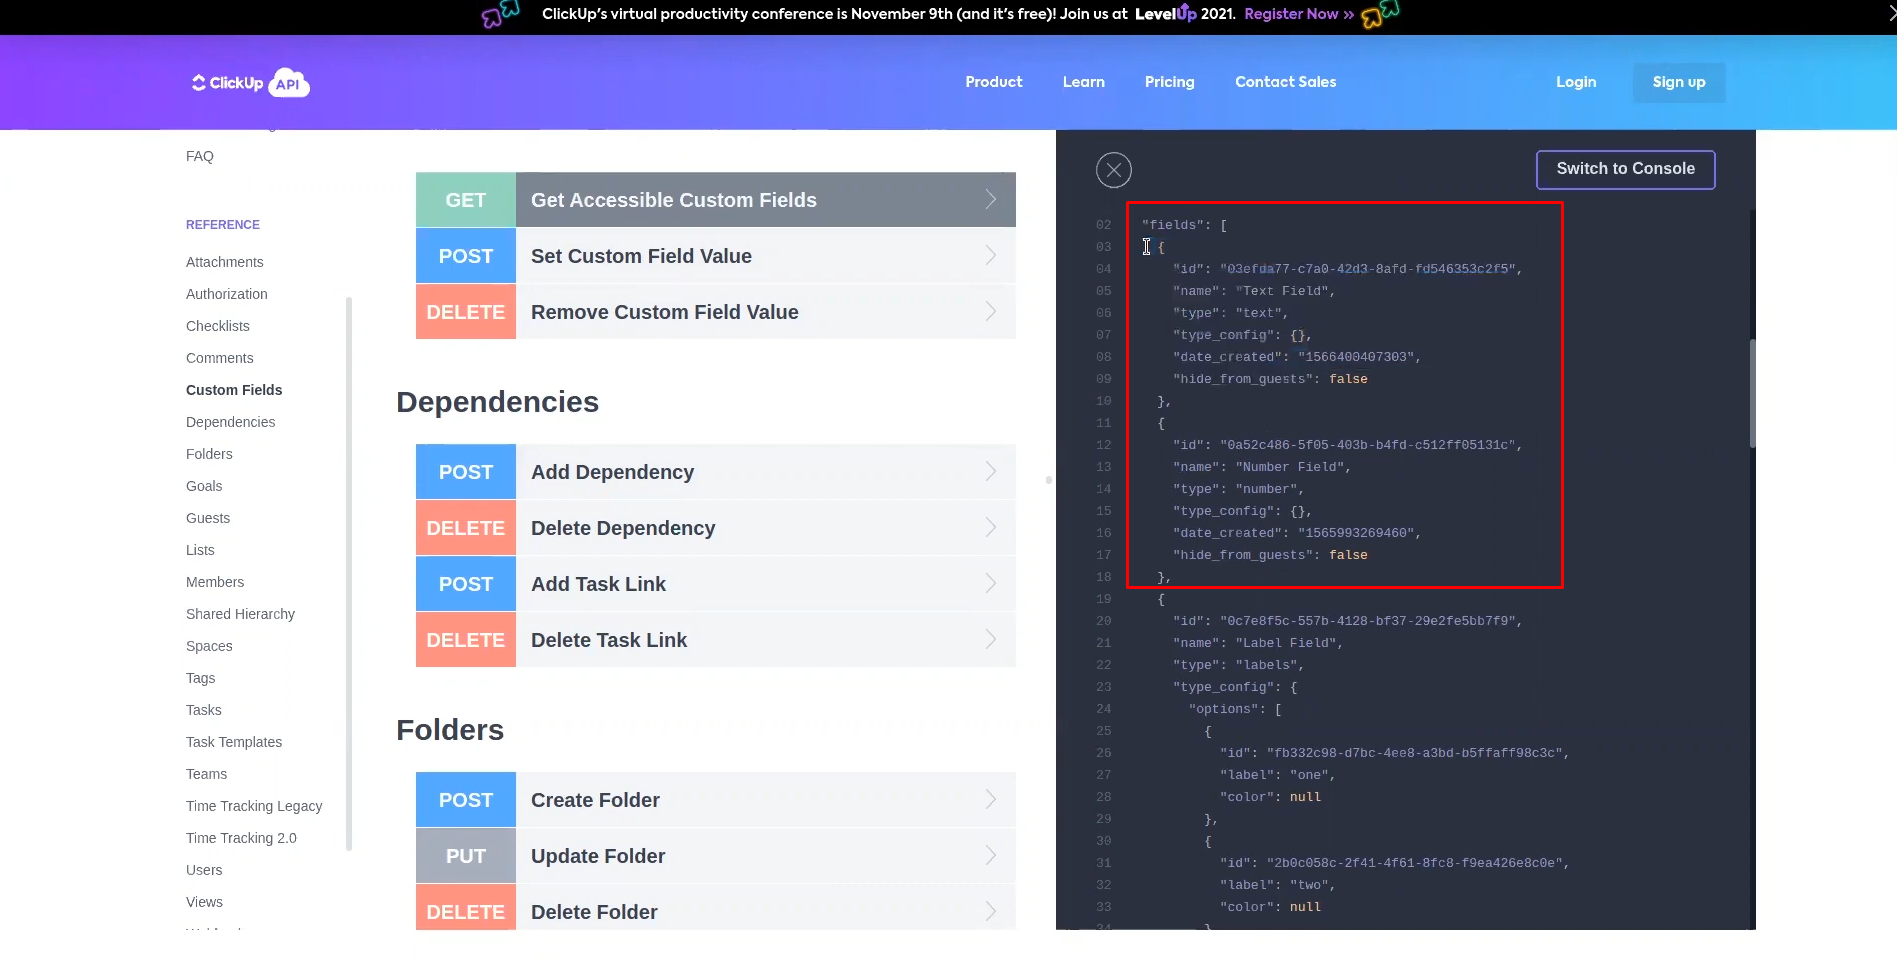
Figure 58. Custom Fields Format
On Figure 59. is shown the Configuration of Get Fields from DataType (Collection Format).
First, a user needs to choose from which endpoint he wants to add Workflow. After that, he chooses Custom Fields as action and he also chooses Get Fields from DataType (Collection Format) because it gives us back collection inside of Custom Fields.
Next, it is necessary to look where Custom Fields are in the schema, ie to find a position. After that, he needs to choose from which Data Type he wants to get that Custom FIeld. In this case, there is a special endpoint for that.
After that, it needs to be set id, name, and value in those fields and needs to be chosen in the option "Select how to send data", Collection, because it has been said in the documentation that it needs to be sent as Collection.

Figure 59. Configuration of Collection Format
Get Fields from DataType(s) Intersection
Example Integration: Smaily
Data Type Example: Send All Subscribers
There are fixed fields and fields like birthday, first_name, etc. So we have plain fields and custom fields. There is json like this because custom fields are not separated into a separate complex or collection. The goal is to pull the whole schema and remove from it what is the default, and what is left will be custom fields. An example of json is on Figure 60.
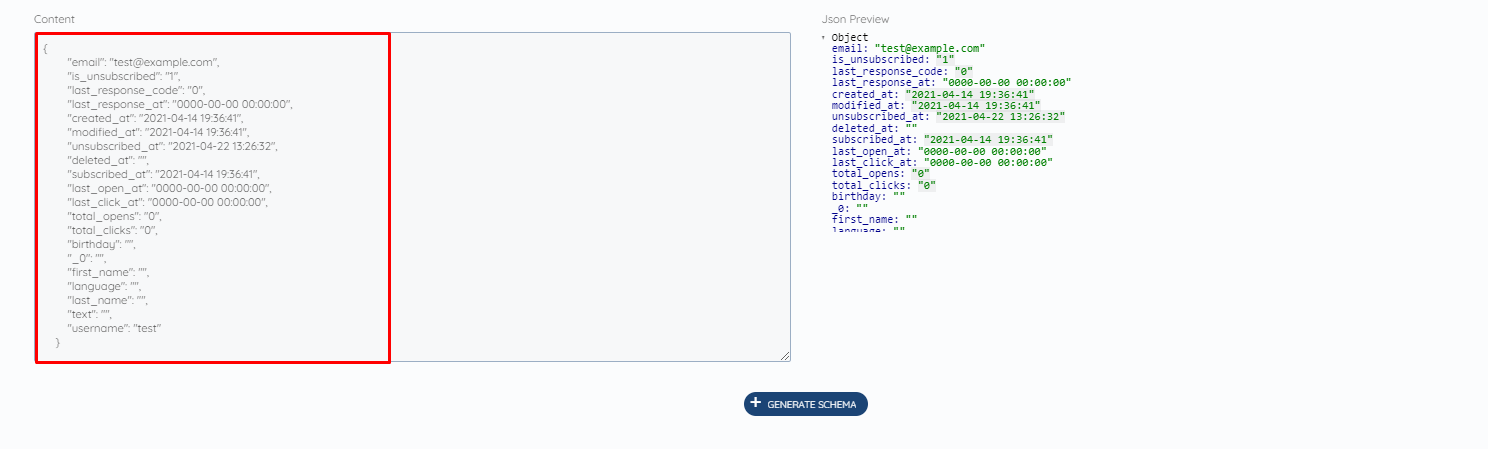
Figure 60. Json Example
On Figure 61. users can see the configuration of the Intersection. A request will be sent to that endpoint and some kind of json will be obtained in the response, so these default fields, which will always be the same, will be removed from that response. Fields that are not always the same will be added to these fields, which are custom fields. Therefore, in the section "Enter key response that needs to be excluded in the schema", fields that are always the same will be entered.

Figure 61. Configuration of Get Fields from Data Type(s) Intersection
2. Add/Modify Schema Field
There are two types in Add or Modify section:
Add New Field
Modify Existing Field
If the user chooses Add New Field option he will have additional options in the Select operation section.
Concatenate - ...
Use encryption - ...
Combine - ...
Calculate - ...
Date Transformation
This type is used when the user wants to transform the date in a certain date format that is going to be input in Mapping Screen for a certain Data Type. Here, the user will create a new Date by entering the name of the Data Type. Date Formats can be seen by clicking the button Select in the Select Date Format section and the last one, the user will choose the source attribute for that new field.
An example of Date Transformation can be seen in Figure 62.
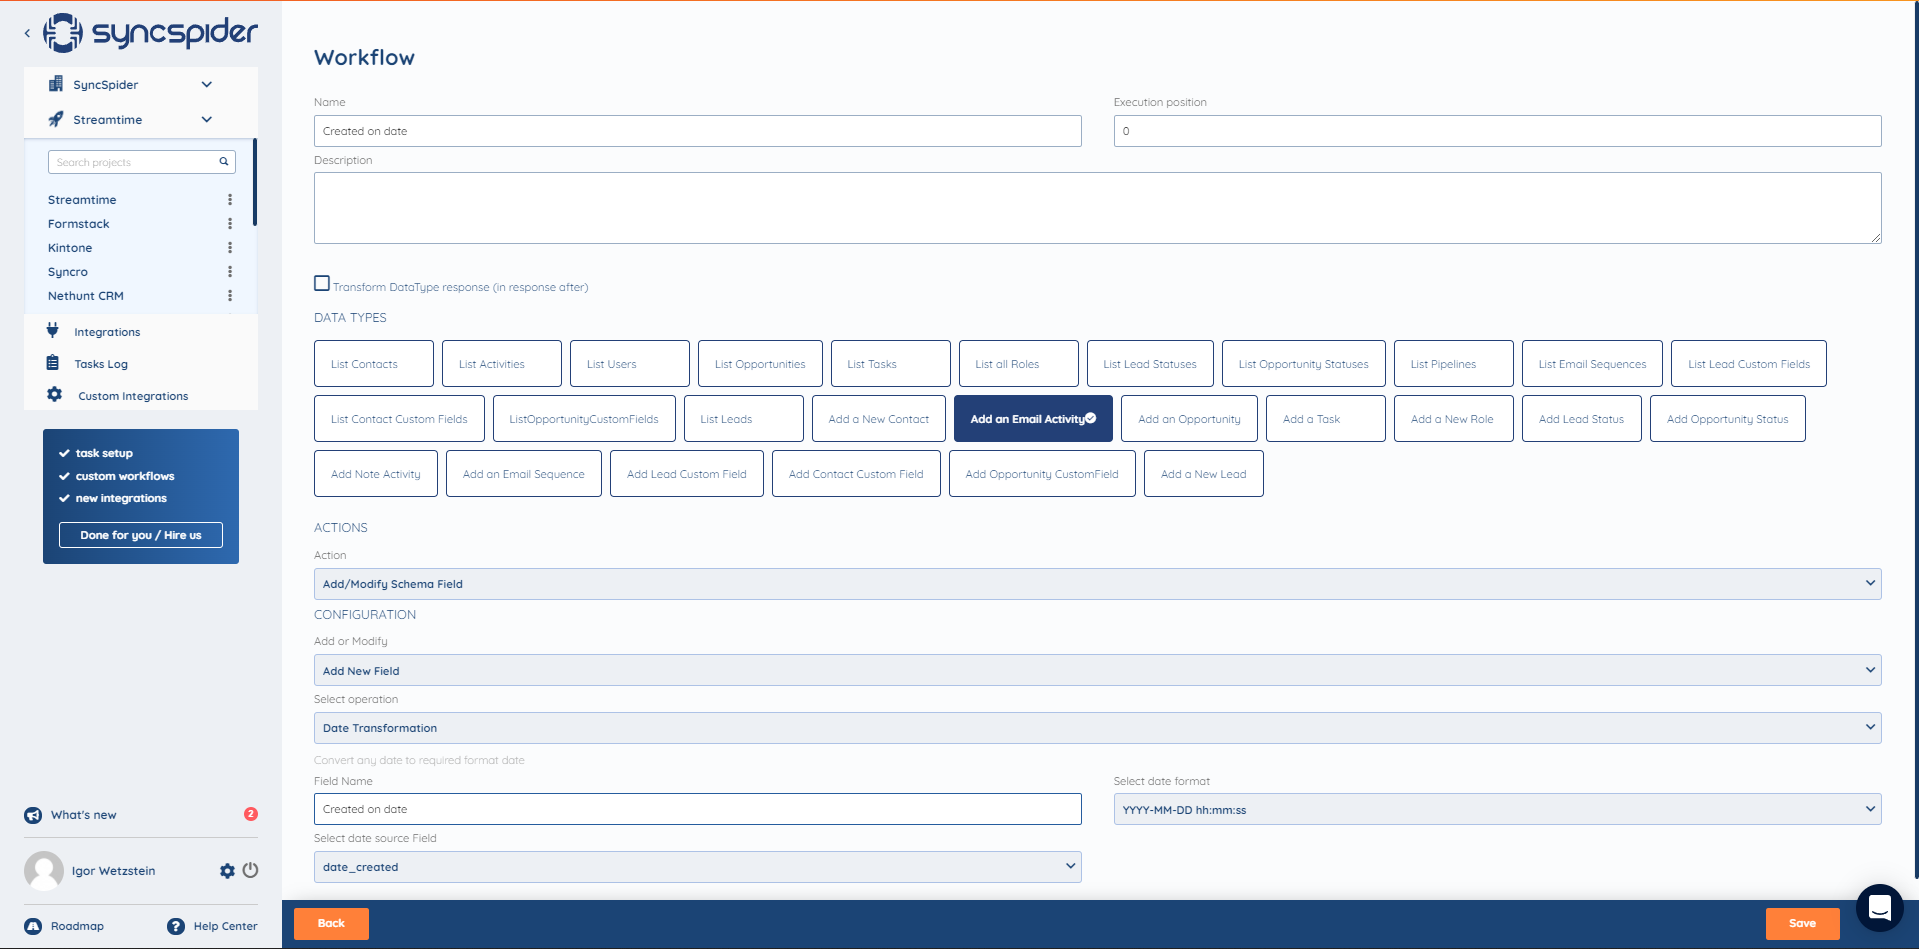
Figure 62. Date Transformation
Extract
Example Integration: LiveStorm
Data Type Example: List People for an Event
In the basic scheme, a collection is given that has, for example, id, name, and value. Now we want a field to appear at the bottom of the schema which in this case will be called registrant_details. Currently, only the value of the field is displayed. Id, name, phone, email, etc. are not displayed. In order not to display it as a collection, the extract will be applied and in registrant_details it will be displayed e.g. first_name, last_name, email which when mapped to the Mapping Screen will get their value.
On Figure 63. is an example of fields that should be extracted.

Figure 63. Example of Field
On Figure 64. is an example of the position in Path to collection field support dot (.) in the documentation of Integration.
It is important to see how it is nested.

Figure 64. Path to collection
On Figure 65. is shown the configuration of this type of Workflow. By placing "Use Value as Value", a user wants to take the value of that field. Another option is "Use Key as Value". In that case, a user would take id's of those fields.

Figure 65. Configuration of Extract Workflow
Options
Same example as for Options in Modify Existing Field.
Remove Empty Values - ...
Merge Data Type
Example Integration: Cs-Cart
Data Type Example: Send Orders; Send Order Details
On Figure 66. users can see the Config screen for Endpoint Send Order Details.

Figure 66. Config Screen for Send Order Details
Endpoint Send Orders, It does not give all the attributes and then connects to the Send Order Details. In Api Endpoint, there is {workflow} in url. {workflow} is used mainly in Merge Workflow. When {workflow} is hooked to a url, it means that it uses a workflow that will pick up the id to be continued on the url.
For example, for each Send Order it will throw out 10 results, each will have its own id, and for the endpoint Send Order details there should be a specific id order to get information about it.
It will be picked up from the basic Data Type, Send orders and ids and pinned to the url and thus get for each of them and its details.
On Figure 67. there is a configuration example of Merge Data Type.
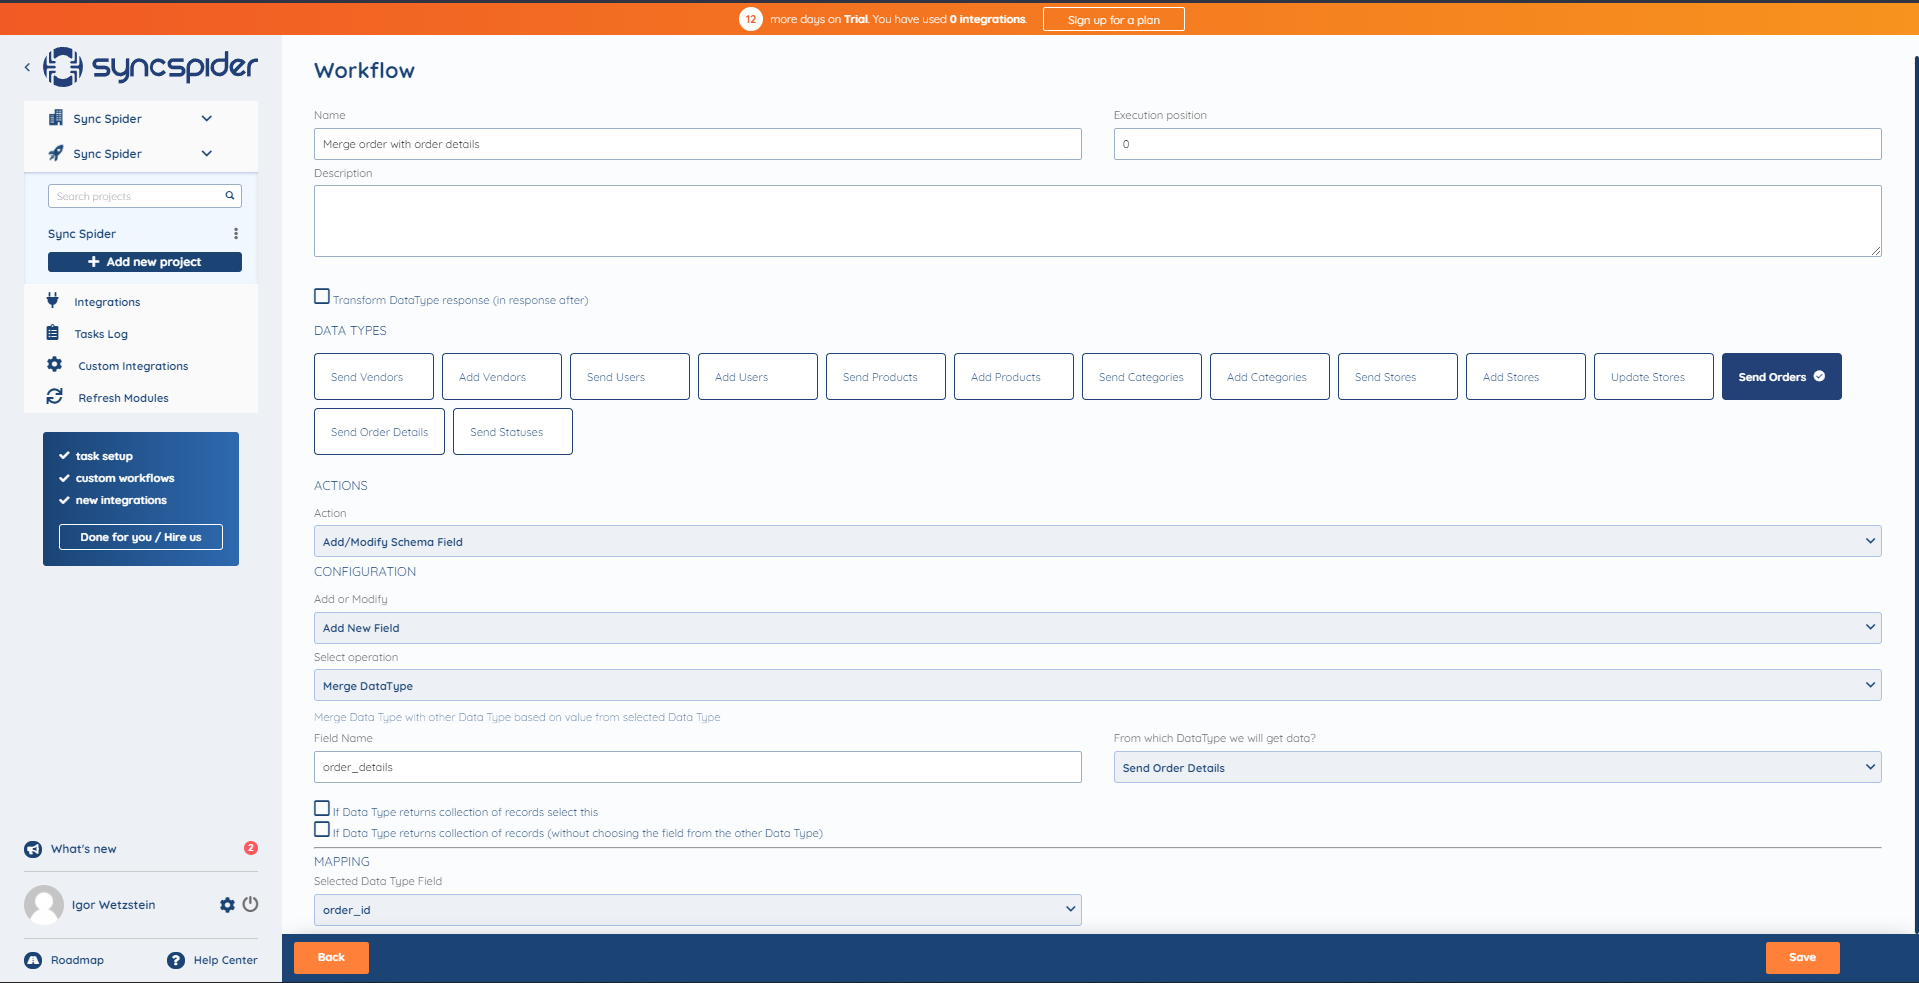
Figure 67. Configuration of Merge Data Type
A new field with a new name will be added and it's going to be type Complex. It will contain all the fields from the second Data Type.
Generate Schema from step
Example Integration: Abyssale
On Figure 68, users can see that in API Endpoint there is template_uuid. In this case, in that place, there will be id that will show on an external system.

Figure 68. Example Config Screen for this Workflow
In this case, Clients will get one textbox, like the one on the Configuration screen of Data Type where users put json. For this integration and for some other certain integrations, for a certain type of template banner, there is a certain json that is created on an external system. That means that there is no special documentation, no schema. Depending on the settings that are going to be selected, json will be generated. Clients/Users will from that json generate schema by fields that were selected.
On Figure 69, there is an example of created json.
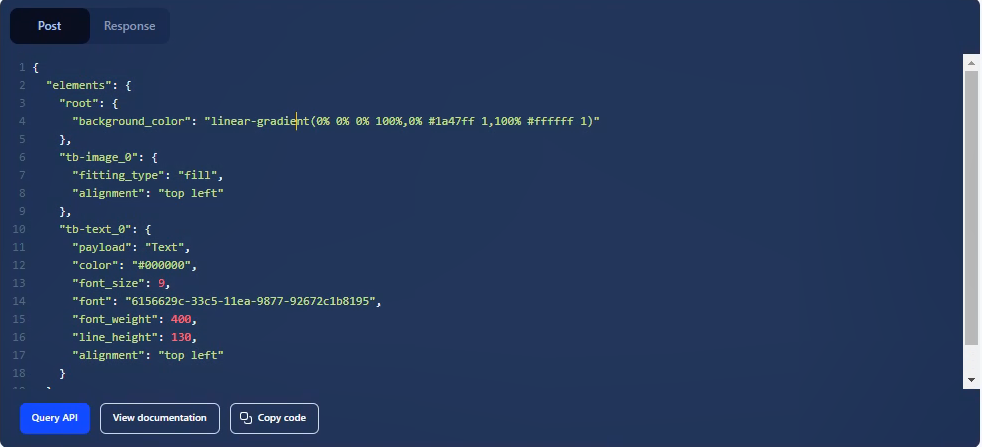
Figure 69. Generated json from settings
Json Decode - ...
Request Hidden Field - ...
Generate Fields From Data Type - ...
Add Collection Counter - ...
Add Regular Expresion - ...
Add or modify hierarchy field - ...
Custom Field Manager
Example Integration: Fluent CRM
If the user chooses Modify Existing Field option he will have additional options in the Select operation section.
----------------------------------------------------------------------------------------------------------------------------
Concatenate - ...
Use encryption - ...
Combine - ...
Calculate - ...
Date Transformation
Same example as for Date Transformation in Add New Field. The only difference is that here the user is modifying the field. An example is on Figure 70.

Figure 70. Example of Date Transformation in Modify Existing Field
Extract
Same as the previous Extract option in Add Schema Field option.
Options
There is an example on Figure 71.
There is a type and he has values 1 and 2. It won't mean anything to users if they see in Mapping Screen numbers 1 and 2 because they don't know what those numbers represent. That's why we use this type of Workflow.

Figure 71. Example of type with options in the documentation
For this example, after usage of this Workflow, in the Mapping screen users will see Organizations and Contacts.
We choose Add/Modify Schema Field, Modify Existing Field, and Options in the following steps.
Next, a user needs to choose in which attribute this should be applied. In this case, it is type.
In Figure 72, in the following fields, users will place the value of that type and label he wants to be seen on the Mapping screen. Also, the box, Value is an integer, will be checked, because there is an integer value. After this, the user needs to click on the "+" button to add that option field. An example of Configuration is on Figure 72.
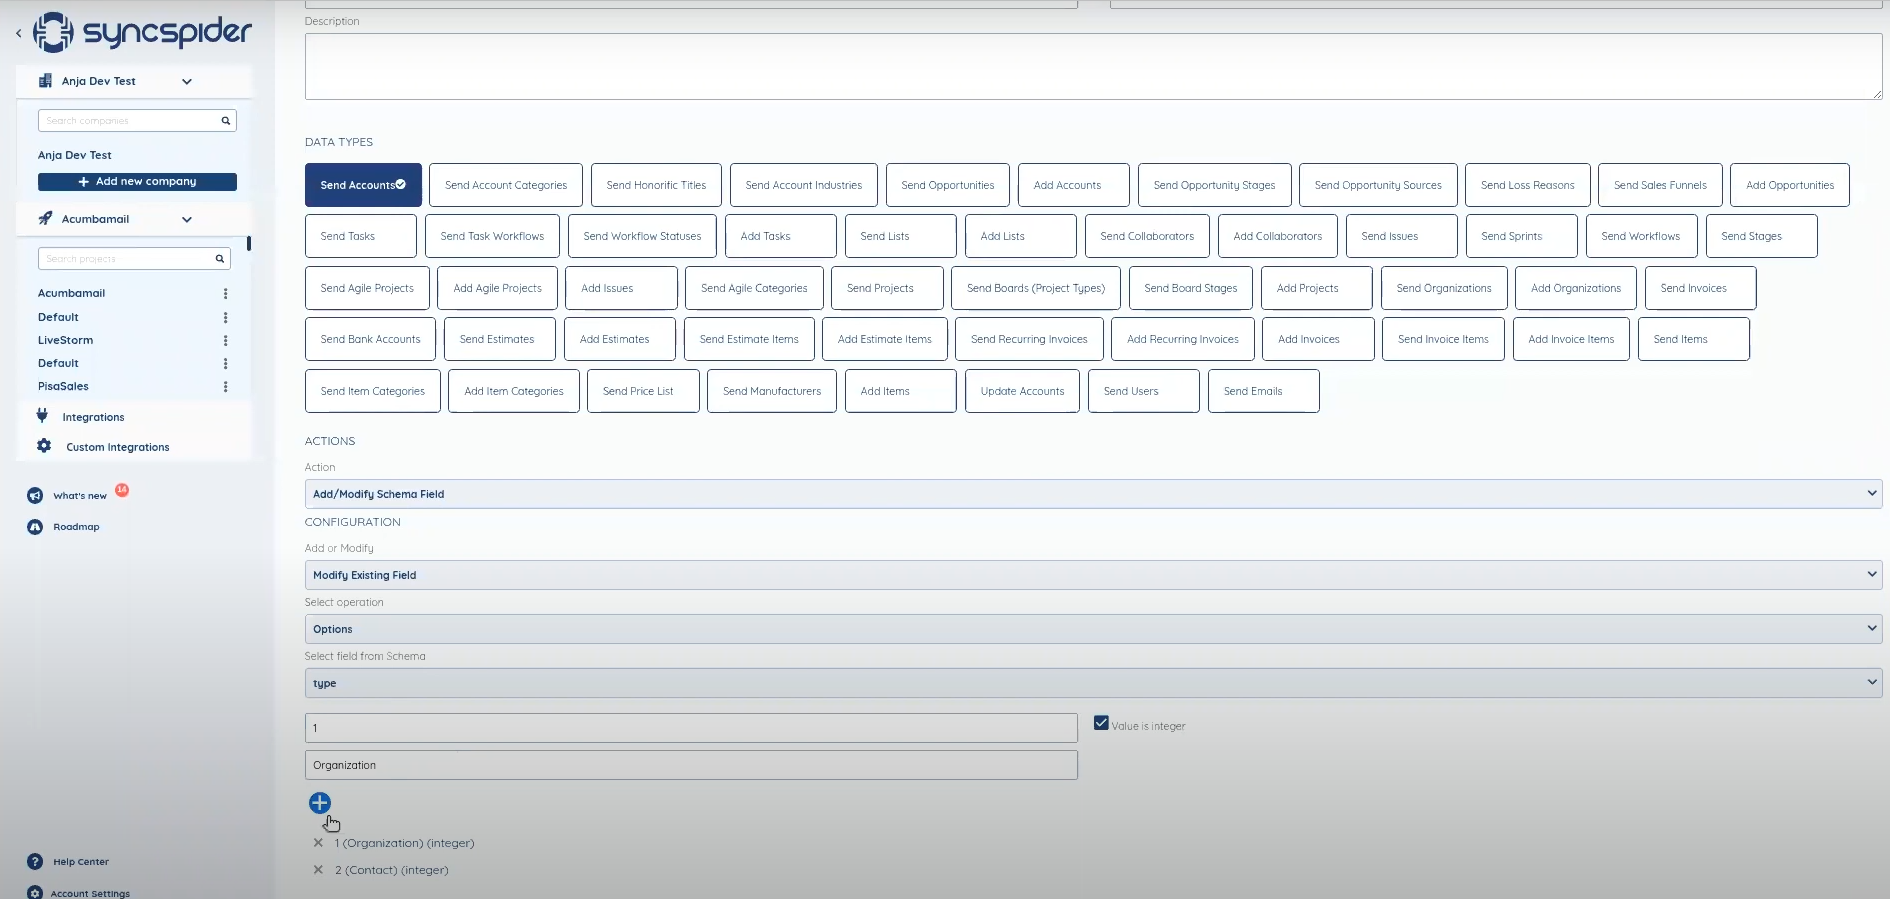
Figure 72. Configuration steps
Remove Empty Values - ...
Transform
Integration Example: helloCash
On Figure 73. users can see Configuration of Workflow Transform.
For example for this integration, Create Invoices, there is no such field as article_code. It can not be sent.
Here it is done so that the client maps the article_code and data will be pulled from Get Articles since Get Articles contains article_code, article_name, and article_id. Matches for a specific code if there is a corresponding name for that article_code. If exists, it will send that name and everything will be matched.
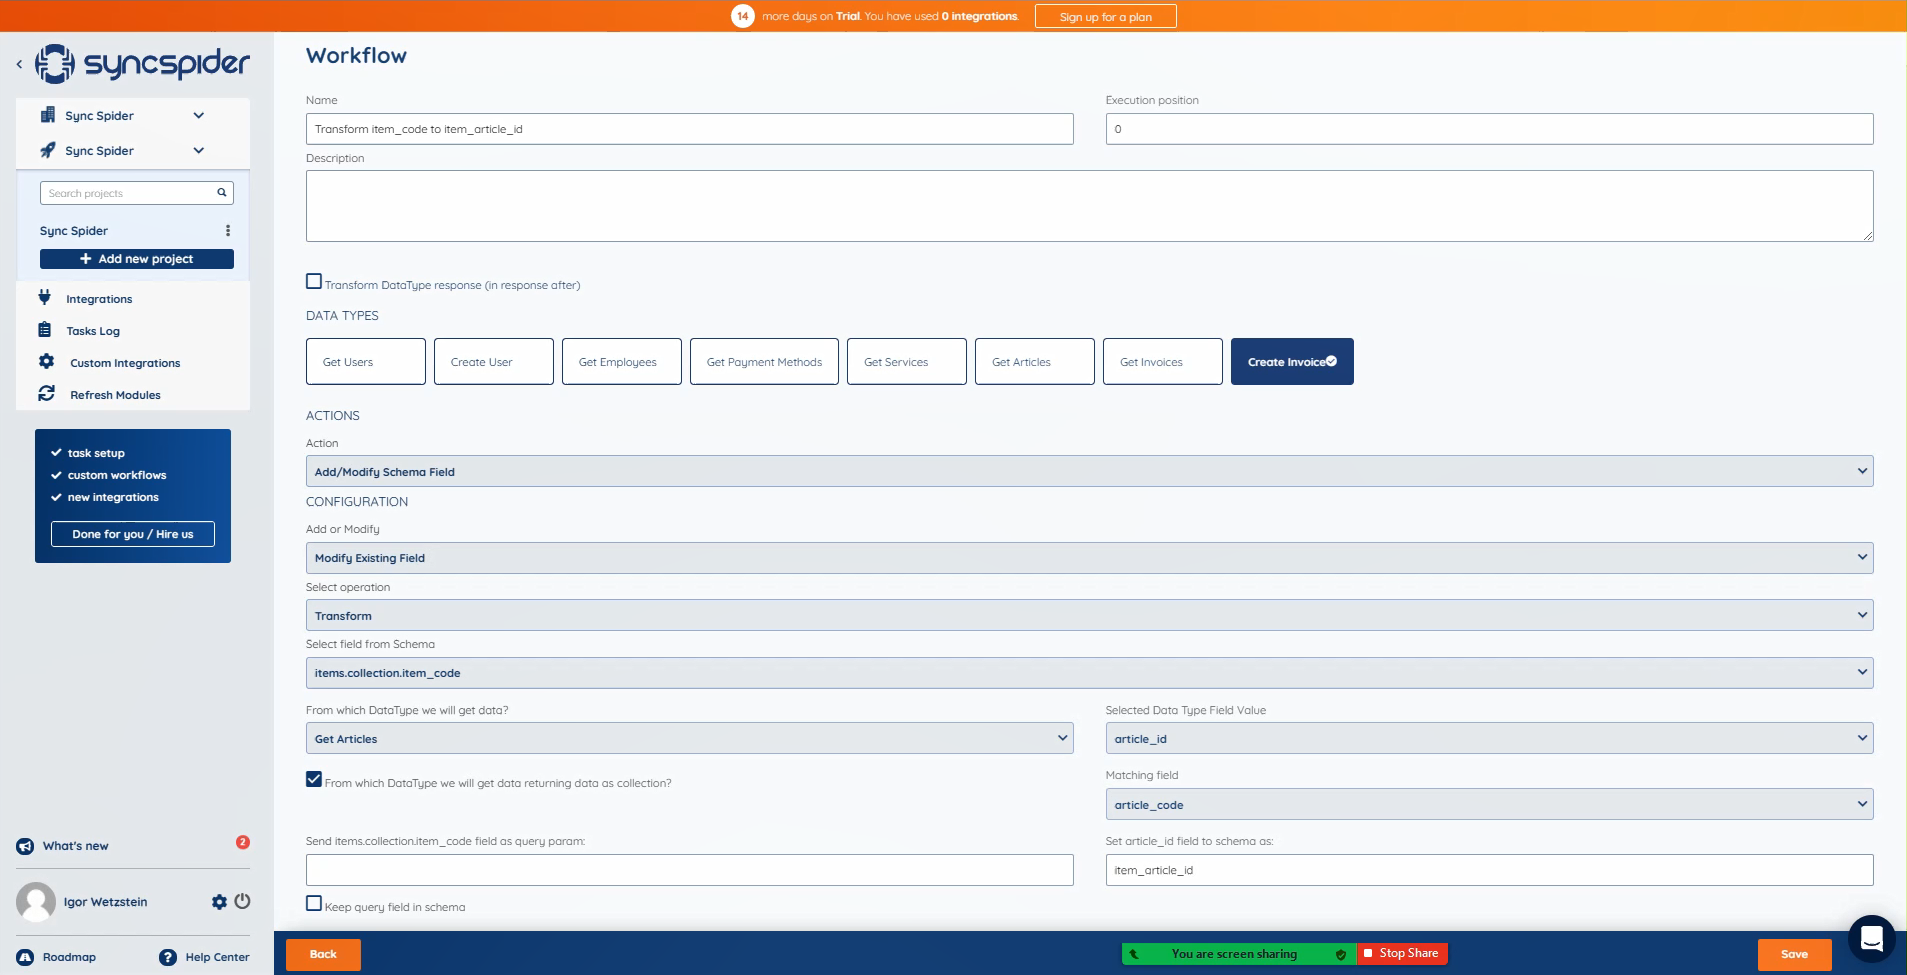
Figure 73. Workflow Transform
Json Decode - ...
Generate Fields From Data Type- ...
Add Label To Schema Field
This one is used when the user wants to rename some fields in Mapping Screen. An example of configuration is shown on Figure 74.
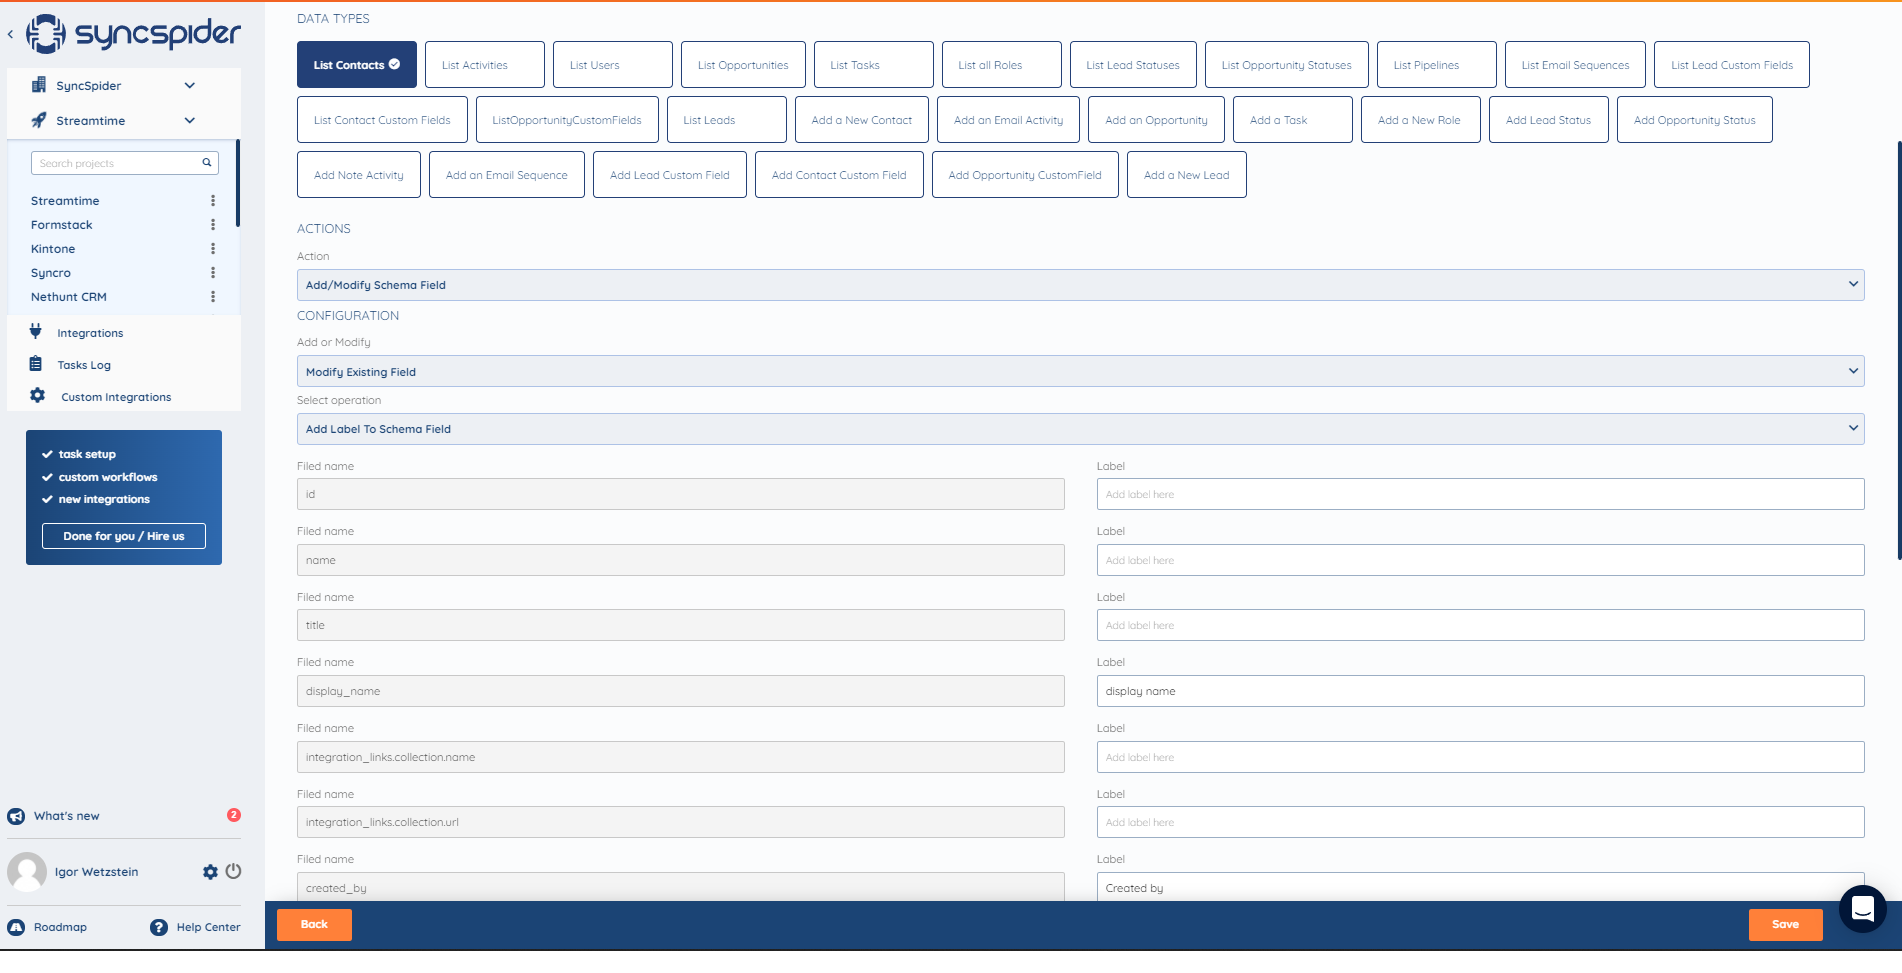
Figure 74. Add Label to Schema Field Example
Add Regular Expresion - ...
Add or modify hierarchy field - ...
3. Incremental Import
It is used mainly for Orders. When the client has already completed one task where he transferred all Orders he has.
There is usually a schedule for those tasks that are executed after a certain period and then it's important not to transfer the same Orders that are already on the same account than to transfer only those Orders that are new from a certain date.
In section, Select Type, there are two types: API and Schema.
API is used when the user wants to send parameters in a query.
On Figure 75. there are Requested Parameters. When a parameter begin is sent with some date, then will only be listed Orders from that date and further.

Figure 75. Requested Parameters
We choose the format of the date that is in column Value on Figure 76 and we write begin in QueryParams section. After that, we choose Dynamic Value because he will be updated every time from the last task. When the last task is completed, that date will be written, and from that date onwards, all orders will be added that are in the meantime added.
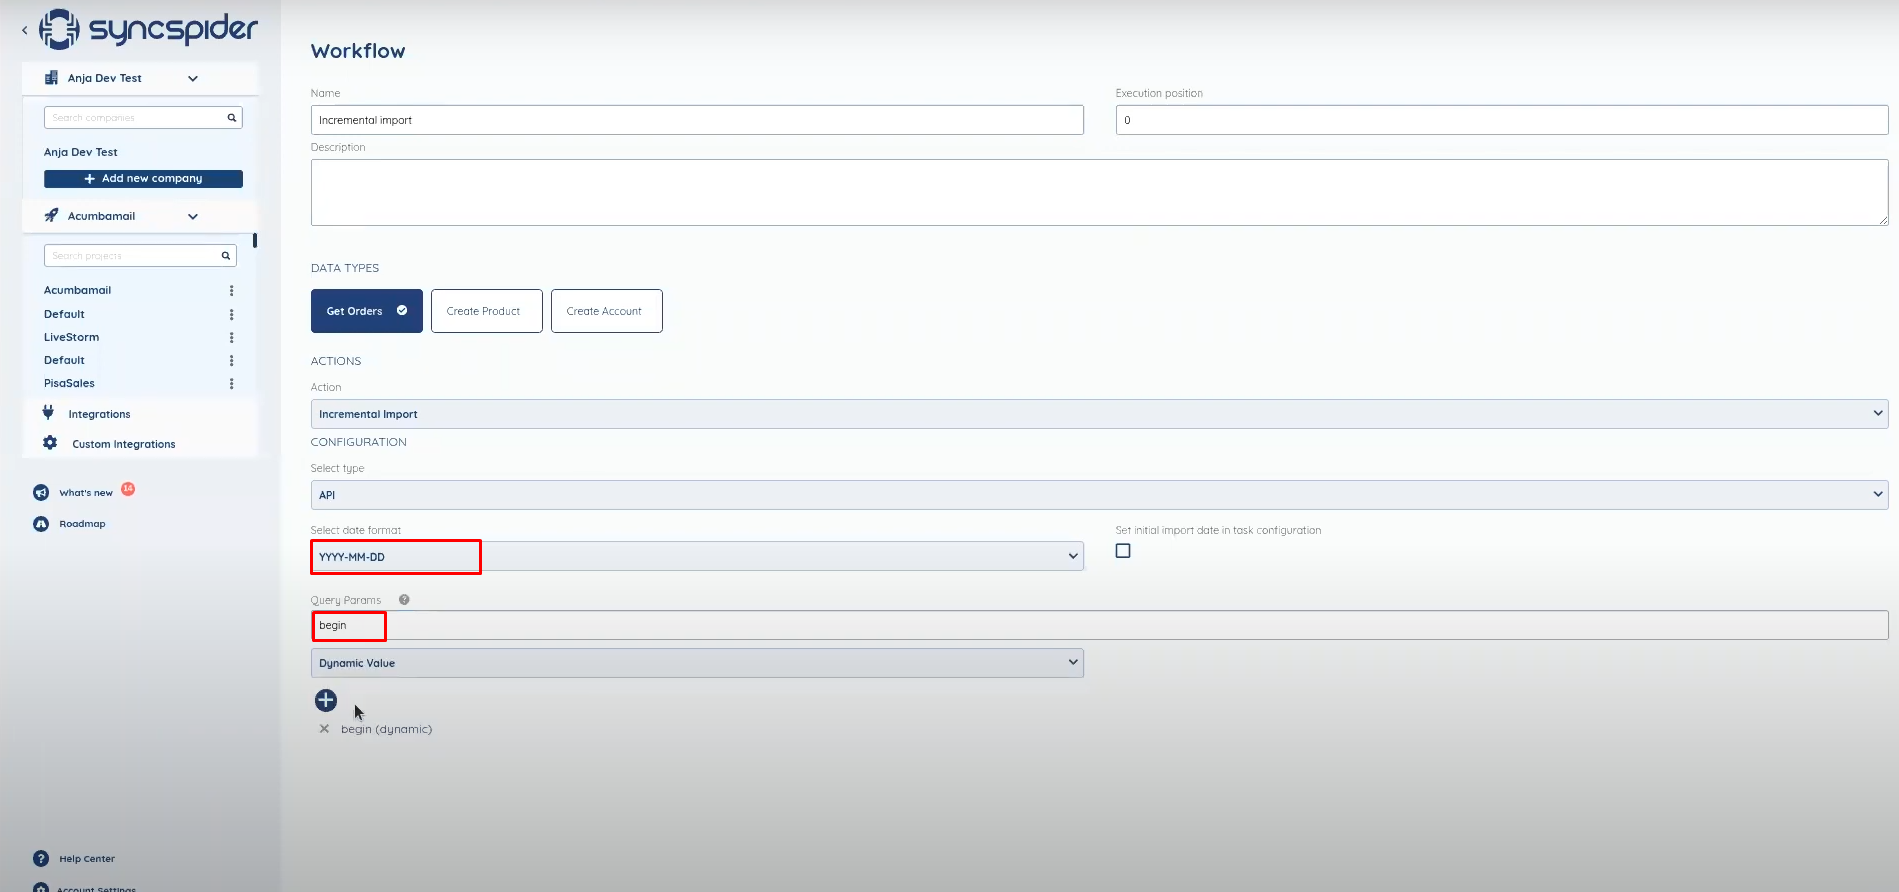
Figure 76. Configuration of Incremental Import
Option schema is not using a query that already exists, it is using a field from schema. For example, there is field created_at, depending on that field, users use Incremental Import Workflow. The principle is very similar.
4. Data Payload Handler
Mostly is used when is needed to add another parameter.
From section Choose action operation we choose "Add New Param". We set the name to that parameter and then in the section Parameter type, it is chosen which type parameter will be. It can be Constant Value, Text-Free form, Bool Value, Number Value, Get Data from Data Type, Get Value from Connection Config.
In this example, we will use Get Data from Data Type.
With checked fields, it will be shown in Pre-mapping(Config) Screen and value will be sent in the header.
Next, we choose from which Data Type will take data and after that, he will search for a way to recognize it. We will choose id as a key and we will display it as Value in form of a name. After that, a user needs to click on the button to Add Parameter Configuration to add this parameter configuration.
An example of Configuration Data Payload Hander is shown on Figure 77.

Figure 77. Configuration of Data Payload Handler
5. Other
Created for specific integrations.
Developers create custom Workflow for certain integrations.
6. Webhooks -
.....
Was this article helpful?
That’s Great!
Thank you for your feedback
Sorry! We couldn't be helpful
Thank you for your feedback
Feedback sent
We appreciate your effort and will try to fix the article