TABLE OF CONTENTS
- What are webhooks?
- Why would I want to use Webhooks?
- How do I know if I can use the Webhooks module?
- How do I set this up?
What are webhooks?
Webhooks are a way for apps to communicate between them automatically. You can register a webhook by registering the URL to notify once given events occur.
The route created holds the logic to be executed once the event occurs.
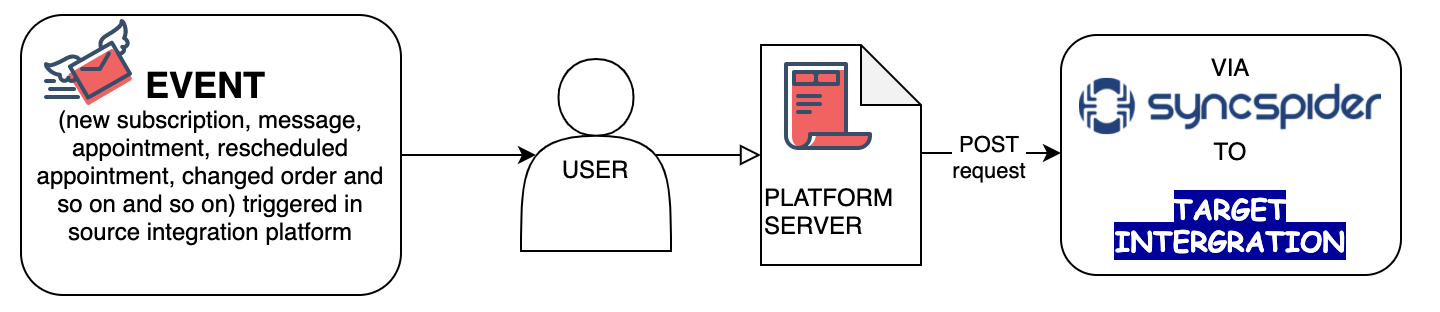
This way, a system doesn't have to know the nature of what needs to be executed, it only needs to keep track of the routes to notify. Once the trigger event occurs, a POST request is sent to the pre-defined URL with a number of data fields.
To simplify this you can view Webhooks as placing a dog next to your front door which will bark every time someone shows up to your home. In this case the observation of a visiting would be the equivalent of a trigger event with the footsteps your dog hears, the barking is a POST request sent to you, and, you guessed it, the dog's name is Webhook.
Here's an approximate visualization of how it all works.
Why would I want to use Webhooks?
It's a simple way to import data from any system AND you don't have to run synchronisations all the time! The system will now to send the data once the trigger event occurs. This is especially useful for systems that don't have a full integration yet since you don't need to wait in order to obtain data and send it where you need it. Hundreds of scenarios are the use cases: get lead, order, appointment or any other added or updated entity synchronized to your other platforms immediately.
How do I know if I can use the Webhooks module?
Webhooks are a relatively new technology, hence some platforms might not have this option yet. Simply open your favorite search engine and type in the name of your desired integration + webhooks in the search bar. In most cases one of the first three links will give you an explanation on the current webhooks situation within the platform. WATCH OUT, sometimes webhooks integrations can be a paid add-on or limitations might be set by the system. Additionally, make sure you can trigger an event you'd like to be the trigger, you'll need this as a so-called "webhook response" during setup.
So, summary of the pre-requisites:
make sure the platform supports webhooks
check if using webhooks is free (it is rarely a paid feature, but still happens)
be prepared to replicate your desired trigger event during setup
How do I set this up?
Intrigued? That's no surprise, Webhooks are a great tool! Let's get hooked then...
Before you dive in this overview of how the setup is done might be helpful.
Step 1.
Go to your Integrations page or create a new task.
Step 2.
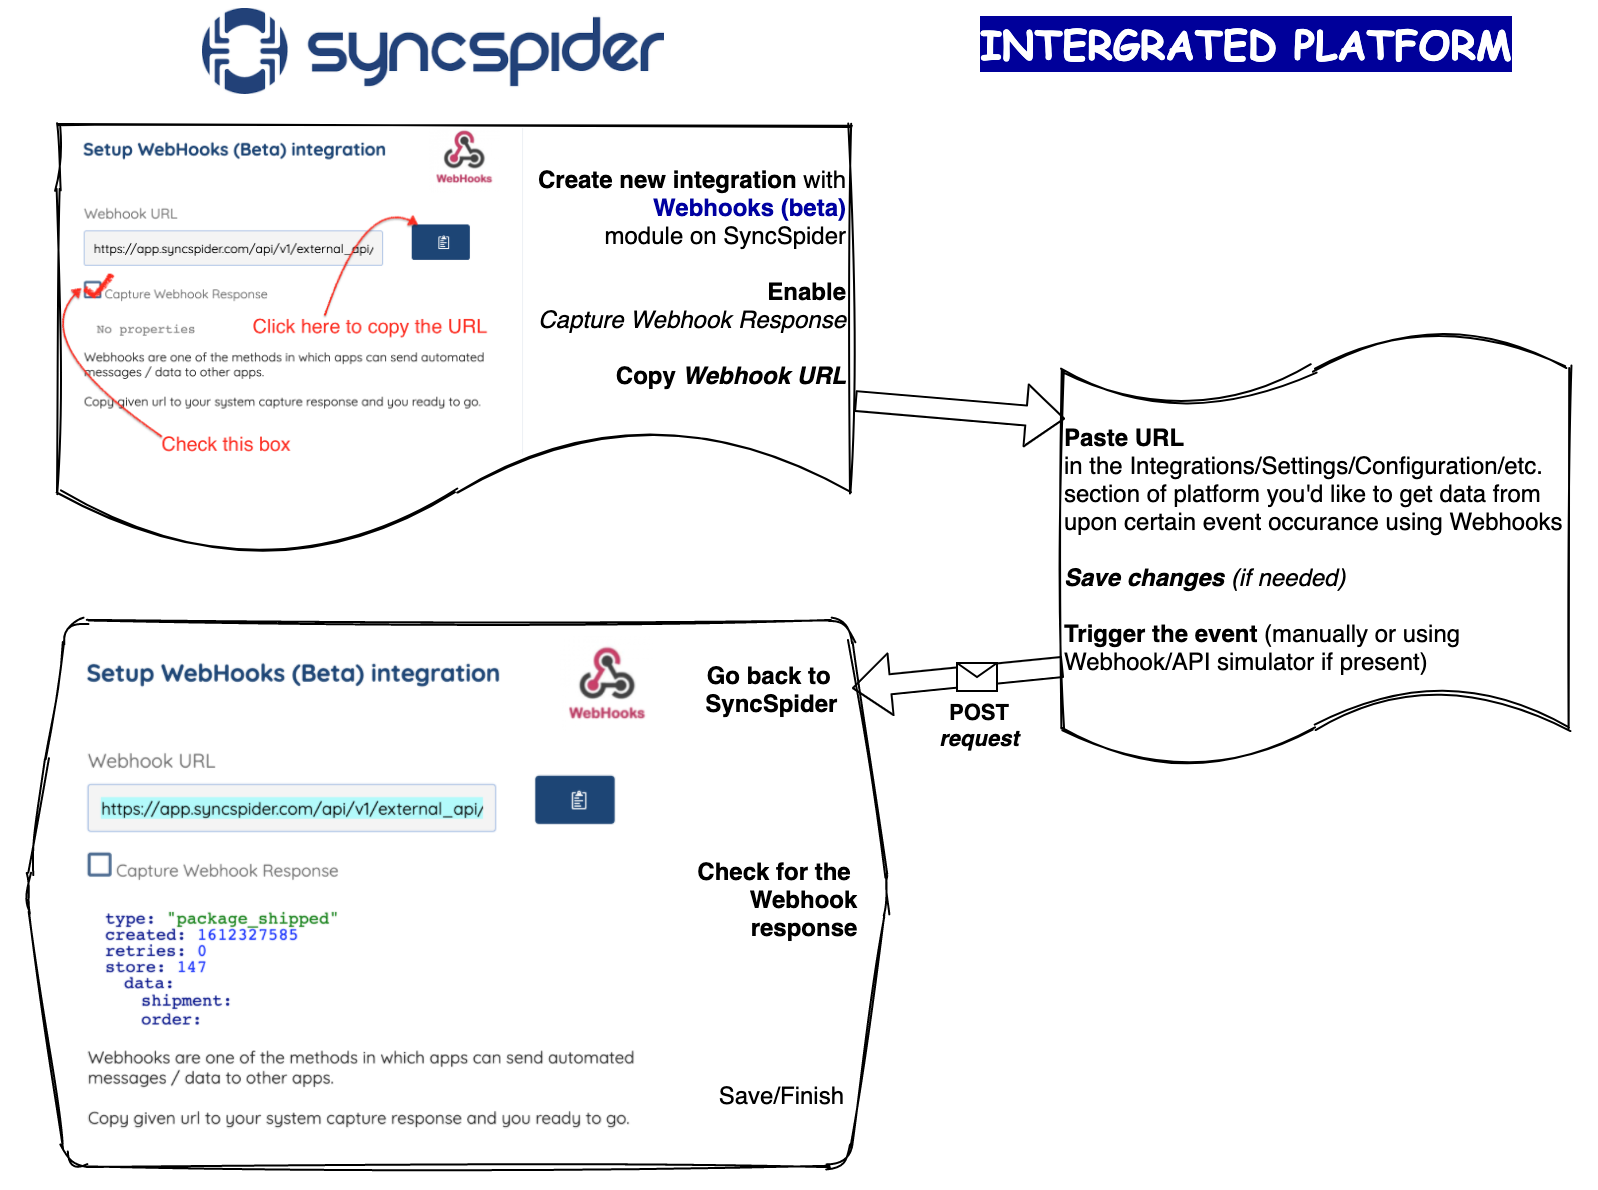
Find Webhooks /NOT Webhooks (Legacy)/ in the list of options to create a new integration. Select it and enter the title and the description in the pop-up window. Once done, click Next.
UPDATE: the module is re-named. Use WebHooks module as per screenshot. WebHooks(beta) is no longer relevant and is modified to WebHooks (Legacy).


Step 3.
In the next window check the box for Capture Webhook Response and click the clipboard icon to copy the Webhook URL.
Note: keep this tab open until you get the webhook response after triggering (see next steps).

Step 4.
Log in to the platform you'd like to use with our webhooks integration module. Make sure it supports webhooks by searching for keywords "[system title] webhooks" on the web.
You can also consult the platform's help files if needed. In most cases, you will also find instructions on where to find the Webhooks setup within the platform as it is not always intuitively placed. Most popular sections to look into would be Integrations, Settings, Configurations.
Step 5.
Paste the Webhook URL copied from the SyncSpider Webhooks setup page and trigger the event.
Find out what the trigger event is. Possibly, multiple events are tied to one Webhook response. Depending on the amount of documentation and tools available on the platform you might also be able to see information on the data fields sent with the POST request and even an event simulation tool to trigger the response.
Paste the Webhook URL copied from the SyncSpider Webhooks setup page, save changes (if needed) and trigger the event. For the luckiest of us it will look somewhat like this:

Step 6.
Go back to the SyncSpider tab with the Webhooks setup. If the response has been captured successfully, you will see the summary of the fields imported.
Once you see the response (similar to the example below), press Finish or Save.

Was this article helpful?
That’s Great!
Thank you for your feedback
Sorry! We couldn't be helpful
Thank you for your feedback
Feedback sent
We appreciate your effort and will try to fix the article